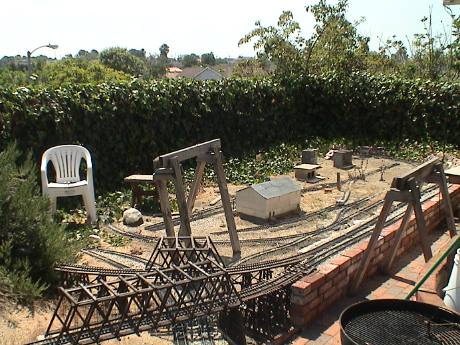
 The town
area is pretty well degraded. Besides some junk stored on the layout,
the whole thing has become quite overgrown and run down. Compare this
to the wasteland view from 7 years
ago.
The town
area is pretty well degraded. Besides some junk stored on the layout,
the whole thing has become quite overgrown and run down. Compare this
to the wasteland view from 7 years
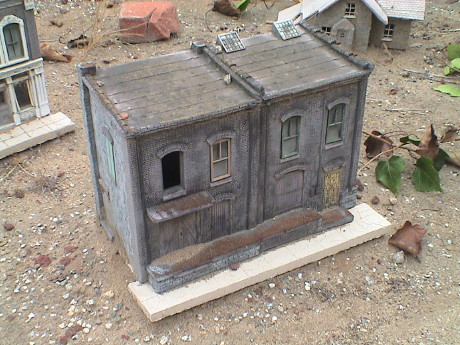
ago.The period starting in about 2002 was a busy time for me at work and I pretty much dropped the continued development of the GIRR just because I didn't have any time. However, I retired at the end of July 2007 and now I've got lots of time so I've just started rehabilitating the GIRR. Time was not kind to the GIRR and it'll take lots of work to make the railroad usable again. Many tie strips have disintegrated in the sun, the whole thing became overgrown and some of the trestles just fell apart. Crafter's Goop just doesn't hold up to the weather. I have no clue how the electronics have held up, but most of it seems visually ok.
Compare these photos to others on the site (especially in the previous page) to see what time and neglect have done.
The town
area is pretty well degraded. Besides some junk stored on the layout,
the whole thing has become quite overgrown and run down. Compare this
to the wasteland view from 7 years
ago.
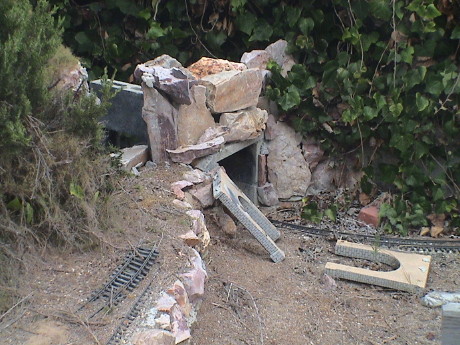 The tunnel portals were
cemented and glued into place but the mortar and glue joints all broke
and the portals are down. The portals themselves are fine, I'll just
have to reinstall them.
The tunnel portals were
cemented and glued into place but the mortar and glue joints all broke
and the portals are down. The portals themselves are fine, I'll just
have to reinstall them.
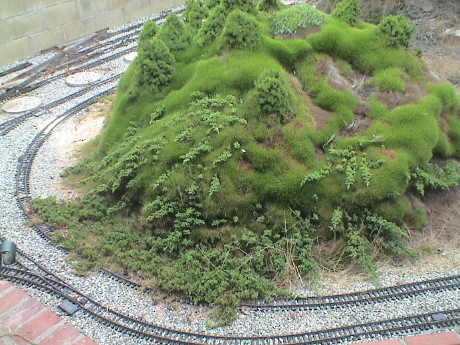 A juniper nana was one of the
first plantings on Geologically Improbable
Mountain. It has grown quite a bit and invaded the track.
A juniper nana was one of the
first plantings on Geologically Improbable
Mountain. It has grown quite a bit and invaded the track.
 If I had known how the Korea
grass would become so invasive, I never would have planted it. I may
have to make an attempt to rip this stuff out, but it is probably
hopeless now.
If I had known how the Korea
grass would become so invasive, I never would have planted it. I may
have to make an attempt to rip this stuff out, but it is probably
hopeless now.
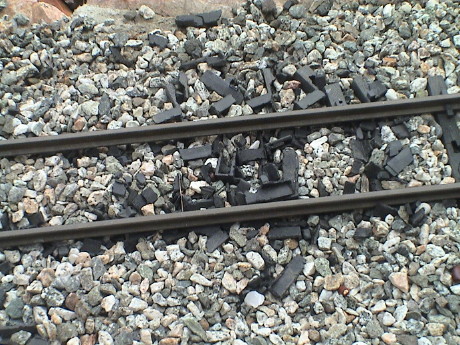 Aristo-Craft tie strips are
supposed to be UV resistant, but the sun has completely torn these
up.
Aristo-Craft tie strips are
supposed to be UV resistant, but the sun has completely torn these
up.
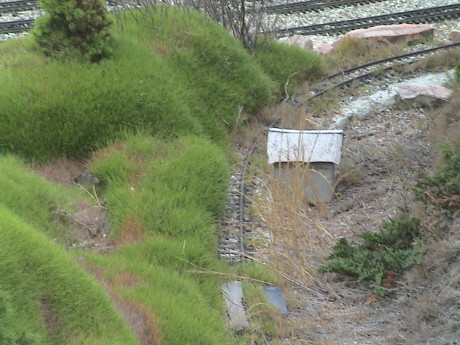
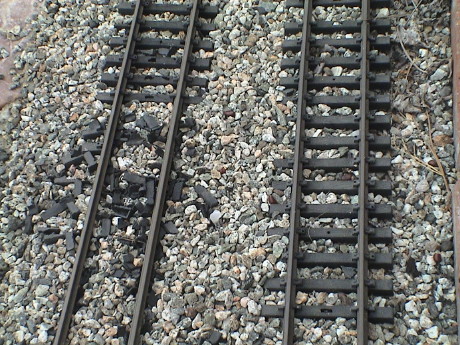 However, on the adjacent track,
with the same sun exposure and the same kind of tie strip, the tie
strips have held up fairly well. These strips come in 1 foot sections.
It appears that some 5' track sections have all or most of the tie
strips fall apart while others are ok. I am guessing that there must
have been a quality control problem when some of the strips were shot.
The failure of the strips tends to be consistent within each strip. If
part of the strip totally fell apart, then the whole strip did. If a
part only cracked, then the cracking was minor on the whole strip. Many
strips are faded, but otherwise appear to be fine. Often if one strip
in a 5' section was bad, all of them were bad. This tends to indicate a
problem with particular batches of plastic. I am either going to rip
these track sections up and replace the tie strips or I'll spike these
sections with redwood ties.
However, on the adjacent track,
with the same sun exposure and the same kind of tie strip, the tie
strips have held up fairly well. These strips come in 1 foot sections.
It appears that some 5' track sections have all or most of the tie
strips fall apart while others are ok. I am guessing that there must
have been a quality control problem when some of the strips were shot.
The failure of the strips tends to be consistent within each strip. If
part of the strip totally fell apart, then the whole strip did. If a
part only cracked, then the cracking was minor on the whole strip. Many
strips are faded, but otherwise appear to be fine. Often if one strip
in a 5' section was bad, all of them were bad. This tends to indicate a
problem with particular batches of plastic. I am either going to rip
these track sections up and replace the tie strips or I'll spike these
sections with redwood ties.
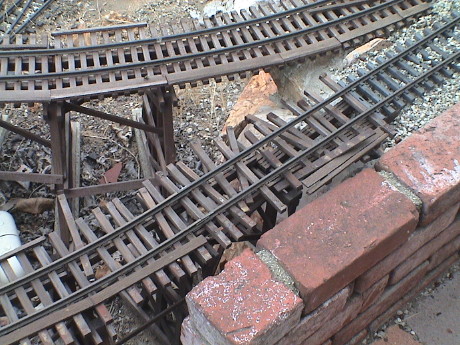 This was my first trestle section
that I purchased from Eldorado Railways. The design and the wood was
fine, but the adhesive supplied just didn't hold up. Don't use
Crafter's Goop out of doors. This one is literally falling apart. I am
going to have to remove it (easily done) and rebuild it with Gorilla
Glue. The one behind is later construction that has held up better.
This was my first trestle section
that I purchased from Eldorado Railways. The design and the wood was
fine, but the adhesive supplied just didn't hold up. Don't use
Crafter's Goop out of doors. This one is literally falling apart. I am
going to have to remove it (easily done) and rebuild it with Gorilla
Glue. The one behind is later construction that has held up better.
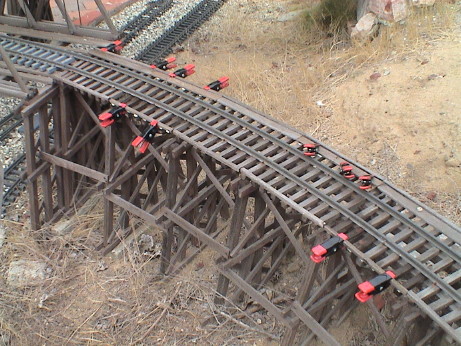 This is a trestle
section that I fabricated myself. I don't remember what kind of
adhesive that I used to build this one, but it has held up much better.
Only some of the edging and walking planks came loose. These are going
back on with Gorilla Glue.
This is a trestle
section that I fabricated myself. I don't remember what kind of
adhesive that I used to build this one, but it has held up much better.
Only some of the edging and walking planks came loose. These are going
back on with Gorilla Glue.
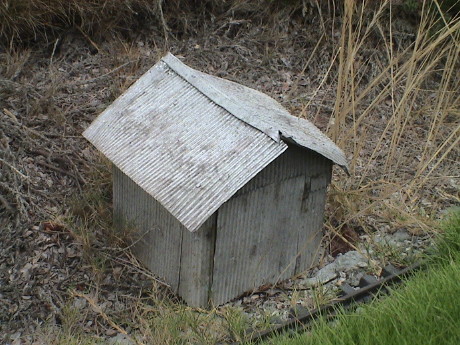 This was my first attempt at
a structure built with corrugated aluminum siding. It's
a little beat up, but the siding has held up well.
This was my first attempt at
a structure built with corrugated aluminum siding. It's
a little beat up, but the siding has held up well.
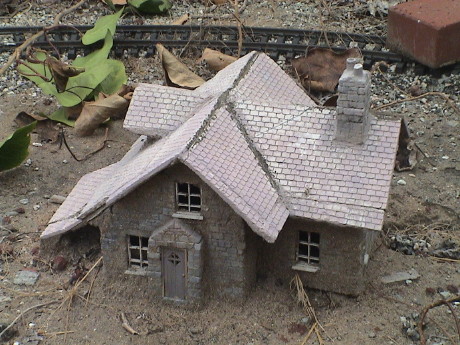 The Jigstones farmhouse has
suffered some. There are some broken roof sections and the paint is
badly faded, but it has help up pretty well. At least it's still in one
piece.
The Jigstones farmhouse has
suffered some. There are some broken roof sections and the paint is
badly faded, but it has help up pretty well. At least it's still in one
piece.
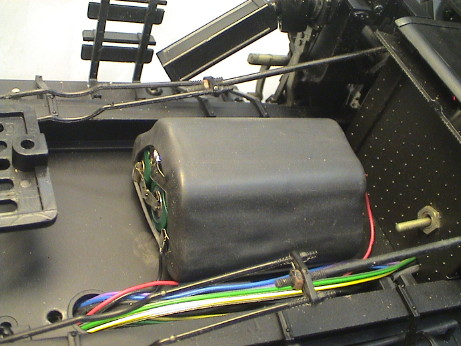
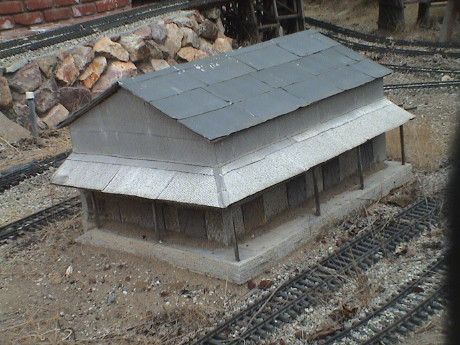 The large warehouse that I built to protect
the main wiring junction is also doing well. The weathering may have
improved the appearance of the structure.
The large warehouse that I built to protect
the main wiring junction is also doing well. The weathering may have
improved the appearance of the structure.
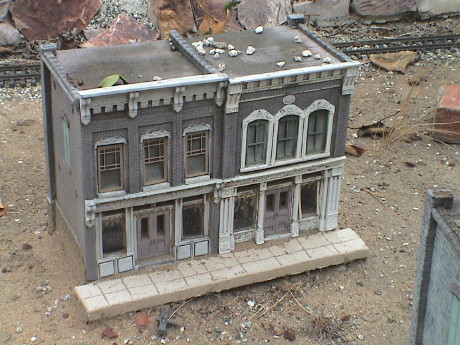 These cast resin buildings are a
little worse for the wear. The paint is badly weathered and some of the
window frames have fallen out.
These cast resin buildings are a
little worse for the wear. The paint is badly weathered and some of the
window frames have fallen out.
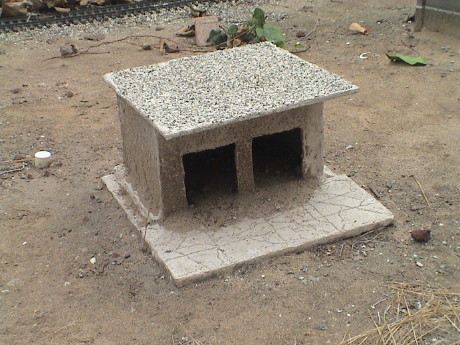 The Wonderboard test structure
that is sort of modeled after a gas station has held up quite well.
Besides the dirt, it is none the worse for wear. If it had been colored
with stucco tinting, the color might still be there as well. It would
appear that the corrugated siding and Wonderboard construction methods
will hold up under total neglect the best.
The Wonderboard test structure
that is sort of modeled after a gas station has held up quite well.
Besides the dirt, it is none the worse for wear. If it had been colored
with stucco tinting, the color might still be there as well. It would
appear that the corrugated siding and Wonderboard construction methods
will hold up under total neglect the best.
It's been about a week and I have been busy, the trains still aren't running due to the broken ties, but most everything else is fixed, or at least, usable. I've done these things and still haven't spent a penny out of pocket:
 I didn't get a photo of the track
to the garage before it was repaired, but it was crushed, bent, and
essentially destroyed by my kids stepping on it in the dark. The bright
track is obviously the new stuff. It's now all graded properly, leveled
and ready to go.
I didn't get a photo of the track
to the garage before it was repaired, but it was crushed, bent, and
essentially destroyed by my kids stepping on it in the dark. The bright
track is obviously the new stuff. It's now all graded properly, leveled
and ready to go.
 This track leads to a bridge that
can be placed in the side door to the garage so that the yard can be
accessed. This track was in bad shape to with many broken ties. It has
been patched back together with Gorilla Glue and some new track
supports.
This track leads to a bridge that
can be placed in the side door to the garage so that the yard can be
accessed. This track was in bad shape to with many broken ties. It has
been patched back together with Gorilla Glue and some new track
supports.
I still have some work to do. Aristo has agreed, at least in principle, to replace the bad tie strips under the unlimited lifetime warranty. It'll take quite a bit of work to disconnect many track sections, break off the remains of the old strips (where they remain at all), slide on the new strips, and rejoin and resolder the track sections. Then the track will need to be reballasted and releveled all around. I also have to check out the track power systems including the DCC stuff. It hasn't been tested at all.
Even though the track is useless in spots, I fired up the layout to see what worked. The TE system came back on line ok, as did the DCC system although I had to reboot the DT400 throttle to get it to work. The SD45, Doodlebug, RS3's and the Climax still work. The Shay has mechanical difficulties though, three of the axles freewheel so that there is clearly some gearing difficulty. Three of the four battery powered locos, an FA, Thomas and a Center Cab, still had charge in their batteries and responded to commands. The LGB 2060 was totally dead, probably a dead battery, it's on charge. Overall, things went pretty well.
I ran all the trains that were in the garage storage yard out the new trackage in the side yard as far as they could go before they hit track with bad tie strips. The new trackage worked fine, no derailments at all. I used to always get some but this time I leveled the track better. As I backed each train back into the yard, I picked up each car and loco with power pickup and cleaned the wheels. I've never seen so much crud and corrosion. I am surprised that the trains ran at all. The storage tracks are adjacent to the floor vents required by building codes. This allows damp air to get to the trains. I cannot block the vents without violating building codes. These are required in garages to allow gasoline vapors (which are heavy) to vent before they reach the level of a raised water heater or other pilot light. Even though I can't get a car in my garage (too much junk) the vents are still required.
I discovered that the hot setup for wheel cleaning is a Dremel tool with a brass wire wheel. Even very dirty wheels can be quickly cleaned.
The 2060 began to work after it got a charge, so far so good. The Soundtraxx Sierra batteries in the Warbonnet FA and the Shay have died, the Warbonnet has been fixed with a NiMH pack. Now the Warbonnet FA/FB set works fine. I'll fix the Shay when I work on the gearing, but that will require that I clean off my workbench which is too terrifying a thing to think about now. The GP9 didn't work at all when I first fired it up and its sound system made a terrible hissing noise. However after the DCC system went down (bad wire between the command station and the booster) and was rebooted, the GP9 started to work again. Go figure. The 040, Atlantic and Pacific still work, the Atlantic's NiCad sound system battery needed a charge. The NiCad battery in the RS3 with the PH Hobbies sound system is apparently dead.
Since almost all the other stuff is now working, except that I still haven't done the really big job of replacing the ties, I decided to tear into the Shay. The problem is that on 3 of the 4 axles, the axle gear split and the gear would then spin on the axle. I tried to repair the damage with Zap-A-Gap and it worked for a few axle turns, then one broke again. I'll have to get replacement axle assemblies from Bachmann to fix this one. The battery for the Soundtraxx Sierra is also dead, but that will be a relatively simple fix as it is mounted in the bottom of the Shay under the cab so that I can replace it without even cracking open the loco.
The RS-3 has come back to life too. I cracked it open to see about making another battery for it and found that I had installed a switch in series with the battery to allow it to be disconnected so that it wouldn't be drained flat by the leakage of the sound system. I had simply neglected to reconnect the battery. After flipping the switch to the "on" position, the battery apparently can still take a charge. I did have to replace one of my cross jumper wires that go between locos, one of them had broken internally.
 The Shay's Sierra battery was indeed
easy to replace. With the replaced battery, the system came back to
life after the new battery had charged for only a few seconds.
The Shay's Sierra battery was indeed
easy to replace. With the replaced battery, the system came back to
life after the new battery had charged for only a few seconds.
The Shay trucks, however, didn't fare as well. It is going to cost $50 to get new trucks, even under the Bachmann warranty. Then I'll have to modify them to adapt them back to the DCC configuration.
The Shay trucks have been replaced and work now, you can see details at my Shay Tips page.
AristoCraft finally sent me the replacement ties under warranty. I had asked for 105 but they sent me three boxes of 48 each, or 144 pieces total. I might need the extras as I have rebuilt the main line and I have used 66. There are about 40 more to replace in the main yard and a dozen or so in the town. I'd have been a dozen short if they had just shipped what I asked for. I still have to electrically reconnect the track, ballast and level it before I can run a test train.
I lifted each section that had a bad strip and replaced all the strips that appeared to be weak. My test for weakness is to press on the center of a tie firmly. If the top of any tie collapses or cracks, then the strip is bad. Most of the time, I could tell just by looking which strips were dead, but a few looked ok until touched and then they fell apart.
About 6 years ago, I had selected a process for gluing the ballast in place. I most cases, I was pleased to find that the glue was still holding. Where it had been stepped on, the glued layer was broken apart, but left unmolested, the glue technique appears to work and stand up over a reasonable period of time.
It's stopped raining and the weather is perfect for track soldering. It is cool enough outside so that I can work in the sun, but the sun is bright enough to pre-heat the rails enough so that the rail heats well enough for soldering.
In the process of reconnecting the track that I had removed to replace the tie strips, I started at a point where most of the track power feeders are. After checking out which wire was which, I found that the Train Engineer receiver that feeds cab #1 has died. It just outputs an intermediate voltage, won't receive commands and doesn't respond to it's code set button. The TE for cab #2 still works. Since cab #2 is shared between TE #2 and the DCC booster (via a selector switch), cab #1 is currently non-functional. I don't need two TE receivers now as I haven't used the one on cab #2 for many years so I am just going to pull out the bad TE and put the good one in it's place.
I also discovered that a solder joint inside the control panel had failed such that cab #2 could not feed power to the mountain loop of track. A quick hit with a soldering iron fixed that.
I also installed a "booster" to the AC supply that feeds my turnout motors. The 24 VAC transformer I was using was almost good enough, but some of the motors that have accessory contacts on them just don't quite make it all the time. I added a 6 VAC wall wart in series with the other transformer and that made most of them work quite well. There is still one that is obstinate and I'll have to work on it more.
Today was somewhat of a milestone. The first train to run on the GIRR in over 3 years ran today. Over the last few days I had replaced the damaged tie strips on the main line, resoldered all the rail joint jumpers that I had to cut to get the rail out and did a coarse job of leveling the line. After a quick pass with the pole sander to get many years of corrosion off the railheads, the Doodlebug ran all the way around a few times.
The Shay is still not completely operational yet. There were three distinct problems with power pickup. I've solved two of the problems but the third one is not quite solved yet. Two wheels remain intermittent.
I'm getting pretty good at changing out bad tie strips, I did 59 strips in the yard this morning. Remember, this is southern California and I can work outside in a tee shirt in December. Every tie strip in the main yard was gone. It's a good thing that Aristo sent more than I asked for because I've used 118 strips so far. There are only a few obviously bad ones left in the town loop. I'm only going to have to change out one of them immediately.
The yard is all soldered back together, but I'm going to run out of ballast before I can finish with it. The main line grade is nearly completely ballasted, leveled and glued. It's going to take the rest of my ballast to finish that. I'll have to make a trip to A1 Grit in Irwindale to get another 80 lb bag of #5 gravel.
The entire grade is finished and I'm almost completely out of ballast. I coarse leveled the main yard with ballast scooped up from the walkway between the yard and the main line. I still have the town to rebuild but I'm not going to start that until the rest of the layout is completely done. I found two more stretches on the main line of tie strips that have degraded but have not yet fallen apart. They might go a year or two or I might do them now.
The Shay is fully functional again, I took out the Hillside wheel contacts and reinstalled the Bachmann contacts. I do not know what is wrong with the Hillside contacts, they were very reliable for many years.
The grade on the main line is fully ballasted, leveled and glued. It's done. I'll finish ballasting the rest of the main line when I get some more ballast.
I started changing out tie strips in the town loop and it's in much worse shape that I thought. I'll have to change out 78 strips in the that area, I have only 2 left after changing 20 of them already.
I stopped by A1 Grit in Irwindale and bought 3 bags of ballast, 80 lbs (7/8 ft3), per bag for $5/bag. I left one bag at the GIRR Mountain Division. I've now gone through a bag and a half on the GIRR but the whole main line and the whole yard is ballasted, leveled and glued.
For those in the LA area, A1 Grit is right off the 605 freeway at Live Oak. There is a road going south immediately east of the freeway, it crosses back over the freeway and goes to a gravel plant. Drive through the scale house and turn south on a dirt road to the south side of the gravel piles. There you will find a nondescript building with a VERY SMALL sign saying A1 Grit. If you don't want to go there, you can drive a little west on Live Oak, past the intersection of Arrow highway and look for Sunburst Rock on the south side of Live Oak (yellow sign).
I cleaned up the yard track and tested it today. It worked fine. Getting through 5 or more years of oxidation AND a recently applied splatter of ballast glue was quite a bit of work, but it did clean up.
I use the Doodlebug for track testing because it is the most sensitive to dirty or poorly leveled track. I notice that it stutters on each of the LGB turnouts when a truck is on the point rails. The moving point rails are probably not making good contact to the track so I'm going to have to do something about that. The connections to those rails are triple redundant, but each method is probably in poor shape right now. The points make contact at the point, but the sides of both the point and stock rails are heavily oxidized. There is a metal slider that the point rail rides on, but it gets corroded as well. Further, there is contact at the pivot, but the pivot doesn't always make good contact. I'm probably going to have to solder a flexible jumper wire somewhere on the turnout to provide a reliable electrical contact.
I've used all 144 tie strips that Aristo initially sent as replacements for dead ones but I've found many more. They say that they are going to send a couple of more boxes (96) so that I can finish.
Except for the town section, the whole railroad works. I'll still need nearly 100 tie strips to finish.
I actually started improving the railroad over the last few days. I built a stone viaduct.
 Today,
the rehabilitation of the GIRR is essentially complete. The track is
cleaned and tested, and apart from a few balky turnout motors, it's
working. It's taken months of on and off work but the railroad is back
to where it was 5 years ago.
Today,
the rehabilitation of the GIRR is essentially complete. The track is
cleaned and tested, and apart from a few balky turnout motors, it's
working. It's taken months of on and off work but the railroad is back
to where it was 5 years ago.
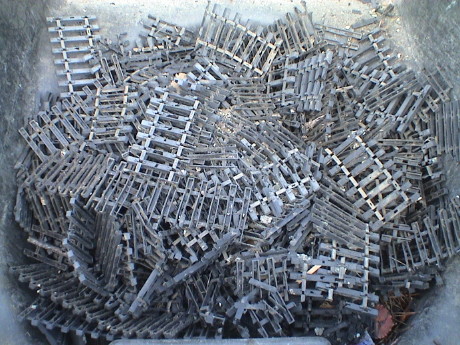 In the process of rehabilitation, I consumed 207 tie
strips, 1.5 gallons of TiteBond glue and about 300 pounds of ballast.
Some of these tie strips may look more or less complete, but they are
all dead. Often a whole tie strip would just fall off the track when I
lifted a section. If I picked up and squeezed any one of these, it
would just crumble in my hands. Many of them were crumbled in place
into pieces so small that I didn't even bother to pick them up, I just
ballasted right over the top of them.
In the process of rehabilitation, I consumed 207 tie
strips, 1.5 gallons of TiteBond glue and about 300 pounds of ballast.
Some of these tie strips may look more or less complete, but they are
all dead. Often a whole tie strip would just fall off the track when I
lifted a section. If I picked up and squeezed any one of these, it
would just crumble in my hands. Many of them were crumbled in place
into pieces so small that I didn't even bother to pick them up, I just
ballasted right over the top of them.
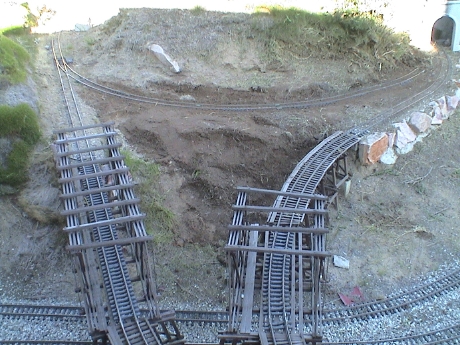
 There was one
section of long abandoned track that I hadn't fixed until today. This
is a siding to service a yet to be built mine. It hadn't been much
used, but I fixed it anyway. The turnout motor leading to it was
totally destroyed. Apparently, water had accumulated in it for a long
time and the mechanism was totally rusted out, so much that the
expanding rust actually burst the motor case. The one I put in to
replace it didn't work. It had a broken wire.
There was one
section of long abandoned track that I hadn't fixed until today. This
is a siding to service a yet to be built mine. It hadn't been much
used, but I fixed it anyway. The turnout motor leading to it was
totally destroyed. Apparently, water had accumulated in it for a long
time and the mechanism was totally rusted out, so much that the
expanding rust actually burst the motor case. The one I put in to
replace it didn't work. It had a broken wire.
 Anyway, that's all fixed
and the track has had it's ties replaced. The track is ballasted in
dirt instead of ballast but now it's at least flat. There were 7 more
tie strips replaced on this section so that brings the total to
214.
Anyway, that's all fixed
and the track has had it's ties replaced. The track is ballasted in
dirt instead of ballast but now it's at least flat. There were 7 more
tie strips replaced on this section so that brings the total to
214.
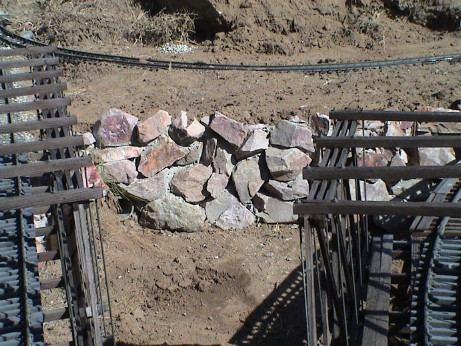 There is one last thing that I did. The dirt "cliff" in the previous photo was unstable so I built a retaining wall from left over quartzite. The rock is backed up with 4" thick concrete blocks. This part won't erode anymore. At the very lower left of the wall is the outlet of a drain so that rainwater won't pool and submerge that one turnout motor ever again.
Two years have passed since I was changing out tie strips. I didn't change them all then because some of them seemed to be holding up and I was running short of strips. However, another two years of UV did in another batch that didn't get changed out the last time. I replaced seven more tie strips today at the top of the outer grade. It was bright, warm and sunny so it made resoldering the track jumpers I had to cut easier. Four of these were complicated because they were attached to rails that were spiked to a trestle. I had to remove a trestle section to work on them. In the process, a bunch of Gorilla Glue joints (that had been repaired two years ago) let go and I had to reglue them, this time with TiteBond III. There is at least one other spot on the main line that has some bad tie strips. I'll get to those later, what I did today was enough to stress my back.