 12 Jun 08
This page covers materials that can be used to ballast track, where to find it, how to select it, how to test it and how to apply it.
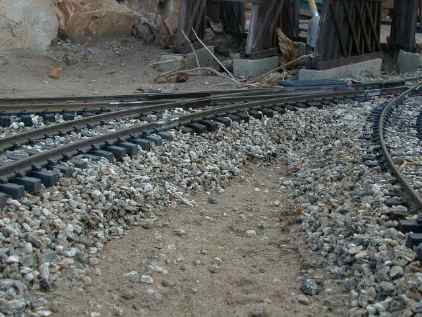
12 Jun 08Real railroads use crushed rock to ballast their track. Its cheap and effective. For the same reasons, crushed rock works very well for ballasting garden railroad track too. A lot of different material has been used for large scale track ballast, but most of it falls in these categories:
Most of what I'll deal with here is loose or semi-loose ballasting because that is what I have experience with. If you get a lot of leaf litter, then you will want to use some form of secured ballast so that you can either sweep or vacuum up the litter. Loose ballast won't put up with a Shop Vac, heavy winds, moving water or burrowing animals.
The best and cheapest ballast material is crushed rock. The stuff that we want is the scrap left over from the crushing operation, small rock and dust. This stuff is usually real cheap IF you have a way to transport bulk quantities from a local quarry. This material goes by many regional names:
In any event, its the small sharp stuff that works the best. The more "dust" it has in it the better as the really fine stuff sets up after it gets wet and holds the larger stuff. It doesn't much matter what kind of rock it came from as long as you like the color. Volcanic rock makes EXCELLENT ballast as it has nothing but sharp edges and it locks into a tight mass really well. It is usually dark in color. Volcanic rock sometimes contains a lot of iron. Please be sure to test it with a magnet as described in the section on tests.
Most gravel available in building supply outlets is either too big or too round. You will probably have to look around for the good stuff. Try these places:
Whatever you decide to get, you must TEST it before you buy.
Lock Up Test. Grab a handful of the prospective material and squeeze it. If the mass of rock seems to lock up into a solid chunk under light pressure, this is your stuff. If you can still move it around under light pressure, drop it and look for better materials.
Magnetic Properties Test. Take a STRONG magnet with you. Bury it in a pile of rock and pull it out. If ANY of the material adheres to the magnet, find some other kind. If you use even slightly magnetic rock, it'll jump off the track and hitch a ride on the bottoms of your locos, either on control magnets or on your motor's external magnetic field.
[ Top ]What ever you buy, be prepared to buy a lot. Most crushed rock weighs about 80 lb per cubic foot. If you ballast deep and wide (a 6" by 6" trench full) you'll use 20 lb/ft of track. Crushed rock is usually sold by the yard, 27 cubic feet to a yard. At 20 lb/ft, you'll need about a yard of rock to ballast 100 feet of track. In well drained soil, you don't need nearly as much, but it still adds up.
[ Top ]If you trench before ballasting, you might want to consider lining the trench with weed guard. The stuff is only marginally effective in stopping weeds, but it will tend to separate the ballast from the surrounding dirt.
Trenching is important if your soil drains poorly, it will allow rain to spread out and not puddle so badly around the track. If your soil is very well drained, then you can just ballast on top of the existing grade, just as the real railroads do. In this case, you will want to ballast an inch or more thick and you will have to secure the ballast by some method (see below) to prevent it from washing away from the track. Unfortunately, this is one area where the effects of the ballast do not scale. Actually, it is the rain that doesn't scale. It would take a lot of rain to wash 4" chunks of rock off of a real roadbed, but it doesn't take much 1:1 scale rain to wash away 1/4" pieces.
Build your ballast up to about 1" from its final height. You can use larger crushed rock for the lower layers. Then lay the track down in its final configuration and connect the sections together. Then use a large mug or cup to scoop up some ballast and pour it onto the track in small piles 18" to 24" apart. Level the track over a long section and adjust its height as necessary by working only on the little piles. When the track is at the right height and level, then pour ballast right through the track between the supporting piles. Pour on enough to cover the track. Then use an old 2" paint brush to distribute the ballast down the center of the track, allowing the excess to spill over the rails. If you have too much, brush the excess down the line to a section that needs it. If you need more, pour it on. Wiggle the track to get it to spread out and tamp the ballast. Keep checking the height and level as you go at about 6" intervals.
If you are going to leave your ballast loose, just brush it out until the appearance suits you. If you are going to secure your ballast, then read the section below and make preparations BEFORE you apply the ballast.
Turnouts require some special attention. There have been many methods described to keep ballast out of the turnouts. I have found that none of them work very well. Ballast gets in there anyway. I just pour the ballast over the turnouts like regular track and clean them up later with a narrow blade on my pocket knife. It is easy enough to brush out most of the ballast and then pick the rest of it out of the flange ways, points and frog.
It is really important that the track be level. Superelevation is not really practical for the tight radius curves that most railroads have, so level is best. Use a small spirit level to check the track about every 6 inches. Be aware that you'll have to recheck the level of the track periodically. Even if you tamp the ballast well, the forces of nature will nudge things around. The vibration from passing trains, lubrication from rain and thermal squirming due to daily heating in the sun will tend to cause drifts in the level of the track. Track that is out of level, especially if it changes inside a foot or so, will cause derailment problems.
[ Top ]If you feel the need to "glue" down the ballast there are several methods that people have reported to work well. You don't want to make it too strong in case you need to shift things around a little. You'd like to be able to break it apart without an air hammer.
Cement. Cement can be mixed with the ballast to hold it together. I've had poor results with cement mixes or mortar that has sand mixed in it. The best results have been obtained with Portland cement mixed in with the ballast.
I mix approximately equal parts Portland cement and ballast and then spread the mix while dry as if it was just rock ballast using an old 2" paint brush. I then shake the track a little to settle the material. I then wet the mix down with a spray bottle until it won't take any more water. After the mix has set for a day or so, I recheck the level of the track and make fine adjustments. Then I recoat the section and wet it again to fill in any of the places where the ballast has settled during the initial shaking or wetting.
If you have ballasted deeply, then use the cement/ballast mix for ONLY THE TOP LAYER. Use straight ballast for the drainage part. This will allow the set up portion to move around a little over the loose stuff below.
This technique produces a fairly weak bond that will hold the ballast and track in place and still allow the track/ballast to squirm with changes in temperature.
If a firmer base is required, then RapidSet Grout (brown box) or Cement All (blue box) can be used. This stuff sets up really fast and is much stronger than straight Portland cement. RapidSet is considerably more expensive than a bag of Portland cement, but it is really good stuff.
Glue. I've tried various glues diluted about 50 to 80% with water and sprayed on the ballast. Most of the glues go on easily and after they are dry, leave little visual indication. Indoors, ordinary white glue works OK, but outdoors, it'll disintegrate at the first sign of moisture. Matte Medium does well indoors and stands up better to water, however it'll still soften when immersed. Yellow carpenter's glue holds up fairly well under water, but it will fall apart too. The best water based glue that I found is Titebond II or Titebond III. These are still affected by submersion but hold up better than the other glues. When they dries out, they'll set up again. None of these glues represents a permanent solution in a really wet environment. TiteBond II has held up well in seven full years of testing, sections that haven't been stepped on are still holding fine. TiteBond III claims to be waterproof and it does hold up somewhat better than TiteBond II and doesn't darken as much in the sun. It also costs 50% more.
 I've settled on Titebond II and water as
my standard method to secure ballast. Gluing the ballast allows it to
maintain a profile that it never could hold while loose. Titebond II is
fairly expensive ($5/16 oz or $13/gal). Depending on how you mix and
spray it, you can do about 4' of track on both sides with an ounce of
glue. In my fairly dry environment, it holds well enough to keep the
ballast from washing away in our limited rain. The glue must be diluted
enough so that it can be sprayed (see below) and run down into the
ballast. This caps the ballast to keep it from washing away, but it
still allows the track to creep around due to thermal expansion. I have
found that it is not necessary to glue the stuff between the ties at
all. Only the ballast on the sloping sides needs to be glued. The object is to contain the ballast between the ties so that it doesn't wash away. The ballast between the ties, all the way to the ends of the ties, is still loose so that the track can squirm around and you can relevel the track easily later. The track can also be lifted easily if needed.
I've settled on Titebond II and water as
my standard method to secure ballast. Gluing the ballast allows it to
maintain a profile that it never could hold while loose. Titebond II is
fairly expensive ($5/16 oz or $13/gal). Depending on how you mix and
spray it, you can do about 4' of track on both sides with an ounce of
glue. In my fairly dry environment, it holds well enough to keep the
ballast from washing away in our limited rain. The glue must be diluted
enough so that it can be sprayed (see below) and run down into the
ballast. This caps the ballast to keep it from washing away, but it
still allows the track to creep around due to thermal expansion. I have
found that it is not necessary to glue the stuff between the ties at
all. Only the ballast on the sloping sides needs to be glued. The object is to contain the ballast between the ties so that it doesn't wash away. The ballast between the ties, all the way to the ends of the ties, is still loose so that the track can squirm around and you can relevel the track easily later. The track can also be lifted easily if needed.
I don't try to keep the glue off the railheads but if you spray it carefully, you won't get much on the rails anyway. Before the glue dries, I wipe the railheads with a paper towel. Then I use a pole sander to clean the remainder off after it has dried. This way, I don't disturb the track while the ballast is still wet and loose.
Titebond II leaves a dirty brown cast to the ballast that seems to get darker after extended exposure to the sun. Matte medium has virtually no color at all.
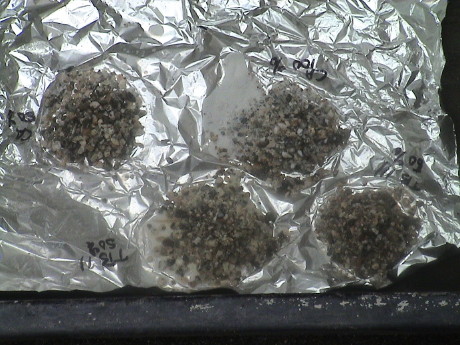
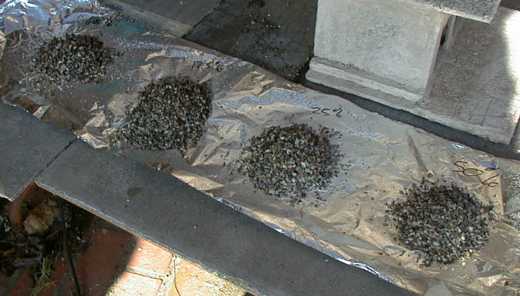 After I had selected TiteBond II as the adhesive, I
needed to determine the proper dilution. This photo shows four piles of
reclaimed ballast, each soaked with a different dilution of glue. I
chose dilutions of 50%, 25%, 12% and 6% glue as test cases. 2 ounces of
mix was prepared for each case and about half of that quantity was
sprayed on its own pile and left to set. The 50% case was pretty thick
and didn't appear to soak very deep. The heavier dilutions soaked right
in. Since about the same total quantity of mix was used on each pile,
the total amount of glue applied to each pile was decreased by about
half in each case. Heavier dilutions would be preferred as the mix will
soak deeper and less glue would be needed per linear foot of track. Too
heavy a dilution won't leave enough glue behind to hold the ballast in
place.
After I had selected TiteBond II as the adhesive, I
needed to determine the proper dilution. This photo shows four piles of
reclaimed ballast, each soaked with a different dilution of glue. I
chose dilutions of 50%, 25%, 12% and 6% glue as test cases. 2 ounces of
mix was prepared for each case and about half of that quantity was
sprayed on its own pile and left to set. The 50% case was pretty thick
and didn't appear to soak very deep. The heavier dilutions soaked right
in. Since about the same total quantity of mix was used on each pile,
the total amount of glue applied to each pile was decreased by about
half in each case. Heavier dilutions would be preferred as the mix will
soak deeper and less glue would be needed per linear foot of track. Too
heavy a dilution won't leave enough glue behind to hold the ballast in
place.
After the initial round of tests, a 33% dilution was added.
I choose to evaluate several performance factors:
Spray Characteristics evaluate how well the material can be dispensed from a standard pump spray bottle. This happens to be about the easiest way to apply the material.
Surface Bonding evaluates how well individual particles of ballast adhere to the surface of the ballast pile. This characteristic describes how well the glue will prevent individual pieces from washing away.
Adhesion Depth evaluates how deep the adhesive is effective. While 1/4" adhesion depth will keep the whole pile in place, that thin a skin is easily disturbed and can peel off leaving loose ballast exposed. 1" or more of adhesion depth provides adequate strength to allow the glued ballast to resist most normal disturbances.
Clump Strength is another measure of the robustness of the glued ballast. A clump that falls apart easily will not hold up to normal environments. One that is super strong may not be desirable either as it will be more difficult to reclaim the ballast later if desired.
| Dilution % glue |
Spray Characteristics | Surface Bonding | Adhesion Depth | Clump Strength | Overall Performance |
|---|---|---|---|---|---|
| 50% |
Fairly thick Soaks in slowly |
Good | 1/4"-3/8" | Good | Holds the ballast well but doesn't soak in well enough |
| 33% |
Thin Soaks in quickly |
Good | 3/8" | Good | As strong as the thicker mix, but soaks in deeper so it bonds to more ballast particles |
| 25% |
Thin Soaks in quickly |
Good | 1/4" | Fair | Mix is too thin, not enough glue is applied, most of it bonds only to the top particles |
| 12% | Like water | Poor | 1/4" | Doesn't clump, particles break up easily | Not adequate |
| 6% | Like water | None | None | None | Might as well have not glued it at all |
It would appear that 1 part glue and 2 parts water is the best mix. This mix appears to be adequately strong and soaks in deepest. If you want deeper penetration, you really have to pour the stuff on.
After the glue has dried on any given section of track (at least 24 hours in warm weather), I use a Shop Vac to reclaim any ballast that didn't get glued. This cleans up all the loose pieces that a subsequent rain storm would wash away and also finds the spots that need reapplication of ballast or need to be reglued.
Over time, the ballast may get disturbed and peel off in chunks if the glue didn't soak deep enough. This is why a highly diluted glue mixture works well, it'll soak deeper and there is still enough glue left to do the job. When it comes time to touch up the ballast, the loose stuff and broken chunks are vacuumed up with a Shop Vac and discarded or reclaimed as appropriate. The remaining material should be resoaked and allowed to dry. This gets the glue down deeper. Then new clean ballast is applied and then sprayed with glue again. The glue will soak through this new thinner layer and bond to the old glue underneath to make a thicker stronger mass.
If it becomes necessary to remove the ballast, it is fairly easy to break up the clumps and then crumble them back into individual pieces. The glue coated ballast can then be reclaimed and reused if desired.
[ Top ]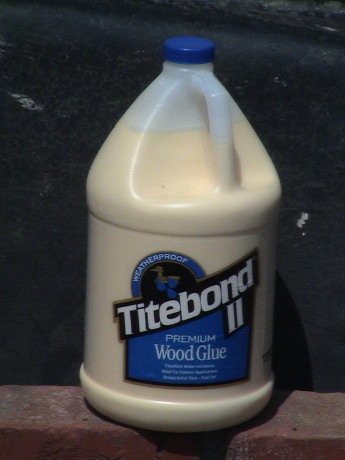 It's been seven
years since I settled on TiteBond II wood glue diluted 33 to 50% in
water. While 33% soaks in better, 50% is stronger. I just tend to apply
more of the 50% stuff and it works well. The stuff has generally held
up well in my relatively mild SoCal environment. It is not strong
enough to handle being stepped on, but simple rain will not wash it
away. However, it is also not strong enough to be a bother when the
track has to be lifted or moved. Clumps will stick to the track, but
they can be easily broken off.
It's been seven
years since I settled on TiteBond II wood glue diluted 33 to 50% in
water. While 33% soaks in better, 50% is stronger. I just tend to apply
more of the 50% stuff and it works well. The stuff has generally held
up well in my relatively mild SoCal environment. It is not strong
enough to handle being stepped on, but simple rain will not wash it
away. However, it is also not strong enough to be a bother when the
track has to be lifted or moved. Clumps will stick to the track, but
they can be easily broken off.
In the intervening years, two newer adhesives have come to may attention. These are TiteBond III wood glue and Quikrete Concrete Bonding Adhesive. I figured that I should test them too to see if they provide any performance or cost advantage over TiteBond II and water.
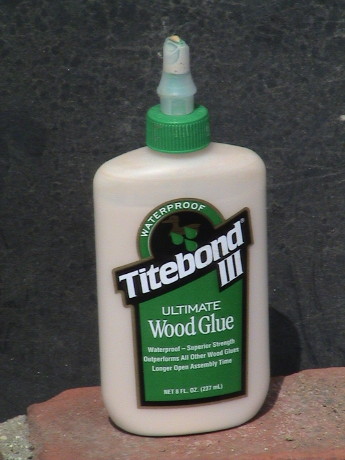 TiteBond III is a higher performance
wood glue. I bought only this small bottle because it wasn't locally
available in gallon bottles at the time. The last time I went to Home
Depot, it was there in gallon bottles, but it is expensive. I have used
it for wood gluing projects and it a damn fine wood glue. I didn't try
it for ballast because I didn't have enough and I also bought a gallon
of TiteBond II at the same time and I have been using that with good
results.
TiteBond III is a higher performance
wood glue. I bought only this small bottle because it wasn't locally
available in gallon bottles at the time. The last time I went to Home
Depot, it was there in gallon bottles, but it is expensive. I have used
it for wood gluing projects and it a damn fine wood glue. I didn't try
it for ballast because I didn't have enough and I also bought a gallon
of TiteBond II at the same time and I have been using that with good
results.
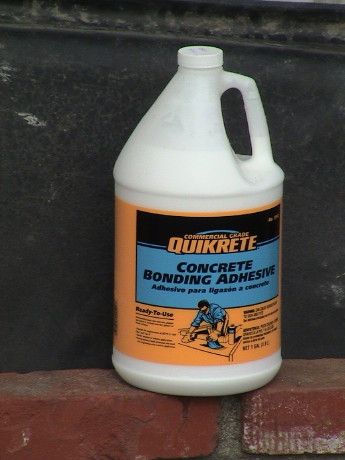 Recently, I went to a
SoCal GRS open house at Art Lizer's layout in Riverside CA. He was
using this Quikrete Concrete Bonding Adhesive to glue is #10 chicken
grit ballast. He also used on black #10 to make very credible asphalt
roadways. I bought a bottle at Home Depot to try it out. At the Home
Depot that I go to, the TiteBond is in the paint section (?) and the
Quikrete adhesive is back with the cement mixes.
Recently, I went to a
SoCal GRS open house at Art Lizer's layout in Riverside CA. He was
using this Quikrete Concrete Bonding Adhesive to glue is #10 chicken
grit ballast. He also used on black #10 to make very credible asphalt
roadways. I bought a bottle at Home Depot to try it out. At the Home
Depot that I go to, the TiteBond is in the paint section (?) and the
Quikrete adhesive is back with the cement mixes.
As an initial test, I did two things. I releveled and reballasted some sections of track that were out of level. Then I applied this adhesive at full strength with a pump spray bottle. I'll have to wait and see what happened there.
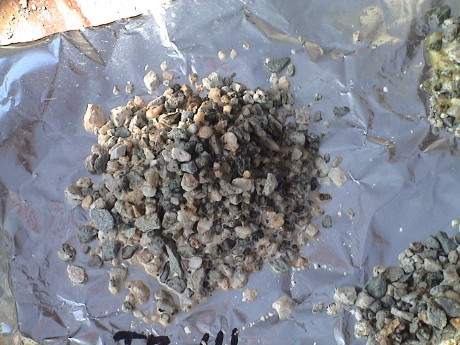
I also piled some ballast on a sheet of aluminum foil and soaked it in four adhesive formulations. After these fully dry, I'll evaluate their strength qualitatively and then I'll soak each pile in water to see how well they hold up.
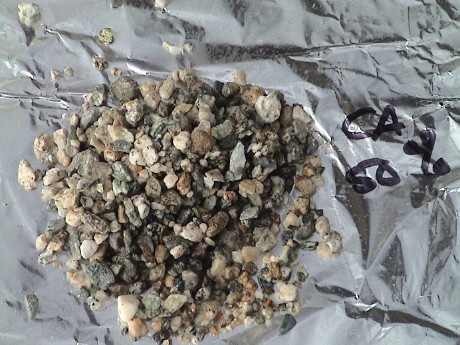 This
is the Quikrete adhesive diluted 50% in water. It dries clear enough so
that it can't be easily seen but unfortunately, it isn't very strong.
The pile is cohesive, but rubbery. I haven't attempted to break it
apart yet, but it is pretty obvious that it won't hold up to abuse.
This
is the Quikrete adhesive diluted 50% in water. It dries clear enough so
that it can't be easily seen but unfortunately, it isn't very strong.
The pile is cohesive, but rubbery. I haven't attempted to break it
apart yet, but it is pretty obvious that it won't hold up to abuse.
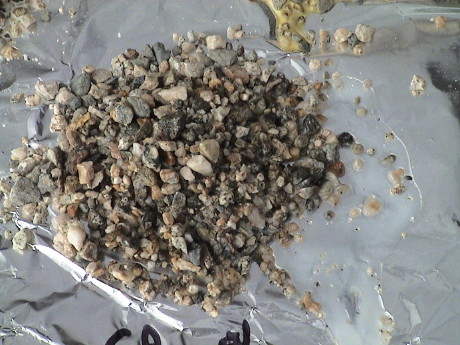 The
undiluted Quikrete adhesive is thick, but considerably thinner that
TiteBond II. At the time it was unclear if I could spray the undiluted
adhesive so I just poured a little on the pile and let some run out to
the side. Eventually, I did try to spray it undiluted and it works well
enough in a pump spray bottle. It dries milky white, very similarly to
matte medium. The pile is mechanically cohesive after 24 hours but it
is still a little rubbery.
The
undiluted Quikrete adhesive is thick, but considerably thinner that
TiteBond II. At the time it was unclear if I could spray the undiluted
adhesive so I just poured a little on the pile and let some run out to
the side. Eventually, I did try to spray it undiluted and it works well
enough in a pump spray bottle. It dries milky white, very similarly to
matte medium. The pile is mechanically cohesive after 24 hours but it
is still a little rubbery.
Art says that the stuff needs to be left to dry for three days. If it rains in that time, the adhesive will soften again, but after three days of dry out, it will no longer soften. I'm going to let the samples sit for at least three days before I try the water immersion test.
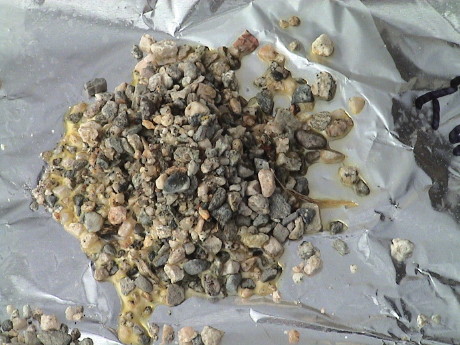 This is
TiteBond II diluted 50% in water. This pile is considerably firmer than
the concrete adhesive, but the material dries with a yellow cast.
Experience has show me that after exposure to the sun, the yellow color
turns to a pale dirty brown.
This is
TiteBond II diluted 50% in water. This pile is considerably firmer than
the concrete adhesive, but the material dries with a yellow cast.
Experience has show me that after exposure to the sun, the yellow color
turns to a pale dirty brown.
 This is a TiteBond
III sample that I only poured about an hour before the photo was taken
so it isn't dry in the photo, but after it fully set up, the color
didn't change much. I do not know how it will fare in the sun.
This is a TiteBond
III sample that I only poured about an hour before the photo was taken
so it isn't dry in the photo, but after it fully set up, the color
didn't change much. I do not know how it will fare in the sun.
I didn't evaluate how well either TiteBond will work without dilution as they are both too thick to apply with a pump spray bottle. I suppose that they could be applied full strength with a turkey baster or something like that, but they are strong enough after dilution and the diluted mix sinks into the ballast better so not as much is needed.
At the end of the cure cycle, each pile was evaluated for strength by a very qualitative method. Each pile was flexed gently to see how it responded. The 50% Quikrete sample felt a little rubbery and was clearly yielding under light pressure. The 100% Quikrete sample was considerably harder but still yielded a little. The two TiteBond samples were hard masses. I pressed into the middle of each pile from the bottom to see if the ballast inside had also been bonded. Each sample felt like the bottom was hard.
 After a 72 hour cure (48
hours for the TiteBond III) the samples were placed under water in a
concrete mixing tub. At the start of the immersion test, the Quikrete
samples immediately began to show the impacts of water. The adhesive
runout that had been milky immediately became fully opaque and slippery
to the touch indicating that they were reabsorbing water. The parts
that had been clear became partially opaque. The TiteBond II sample
started out with the excess glue being opaque yellow in the thick spots
and clear in the thin spots. The thicker parts didn't change, but the
thinner runout on the aluminum foil became partially opaque. The
TiteBond III sample didn't visually change. The test will run as long
the state of the piles appears to be changing.
After a 72 hour cure (48
hours for the TiteBond III) the samples were placed under water in a
concrete mixing tub. At the start of the immersion test, the Quikrete
samples immediately began to show the impacts of water. The adhesive
runout that had been milky immediately became fully opaque and slippery
to the touch indicating that they were reabsorbing water. The parts
that had been clear became partially opaque. The TiteBond II sample
started out with the excess glue being opaque yellow in the thick spots
and clear in the thin spots. The thicker parts didn't change, but the
thinner runout on the aluminum foil became partially opaque. The
TiteBond III sample didn't visually change. The test will run as long
the state of the piles appears to be changing.
After a half hour exposure, there were changes. The 50% Quikrete sample was beginning to disintegrate. The opaque adhesive runout on the 100% Quikrete sample was beginning to debond from the aluminum foil and peel up at some of the edges although the ballast pile was sill hard mass. The TiteBond samples were still hard masses.
After an hour of exposure, the 50% Quikrete sample is continuing to disintegrate, it looks like this mixture will not be acceptable. The 100% Quikrete sample is becoming softer and an rubbery again. The Titebond samples are unchanged.
After two hours of exposure, the 50% Quikrete sample is falling apart, the 100% Quikrete sample is very rubbery and weak and the TiteBond samples are unchanged.
After four hours of total exposure, the 50% Quikrete sample has officially fallen apart. It's done. The 100% Quikrete sample has degraded into a pile of rock and goo. The two TiteBond samples are starting to soften and feel a little rubbery.
At five hours of total exposure, I terminated the test because I wanted something left to see what happens when the adhesives dry out again. The 100% Quikrete sample was fully softened with no adhesive properties at all. The two TiteBond samples were still sort of cohesive, but had softened significantly.
It is clear that even though TiteBond II and III say "Waterproof" right on the bottle, they are indeed not at all waterproof. After a 3 day dry out, each pile firmed up again to about the same strength that it had when it started. However, the 50% Quikrete sample had many loose particles and clumps of particles that didn't set themselves back into the matrix.
This table is a summary of the performance and cost of each of these adhesives using TiteBond II as a reference because I know that it works well enough. Each sample was allowed to set for 72 hours. The Titebond samples had pretty much set hard in 6 hours but the Quikrete samples didn't fully set for at least 48 hours.
| Adhesive | Cost/gallon 2008 $ |
Dilution | Color When Dry | Strength When Dry | Water Resistance | Reset After Water Immersion | Notes |
|---|---|---|---|---|---|---|---|
| TiteBond II | $18 | 50% | pale yellow | good | Fair, softened in 5 hours | Good | Resists rain well, won't handle foot traffic |
| TiteBond III | $27 | 50% | pale tan | good | Fair, softened in 5 hours | Good | dried color is less obtrusive than TiteBond II |
| Quikrete Concrete Bonding Adhesive | $10 | 50% | clear | fair | Very Poor, failed in well less than an hour | Weaker than it was before, many particles loose | still a little rubbery when set, bending the clump causes the adhesive to yield |
| none | milky white | fair | Poor, softened in about 2 hours | Fair, still a little rubbery | nearly as strong as TiteBond, still has a slight rubbery feel when the pile is flexed |
Without dilution, the Quikrete adhesive doesn't soak into the ballast as well as the TiteBond II diluted in water so you have to use more of it to get it deep enough to do its job. After dilution, Titebond II is less expensive than the Quikrete adhesive. Unless the Quikrete adhesive has some significant performance enhancement (such as the color), then it looks like it will be more expensive to use than TiteBond II. We'll see if TiteBond III is worth the extra cost over TiteBond II.
Indoors, the Quikrete Concrete Adhesive is entirely another story. It is just as effective as matte medium in gluing down scenery and ballast but it is MUCH less expensive. In that application, it works fine at 50% dilution and leaves no color or other sign of it's presence except that the dirt/ballast/whatever is firmly glued down.
This page has been accessed times since 17 Dec 1997.
© 1997-2010 George Schreyer
Created Oct 5, 1997
Last Updated May 9, 2010