 27 Oct 09 30 Dec 09
 16 Nov 09
[ Home ] [ Up ] [ Previous Page ] [ Next Page ]
27 Oct 09 30 Dec 09 16 Nov 09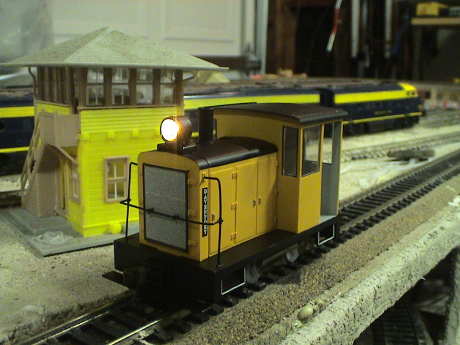 I bought an On30 Bachmann
Davenport for $42 from Micro-Mark (of all places) to bash into a mine
loco. The deal from Micro-Mark is that they pick the paint. I got a
yellow one.
I bought an On30 Bachmann
Davenport for $42 from Micro-Mark (of all places) to bash into a mine
loco. The deal from Micro-Mark is that they pick the paint. I got a
yellow one.
That doesn't matter at all because I will be seriously bashing it. The plan is that this loco is to represent an 15" gauge mine loco in 1:24 scale or 12" gauge in 1:20.3 scale. It will have the cab sawed off and a large scale engineer somehow mashed into what is left of the cab. Three tipper cars, still on backorder, will be the assigned consist on a point to point track that comes out of a mine shaft, up a ramp and to a dump platform above a 1:24 (or thereabouts) gondola car. I am sort of overlooking the fact that internal combustion engines were typically not used in mines...
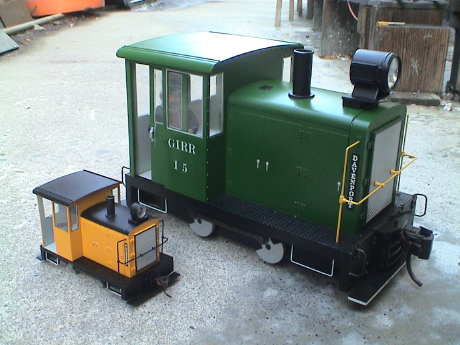 The On30 model
Davenport is tiny in comparison to the F scale (1:20.3) Davenport. Both
represent the same narrow gauge prototype, but the On30 one looks
smaller than that.
The On30 model
Davenport is tiny in comparison to the F scale (1:20.3) Davenport. Both
represent the same narrow gauge prototype, but the On30 one looks
smaller than that.
E-Z Command is Bachmann's name for an entry level DCC system. The loco itself came with an E-Z Command DCC decoder installed, although it is easily removed by unplugging it and plugging in some little jumpers. The decoder is a very basic one. I don't know who manufactured it for Bachmann but it reports a manufacture's ID of 101. It will operate in 128 speed step mode. It will not accept address programming in OPS mode from a Digitrax command station but it does respond properly on a programming track. The motor switching frequency is pretty low, it buzzes some.
I used JMRI DecoderPro to read back the entire contents of the decoder and only the MRC decoders read back as fast. There is not much that can be done with this puppy. It does support analog conversion and it does it pretty well. Supported CVs are CV1, 2, 3, 4, 7, 8, 17, 18, 19, 29, 50, 51, 105 and 106. The last 4 CV's are for Bachmann's use and Bachmann doesn't describe what they do. The decoder will take a 4 digit address. It will work with advanced consisting but it has no options for speed matching, either with a 3 step or 28 step method, so that operating in a consist will require that the OTHER locos be speed matched to the Davenport.
The instructions indicate that the lighting is controlled by F10, but that doesn't do anything on this unit. The Bachmann E-Z Command system doesn't have an F0 button, they label the buttons 1 through 10. These buttons are also used to select addresses for their system which are only allowed in the range of 1 through 9. The "10" button is really address 00. These buttons are also used to control functions, hence the 10 button is really F0. The headlight is directional and can be turned on and off with F0 on a more normal DCC command station. F1 sets the headlight intensity to half.
A photo of the decoder can be found below.
When I first put the loco on the HO track it didn't run. I couldn't get power into it. By dragging it around a little, the thing started to respond at address 3 but it was really flakey. It acted like the track was really dirty but the HO docksider ran ok on the same track. Both locos are only 4 wheel pickup. I cleaned the track (for the first time in months) and it started to sputter. However, after a few minutes, it smoothed out. It appears that the contact wipers needed a break in. After that, it ran pretty smoothly.
There is some gear noise, as can be heard on this Quicktime movie. The On30 Davenport is actually louder than it's larger 1:20.3 scale brother.
The loco doesn't draw much current. Based on my track current meter (one tick is 200 mA), it draws about 100 mA running light, 150 mA at full slip and 200 mA at full stall.
The loco construction is diecast metal from the top of the frame down and plastic above. The handrails at the front are very fragile plastic, I think that it's going to lose those.
It comes with Bachmann EZ-Mate couplers which work with Kadee HO scale couplers. Despite the differences in scale, the couplers are the same size as the Kadee HO #5 coupler.
There is an interference problem on my HO layout. The outside counterweights on the Davenport hang low enough to catch on the terminals of the Atlas Snap Switch motors that I use. This is not a problem because it is not intended to actually run on this layout.
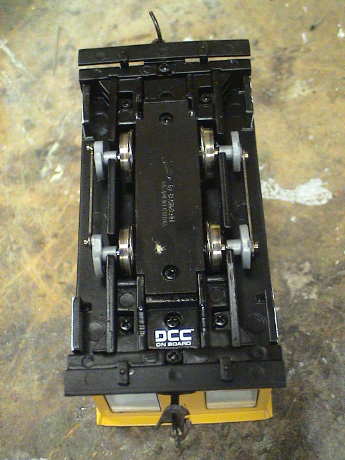 The bottom of the
Davenport is pretty plain. There is a cover that is easily removed to
do a little lubrication.
The bottom of the
Davenport is pretty plain. There is a cover that is easily removed to
do a little lubrication.
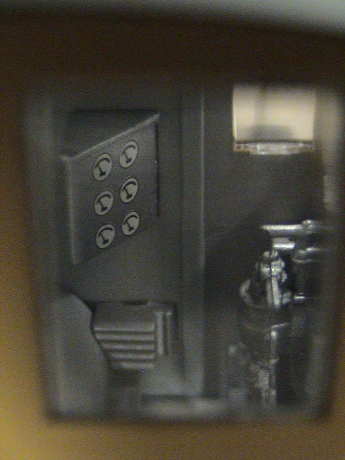 The cab is
pretty well detailed for such a small loco. This is a view through the
back window.
The cab is
pretty well detailed for such a small loco. This is a view through the
back window.
 The shell comes off
by removing the couplers and pockets, two screws. My shell hung up a
little but some gentle nudging convinced it to pop free.
The shell comes off
by removing the couplers and pockets, two screws. My shell hung up a
little but some gentle nudging convinced it to pop free.
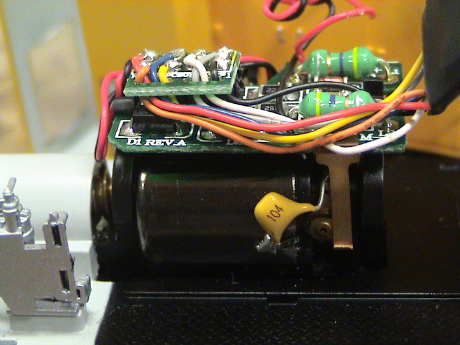
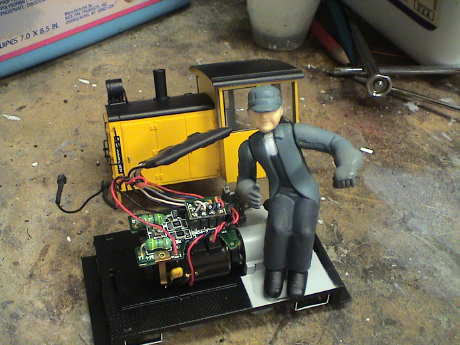
There is a circuit board with an 8 pin NMRA socket on it. There are
other parts there as well, but I haven't tried to trace it out. The
decoder is the black thing supported by it's leads.
 The motor is
a very small unit under the printed wiring board. It drives a worm
inside the "transmission" housing inside the cab. The worm drives a
reduction gear that in turn drives three idler gears. One of them
drives the rear axle, the other two drive the front axle from the rear
idler. The siderods are there for show, but make sure that the axles
are quartered properly if one is removed or the mechanism will
bind.
The motor is
a very small unit under the printed wiring board. It drives a worm
inside the "transmission" housing inside the cab. The worm drives a
reduction gear that in turn drives three idler gears. One of them
drives the rear axle, the other two drive the front axle from the rear
idler. The siderods are there for show, but make sure that the axles
are quartered properly if one is removed or the mechanism will
bind.
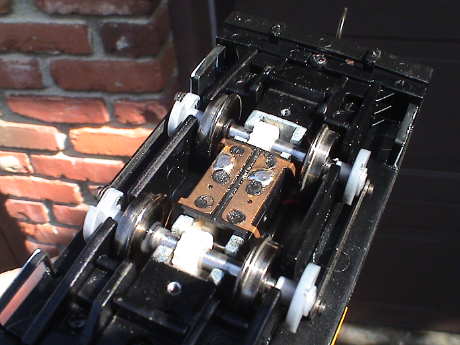 Power pickup is
via 4 wipers that contact the backsides of the wheels.
Power pickup is
via 4 wipers that contact the backsides of the wheels.
The drive gears on the axles looked a little dry to me so I added a dab of AeroCar gear gel lube to each one. It'll work it's way to all the gears in short order.
 The Davenport
is intended to drag a cut of three small tippers out of a mine, up a
ramp to a dump platform over a gondola car. The grade will be pretty
steep. I don't have the tippers yet so I tested the Davenport on a test
grade pulling a single weighted HO gondola which weighs 4.5 oz. This
track is normally my DCC programming track with an HO section glued
onto the ties of a large scale section. For this test, the HO rails
were clip leaded over to an adjacent large scale test track.
The Davenport
is intended to drag a cut of three small tippers out of a mine, up a
ramp to a dump platform over a gondola car. The grade will be pretty
steep. I don't have the tippers yet so I tested the Davenport on a test
grade pulling a single weighted HO gondola which weighs 4.5 oz. This
track is normally my DCC programming track with an HO section glued
onto the ties of a large scale section. For this test, the HO rails
were clip leaded over to an adjacent large scale test track.
This is about the maximum grade that the Davenport could handle without wheel slip. It measures to 11% which is a pretty heavy grade for a simple adhesion loco. This is really rack rail territory. If the grade is increased to 16%, the train will slide back down the rails.
With the three tipper cars (pictured below), the maximum grade is reduced to about 8.5% with the tippers unloaded. I'm going to have to play some games to keep the mine grade under 8%. Adding 2 oz of weight to the loco didn't help much and there is little room for it anyway. The unloaded tippers weigh 2.2 oz each, primarily due to their die cast construction.
 From the way that the cab is constructed and the limited space in
there, it is clear that the roof, doors and rear of the cab are going
to vanish.
From the way that the cab is constructed and the limited space in
there, it is clear that the roof, doors and rear of the cab are going
to vanish.
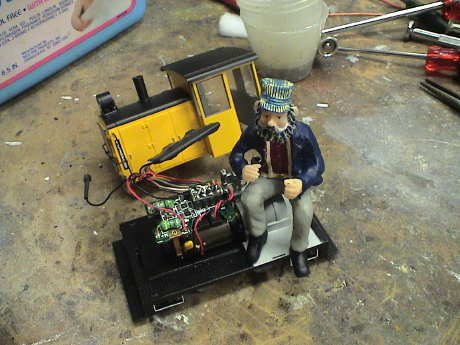
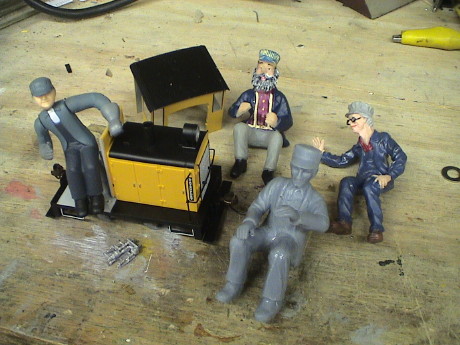
I'll fabricate some sort of seat for a large scale engineer figure something like this one from Just Plain Folk.
 This is a
Bachmann "G Man" figure. This one is intended to be a steam locomotive
engineer leaning out of the cab window. I have other figures at the
GIRR Mtn Div, I'll pick through those to find one that is the best fit
inside the little Davenport cab.
This is a
Bachmann "G Man" figure. This one is intended to be a steam locomotive
engineer leaning out of the cab window. I have other figures at the
GIRR Mtn Div, I'll pick through those to find one that is the best fit
inside the little Davenport cab.
Then the loco will get painted primer gray and stained with rust, ore or coal dust and grease. The handrails will vanish but I'll leave the headlight and exhaust stack. The loco came with a bell, I may install it later.
 After examining
the exploded parts diagram that came with the loco, it appeared that
the hood and cab were separate pieces. Indeed they were and fortunately
were not glued together. This is the effect that I wanted and I didn't
have to cut anything. The cab and hood assembly are fastened at the
front and rear via the coupler pockets acting as dogs to hold them
down. The rear hold down is gone but that little snap that I had to get
over to get the hood off now also holds down the rear portion of the
hood.
After examining
the exploded parts diagram that came with the loco, it appeared that
the hood and cab were separate pieces. Indeed they were and fortunately
were not glued together. This is the effect that I wanted and I didn't
have to cut anything. The cab and hood assembly are fastened at the
front and rear via the coupler pockets acting as dogs to hold them
down. The rear hold down is gone but that little snap that I had to get
over to get the hood off now also holds down the rear portion of the
hood.
I tried all four seated engineer figures that I had available and the "G-Man" fits the best. He is also a little smaller than the other three and his clothes look the most like a miner's clothes. By carefully prying the control stand from the cab floor, I was able to remove it in one piece. I'll remount it on the "backhead" just under the engineer's arm. By grinding the mount for the control stand off the floor, the engineer's feet will sit right on the floor. I can easily fabricate a seat for him over the "transmission housing." This is going better than I expected.
 The engine has been
painted but not yet weathered. I'm going to try it with the Bragdon
weathering powders.
The engine has been
painted but not yet weathered. I'm going to try it with the Bragdon
weathering powders.
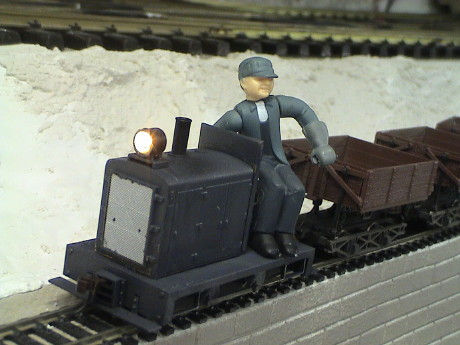
 I weathered the puppy with the Bragdon weathering pigments. It may not be dirty enough though....
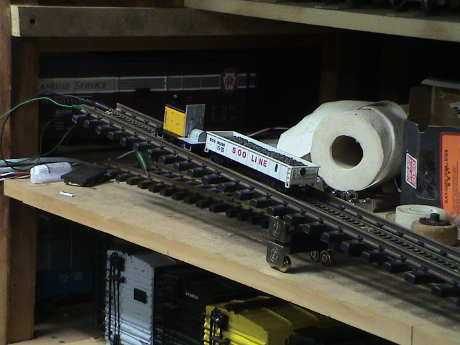
 The whole reason for
the On30 Davenport is to pull these tipper cars out of a mine. The
tippers are mostly metal and come in a set of 3 for less than $50
street price. They are equipped with the same Kadee style coupler as
the Davenport itself.
The whole reason for
the On30 Davenport is to pull these tipper cars out of a mine. The
tippers are mostly metal and come in a set of 3 for less than $50
street price. They are equipped with the same Kadee style coupler as
the Davenport itself.
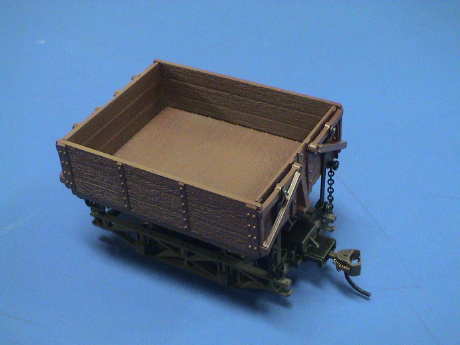
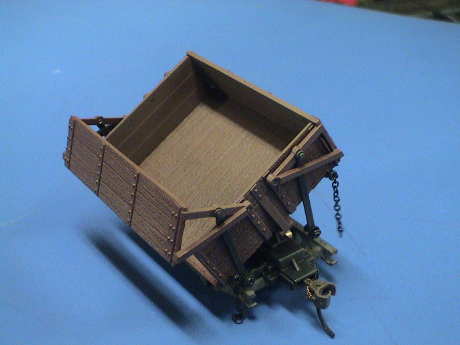 These cars do
actively tip and will do so to either side. To make them tip, something
has to push up on the body of the car from one side or the other or
pull down on the hanging chains. Then a mechanism will automatically
lift the side to allow the card to dump. However, the mechanism is
stiff enough so that the whole car will tend to lift if the tipper body
is lifted from one side. Pulling on the chain will tip the body without
tipping the car, but just barely. However, the chains are fragile and
one of my broke when pulled.
These cars do
actively tip and will do so to either side. To make them tip, something
has to push up on the body of the car from one side or the other or
pull down on the hanging chains. Then a mechanism will automatically
lift the side to allow the card to dump. However, the mechanism is
stiff enough so that the whole car will tend to lift if the tipper body
is lifted from one side. Pulling on the chain will tip the body without
tipping the car, but just barely. However, the chains are fragile and
one of my broke when pulled.
[ Home ] [ Up ] [ Previous Page ] [ Next Page ]
This page has been accessed times since 15 Oct 09.
© 2009-2010 George Schreyer
Created 15 Oct 09
Last Updated December 5, 2010