Sierra Sound Installation in the Aristo
Slopeback Tender
[ Home ] [ Up ] [ Previous Page ] [ Next Page ]
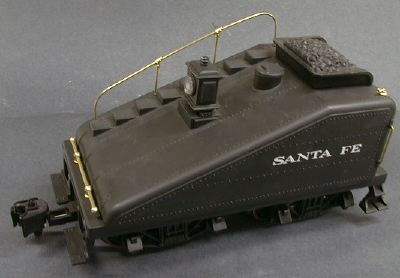 The slopeback tender was developed to give the
engineer better rearward visibility for switching moves. An engineer
could usually see his own rear coupler. The tender couldn't hold nearly
as much water as a regular tender, but switchers rarely were far from
water anyway so it wasn't a problem.
The slopeback tender was developed to give the
engineer better rearward visibility for switching moves. An engineer
could usually see his own rear coupler. The tender couldn't hold nearly
as much water as a regular tender, but switchers rarely were far from
water anyway so it wasn't a problem.
The Aristo Slopeback tender comes with a basic analog sound system.
The only sound that it makes is a chuff which is not very well
synchronized with the engine speed. It sounded ok until I began to
install digital sound systems in other locos when it paled by
comparison.
I elected to install a Soundtraxx Sierra system in the tender behind
an Aristo Rogers 2-4-2. Since Sierra doesn't have a sound system
customized for this loco, I just listened to the sound samples on the
Soundtraxx web site until I
found one that I liked and didn't have already. I ended up with the
sound for an EBT 2-8-2.
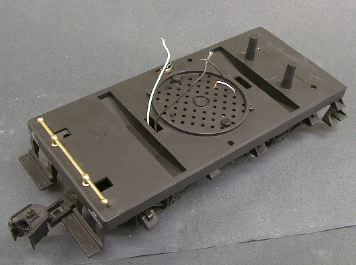 The first thing that I did was strip
everything out of the existing tender. There was nothing there that I
wished to retain except for the power wires from the trucks. The 2"
speaker is a good one for its size, but I wanted a bigger one, and the
stock speaker is not mounted to provide the best sound output. The
sound board itself was scrapped. Even the power switch is not usable
because it has only one pole and I prefer to disconnect both the track
power and the battery when the system is turned off. This takes a dual
pole switch.
The first thing that I did was strip
everything out of the existing tender. There was nothing there that I
wished to retain except for the power wires from the trucks. The 2"
speaker is a good one for its size, but I wanted a bigger one, and the
stock speaker is not mounted to provide the best sound output. The
sound board itself was scrapped. Even the power switch is not usable
because it has only one pole and I prefer to disconnect both the track
power and the battery when the system is turned off. This takes a dual
pole switch.
The 3" speaker supplied with the Sierra can mount over the ring in
the tender floor, but I chose to use a better oval speaker that
typically comes with computer speaker sets. Look for a sale for
"non-amplified" computer speakers and junk the cabinets. The speakers
are fine. I saw a set advertised for $0.99 on sale at Fry's
Electronics.
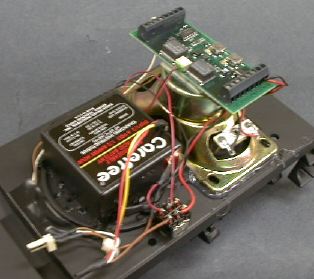
The oval speaker was too tall to mount in the existing speaker
location, so I choose to mount the speaker toward the front of the
tender and to mount the battery where the old speaker was. This is
especially convenient because the Sierra board itself can be mounted on
the back of the speaker so that it is accessible through the coal load.
The coal load unlatches by pushing the water hatch to the rear. This
makes it unnecessary to mount a remote volume control switch. An array
of holes needs to be drilled under the new speaker location to let the
sound out. The speaker didn't fit until some grinding was done on the
old speaker ring.
The new speaker covers over the hole where the wiring to the front
truck used to go. Since there are now only 2 wires, they were rerouted
up through two of the old speaker holes. The rest of the holes were
plugged with hot glue. The hole for the rear truck wiring is plugged by
covering it with electrical tape.
The rear headlight runs from track power and is non directional. It
used to plug into the sound board to pick up its power. Since I don't
like to hardwire the tender shell to the tender floor, I removed the
two pin connector from the old sound board and soldered wires to the
pins that were in the board and then wired it to track power. A 1N4000
type 1 amp rectifier diode can be added in series with the rear light
to make it directional if desired. If it comes on in the wrong
direction, just reverse the diode.
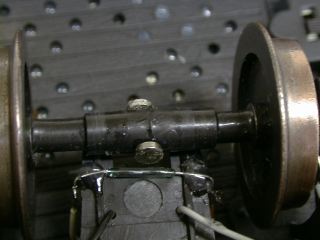 The Sierra can be set so that its chuff rate is
roughly proportional to the engine speed, but this method really
doesn't work too well. I prefer to use a synchronized chuff by
installing the supplied reed switch and magnets. With 2 magnets on a
tender axle, the chuff rate is about 3 chuffs per turn which is fast
enough. It also changes with engine speed reliably except when the
engine is slipping. It is a lot easier to wire the switch within the
tender instead of running wires to the loco and finding a place to
mount the switch and magnets.
The Sierra can be set so that its chuff rate is
roughly proportional to the engine speed, but this method really
doesn't work too well. I prefer to use a synchronized chuff by
installing the supplied reed switch and magnets. With 2 magnets on a
tender axle, the chuff rate is about 3 chuffs per turn which is fast
enough. It also changes with engine speed reliably except when the
engine is slipping. It is a lot easier to wire the switch within the
tender instead of running wires to the loco and finding a place to
mount the switch and magnets.
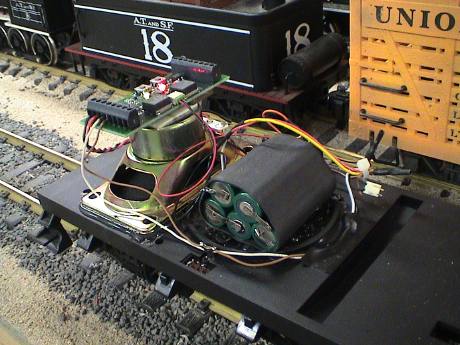 It is now 2006 and after 6 years of intermittent use, the original 500mA-hr gelcell battery has died. I have replaced it with 5 tabbed NiMH
cells to make a new 6 volt battery with 3x the capacity of
the original battery. No modifications to the sound system is
required, the board will charge the new battery at about 150 mA peak, dropping
to less than 100 mA after the battery picks up up a little charge. At
this rate, it will take about 15 hours of sitting on energized track to
full charge these 1650 mA-hr cells. However, the battery still charges while the sound system is in use so that it will eventually fully charge while running. NiMH cells are a better choice than NiCad for this kind of service because NiMH is less sensitive to being continually charged and discharged.
It is now 2006 and after 6 years of intermittent use, the original 500mA-hr gelcell battery has died. I have replaced it with 5 tabbed NiMH
cells to make a new 6 volt battery with 3x the capacity of
the original battery. No modifications to the sound system is
required, the board will charge the new battery at about 150 mA peak, dropping
to less than 100 mA after the battery picks up up a little charge. At
this rate, it will take about 15 hours of sitting on energized track to
full charge these 1650 mA-hr cells. However, the battery still charges while the sound system is in use so that it will eventually fully charge while running. NiMH cells are a better choice than NiCad for this kind of service because NiMH is less sensitive to being continually charged and discharged.
Tabbed cells are much harder to find than regular AA cells. I got
these at Hosfelt for about $2.75
each. The tabs are easy to solder together with the cells arranged plus
to minus. Then the whole works is encapsulated in a piece of shrink
tubing. It is possible to make a battery stack with non-tabbed batteries, but considerable heat needs to be applied to solder to the battery ends and this heat can damage a battery. The welded on tabs on these cells make soldering easy.
 While I was in there, I did add a
directionally sensitive headlight circuit. It was easiest to add it to
the wiring leading to the headlight itself, the connector plugs into
straight track power.
While I was in there, I did add a
directionally sensitive headlight circuit. It was easiest to add it to
the wiring leading to the headlight itself, the connector plugs into
straight track power.
 The GIRR Mountain division uses the
Aristo Train Engineer system with PWC. Adding a storage capacitor to
the diode allows the light to come on brighter sooner. If straight DC
track power is used, the capacitor won't help at all. All that is
needed then is the diode to make the rear headlight directionally
sensitive.
The GIRR Mountain division uses the
Aristo Train Engineer system with PWC. Adding a storage capacitor to
the diode allows the light to come on brighter sooner. If straight DC
track power is used, the capacitor won't help at all. All that is
needed then is the diode to make the rear headlight directionally
sensitive.
[ Top ] [ Home ] [ Up ] [ Previous Page ] [ Next Page ]
This page has been accessed  times since 11 Mar 00.
© 2000-2006 George Schreyer
Created Mar 11, 2000
Last Updated August 19, 2006