 14 Oct
09
14 Oct
09My conventional vacuum cleaner was on the way out. I was looking around for a new one but I was not too thrilled about buying another cheap one that wouldn't last or buying a really good one that I really didn't want to use anyway. Conventional vacuums are such a pain in the backside to use that I ended up not using the one that we have very much. This tended to result in dirty carpets.
 Then I
ran across a web page describing a robotic vacuum called Roomba.
Roomba is manufactured by a company called iRobot. This company makes household,
industrial and military robots. The industrial and military types
are man portable and are often used for bomb detection or disposal
platforms. The household robots simply do floors. Roomba is
designed for dry sweeping of carpets and hard floors. Another
model, Scooba, is designed for wet cleaning hard floors.
Then I
ran across a web page describing a robotic vacuum called Roomba.
Roomba is manufactured by a company called iRobot. This company makes household,
industrial and military robots. The industrial and military types
are man portable and are often used for bomb detection or disposal
platforms. The household robots simply do floors. Roomba is
designed for dry sweeping of carpets and hard floors. Another
model, Scooba, is designed for wet cleaning hard floors.
The web page that tipped me off to this device was a hardware hacker blog. The comments in the blog indicated that the hackers actually liked this device for two reasons. First, the blog claimed that it actually worked. Second, Roomba has a serial interface and documentation that describes how to read all of the sensors (there are many) and issue commands to all its various functions so that it could be reprogrammed. I don't intend to hack it, but if these guys liked it, I figured that it had to be reasonable.
The first Roombas that I got were of the 2nd generation. I have never seen a 1st generation Roomba in person. It looks similar but the dust bin is smaller. As of about 2007, there is a 3rd generation unit. I now have one of these, you can find more info about that unit at the 500 Series section at the bottom of this page.
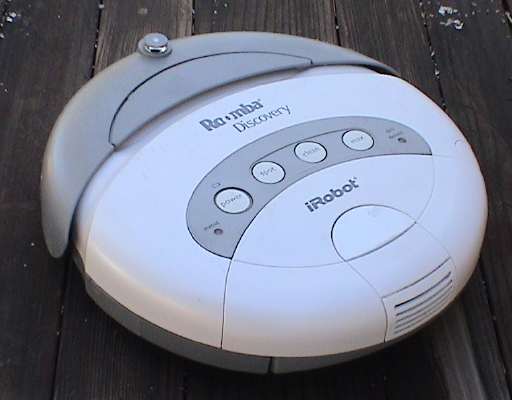
Roomba comes in several models and they all tend to be expensive. The low end ones are about $150, the high end ones reach past $400 at retail. The basic mechanism appears to be pretty much the same, the difference is in the accessories that come with it and the appearance of the cases. The model that interested me the most was the Discovery, the model just below the top of the line. This one comes with a charging dock that Roomba can find when it needs some juice. It lists at about $280 on the iRobot site but "retail" at typical discounters is actually HIGHER, as much as $330. I found a factory reconditioned model of the Discovery at Amazon.com for $180, then a week later at $170, then at $160. Amazon is playing games with their prices. Anyway, I bought one and then after I'd played with it a bit, I bought two more, one for use at another location and the third literally for parts or to act as a replacement when one of the first two eventually craps out. At the "reconditioned" price with a 90 day warranty, I could get two whole sets for the price of a new one with a full 1 year warranty.
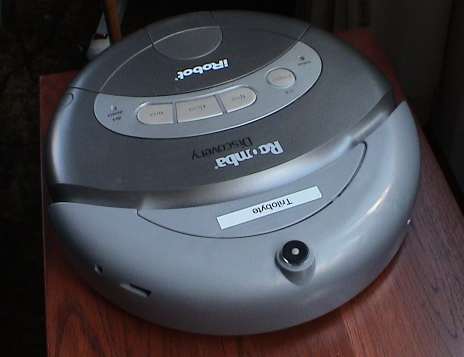 The second
and third ones were a slightly different model even though
Amazon.com described them as being the same. These appear to be a
Roomba Discovery SE model but packaged in a Roomba Discovery box.
As far as I can tell, it's the same unit with different plastic and
different buttons. My wife likes to name inanimate objects. This
one got the name "Trilobyte" because she thought that it looked
like a trilobite.
The second
and third ones were a slightly different model even though
Amazon.com described them as being the same. These appear to be a
Roomba Discovery SE model but packaged in a Roomba Discovery box.
As far as I can tell, it's the same unit with different plastic and
different buttons. My wife likes to name inanimate objects. This
one got the name "Trilobyte" because she thought that it looked
like a trilobite.
This Roomba Discovery SE was manufactured a few months after the white one and has some minor behavior differences, described in detail below. It tends to do quick backup maneuvers and has a left handed wall hugging mode. It might also have two forward speeds. These differences might be due to a firmware upgrade. The two SE models also have the programming interface installed so that they can be more easily hacked.
 Roomba is billed as a vacuum cleaner. It
does have some vacuum functionality, there is a little fan in the
back that does indeed trap the dust created by the main brushes,
but it doesn't really draw heavier dirt up by vacuum. Roomba works
more like a manual carpet sweeper. The brushes do all the work by
sweeping the majority of the dirt back into the dust bin at the
back. Roomba works best on hard floors, well on dense pile flat
carpet, and poorly on fluffy surfaces.
Roomba is billed as a vacuum cleaner. It
does have some vacuum functionality, there is a little fan in the
back that does indeed trap the dust created by the main brushes,
but it doesn't really draw heavier dirt up by vacuum. Roomba works
more like a manual carpet sweeper. The brushes do all the work by
sweeping the majority of the dirt back into the dust bin at the
back. Roomba works best on hard floors, well on dense pile flat
carpet, and poorly on fluffy surfaces.
Roomba will not totally replace a conventional vacuum cleaner. It can't draw dirt up from deep within a carpet. It can and does sweep dirt and hair from the surface but for deeper cleaning, something stronger is required. Once dirt has been driven into a carpet, it's out of Roomba's reach. Roomba doesn't like shag or heavily sculpted carpet. All the changes in level make it difficult for Roomba to brush the dirt. Roomba also can't do stairs and won't reach into some corners. To avoid dragging out the big vacuum to cover these small areas, a battery powered hand vacuum is effective.
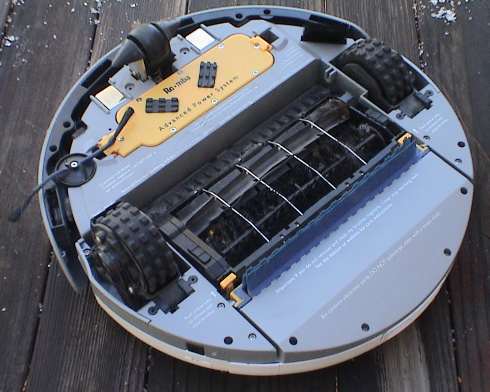 Underneath, Roomba has a tricycle drive mechanism.
There is an individual motor for each suspended drive wheel. The
front wheel is free rolling when Roomba is going straight but does
not swivel. It simply slides as Roomba turns. Roomba can spin in
place if it needs to. There are two motor driven brushes between
the drive wheels that do the most of the work. The large yellow
object is the removable battery. The weight of the battery serves
to keep pressure on the front wheel. There is a small horizontal
brush (left front in the photo) which sweeps dirt from the side
into the path of the main brush so that Roomba can sweep along
baseboards. Although not very visible, there are four IR "cliff"
sensors around the front of Roomba so that it can tell when it is
about to drive off a step. There is also an IR sensor on the right
side pointing sideways that allows Roomba to gauge when it is next
to a wall so that it can brush the baseboard. The darker part at
the front is a bumper that Roomba uses to sense the presence of an
obstruction. Roomba can track over bumps something less than a half
inch high as it moves around.
Underneath, Roomba has a tricycle drive mechanism.
There is an individual motor for each suspended drive wheel. The
front wheel is free rolling when Roomba is going straight but does
not swivel. It simply slides as Roomba turns. Roomba can spin in
place if it needs to. There are two motor driven brushes between
the drive wheels that do the most of the work. The large yellow
object is the removable battery. The weight of the battery serves
to keep pressure on the front wheel. There is a small horizontal
brush (left front in the photo) which sweeps dirt from the side
into the path of the main brush so that Roomba can sweep along
baseboards. Although not very visible, there are four IR "cliff"
sensors around the front of Roomba so that it can tell when it is
about to drive off a step. There is also an IR sensor on the right
side pointing sideways that allows Roomba to gauge when it is next
to a wall so that it can brush the baseboard. The darker part at
the front is a bumper that Roomba uses to sense the presence of an
obstruction. Roomba can track over bumps something less than a half
inch high as it moves around.
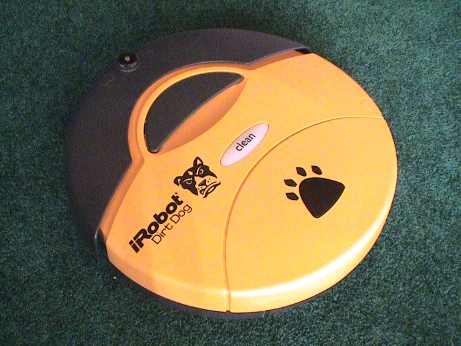 On June
6, 2007, another version of Roomba arrived. This is the Dirt Dog.
Dirt Dog is a modified Roomba designed to sweep shop floors. It is
more effective on hard floors, industrial and very tight pile
carpets. Dirt Dog is designed to pick up bigger pieces and more of
it. It is less effective against dust. The major difference is the
replacement of the rubber brush with a small bristle brush and the
omission of the vacuum function entirely. The controls are also
simplified, there is exactly one button, Clean. Dirt Dog will
respond to the IR remote and it will dock in the standard base
stations. It will also respond to virtual walls. It does NOT have a
dirt detect mode nor any sensors to drive that mode.
On June
6, 2007, another version of Roomba arrived. This is the Dirt Dog.
Dirt Dog is a modified Roomba designed to sweep shop floors. It is
more effective on hard floors, industrial and very tight pile
carpets. Dirt Dog is designed to pick up bigger pieces and more of
it. It is less effective against dust. The major difference is the
replacement of the rubber brush with a small bristle brush and the
omission of the vacuum function entirely. The controls are also
simplified, there is exactly one button, Clean. Dirt Dog will
respond to the IR remote and it will dock in the standard base
stations. It will also respond to virtual walls. It does NOT have a
dirt detect mode nor any sensors to drive that mode.
Dirt Dog can be driven from a Roomba remote control and it can be placed into the Spot or Max mode from the remote.
I found Dirt Dog advertised at Fry's for $89.99 with free shipping so I bought one as the one that cleans the family room (where my kids spend most of their time) was often getting indigestion from larger debris and the carpet floor surface is suitable for Dirt Dog.
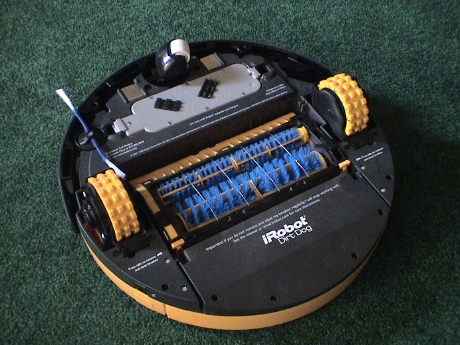 Dirt Dog looks a little different underneath.
It has two bristle brushes and a swiveling front caster. The dust
bin is actually the same size as Roomba's but since there is no
vacuum fan nor dust filter, the volume of the bin is larger. The
cliff sensors and wall sensors are there too so that it won't drive
off steps and will follow walls like its brethren.
Dirt Dog looks a little different underneath.
It has two bristle brushes and a swiveling front caster. The dust
bin is actually the same size as Roomba's but since there is no
vacuum fan nor dust filter, the volume of the bin is larger. The
cliff sensors and wall sensors are there too so that it won't drive
off steps and will follow walls like its brethren.
The battery is a different color than the APS batteries that came with all my other Roombas but it says Advanced Power System on it. By run time tests in both Dirt Dog and a regular Roomba, it appears to be a normal APS battery.
Dirt Dog does well on some larger pieces that will jam a regular Roomba, such as Pistachio shells. Instead of getting stuck in the brush assembly, Pistachio shells are simply tossed back into the dust bin. Dirt Dog is also very effective against crumbs and other small particles on the tight pile carpet shown in the photos. There is a limit to Dirt Dog's appetite though, and a screw on cap from a 2 litre soda bottle about defines it. It also has trouble with dry oak leaves, they get hung up on the wire brush guard.
Even though Dirt Dog is not rated for use on carpet, it will sweep dust off tight pile carpet as well as a regular Roomba. While running Dirt Dog and a Scheduler in the same room, they picked up nearly equivalent amounts of lint and dust.
This Dirt Dog has a swiveling front caster like the new Scheduler robots. The caster is part white and part black. There appears to be an optical sensor looking down at the wheel. I assume this is so that Roomba can "count" the wheel revolutions and better determine if is moving or not.
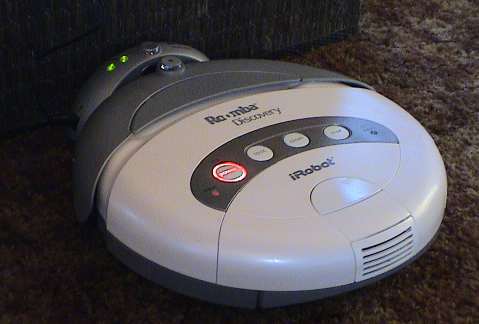 Roomba Discovery and the top-of-the-line Roomba
Scheduler have a "dock" that charges them too. When Roomba decides
that it is done cleaning a room or it runs low on power, it can
find it's dock and recharge automatically. The entry level Roomba
models either need to be plugged into their charger or hung in a
wall rack that has a charger attached.
Roomba Discovery and the top-of-the-line Roomba
Scheduler have a "dock" that charges them too. When Roomba decides
that it is done cleaning a room or it runs low on power, it can
find it's dock and recharge automatically. The entry level Roomba
models either need to be plugged into their charger or hung in a
wall rack that has a charger attached.
The entry level Roomba models must be started manually by pressing the large buttons on the top of the unit. The Discovery and Scheduler have an IR remote control that can also be used to drive the unit around manually as well as duplicating the buttons on the top of Roomba. The Scheduler can be programmed to start it's cleaning cycle automatically at some predetermined time each day of the week. The Discovery and perhaps other models can also be programmed with the Scheduler remote if purchased as a separate item (about $30).
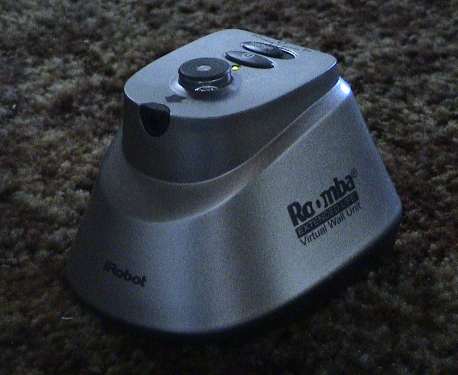
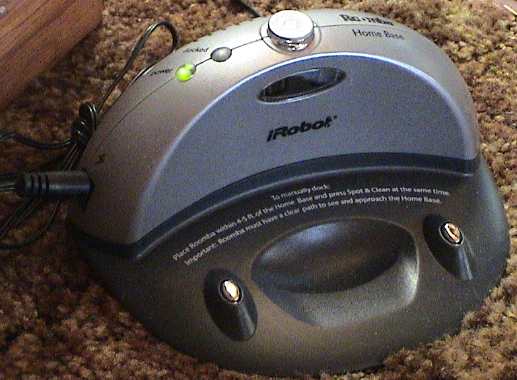 This is the
Home Base or "dock." The IR turret on the top allows Roomba to
avoid bumping into the dock. The oval window on the front of the
dock is the source of the docking beams. The two silver posts on
the dock are low voltage power connectors that connect to two metal
plates underneath Roomba.
This is the
Home Base or "dock." The IR turret on the top allows Roomba to
avoid bumping into the dock. The oval window on the front of the
dock is the source of the docking beams. The two silver posts on
the dock are low voltage power connectors that connect to two metal
plates underneath Roomba.
 This is
the "fast" 3 hour charger. It can either be plugged into the dock
or into Roomba itself. During charging, the charger can become
quite hot, about 150°F on the bottom if is placed flat side
down on a carpet. It doesn't get nearly as hot if it is placed on
it's side, like in the photo, so that air can circulate across the
"bottom" of charger.
This is
the "fast" 3 hour charger. It can either be plugged into the dock
or into Roomba itself. During charging, the charger can become
quite hot, about 150°F on the bottom if is placed flat side
down on a carpet. It doesn't get nearly as hot if it is placed on
it's side, like in the photo, so that air can circulate across the
"bottom" of charger.
 Each Roomba Discovery set comes with an IR remote
control, the black one in the photo. This remote replicates the
four buttons on Roomba itself and additionally allows Roomba to be
manually driven. The white one is the Scheduler remote. This one
has the same functions as the regular remote but additionally
allows a cleaning program to be uploaded to Roomba and the
Scheduler Virtual Walls.
Each Roomba Discovery set comes with an IR remote
control, the black one in the photo. This remote replicates the
four buttons on Roomba itself and additionally allows Roomba to be
manually driven. The white one is the Scheduler remote. This one
has the same functions as the regular remote but additionally
allows a cleaning program to be uploaded to Roomba and the
Scheduler Virtual Walls.
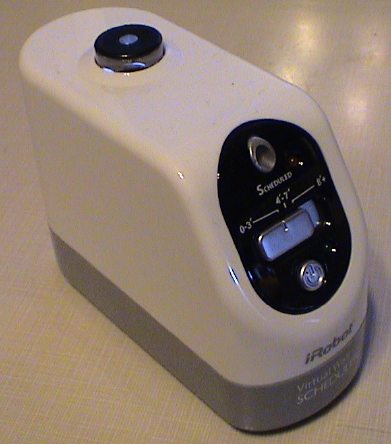
 When the hood on the Scheduler
remote is flipped down, as in this photo, the display shows the
date, time and indicates the days that Roomba is programed to
perform. The buttons replicate the ones on the regular remote.
When the hood on the Scheduler
remote is flipped down, as in this photo, the display shows the
date, time and indicates the days that Roomba is programed to
perform. The buttons replicate the ones on the regular remote.
 With the hood flipped up, the
display changes from blue to red and allows a daily program to be
entered. Roomba is allowed to start a cleaning cycle once per day
for each day of the week. The cleaning cycle can be started on any
15 minute interval over a 24 hour period. Alternately, a cleaning
cycle can be defined to happen once only. When it's time comes,
that program erases itself. With the hood flipped up, new button
labels are visible.
With the hood flipped up, the
display changes from blue to red and allows a daily program to be
entered. Roomba is allowed to start a cleaning cycle once per day
for each day of the week. The cleaning cycle can be started on any
15 minute interval over a 24 hour period. Alternately, a cleaning
cycle can be defined to happen once only. When it's time comes,
that program erases itself. With the hood flipped up, new button
labels are visible.
Once a program is defined, the remote is pointed at Roomba and the Send All button will then send the whole program to Roomba. When Roomba receives the program, it will play a tune. Roomba's instructions say that the program can be sent while Roomba is on it's dock, but this hasn't worked for me. I have to either move Roomba a few feet away from it's dock and turn it on, or unplug the dock and turn Roomba on for it to receive the program. Dirt Dog will respond to the scheduler remote but it has to be turned on from the remote to accept a program. There is no indicator on Dirt Dog that says that a program is active.
Roomba will only execute a program if it is off or connected a charger when the program activates.
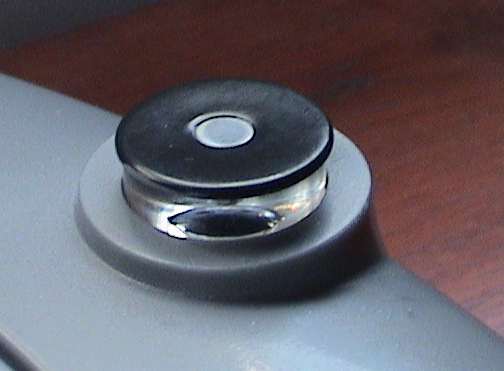 Roomba has a 360 degree IR turret at the front. This is
a lens that deflects an IR beam that is coming from any direction
downward to an IR sensor. Roomba uses this sensor to detect and
avoid its base station and virtual walls when being approached from
any direction. IR commands from the handheld remote control are
also received by this sensor. The base station and virtual walls
also have a similar turret, but these emit a coded IR beam. There
is another IR emitter on the base station that makes a docking
beam.
Roomba has a 360 degree IR turret at the front. This is
a lens that deflects an IR beam that is coming from any direction
downward to an IR sensor. Roomba uses this sensor to detect and
avoid its base station and virtual walls when being approached from
any direction. IR commands from the handheld remote control are
also received by this sensor. The base station and virtual walls
also have a similar turret, but these emit a coded IR beam. There
is another IR emitter on the base station that makes a docking
beam.
 This
is a "virtual wall." It is intended to make a boundary that Roomba
will not cross to allow constraints on Roomba's movements. The
turret on the top emits a beacon that Roomba detects at short range
to avoid bumping into the wall itself and moving it. The small hole
at the front emits the pencil beam that Roomba will not cross. The
pencil beam will reach about 8 feet. If a larger span is desired,
then two can be used, pointing at each other from opposite sides of
the "blocked" opening.
This
is a "virtual wall." It is intended to make a boundary that Roomba
will not cross to allow constraints on Roomba's movements. The
turret on the top emits a beacon that Roomba detects at short range
to avoid bumping into the wall itself and moving it. The small hole
at the front emits the pencil beam that Roomba will not cross. The
pencil beam will reach about 8 feet. If a larger span is desired,
then two can be used, pointing at each other from opposite sides of
the "blocked" opening.
 If Roomba is scheduled to start
automatically through a program, any virtual walls that it needs to
control it's movements need to turn on automatically too. The
Scheduler Virtual Wall does this. It receives the same program that
Roomba does. The Virtual Wall comes on a few minutes before Roomba
does so that by the time that Roomba could get there, the wall is
already on. It will turn itself off in about 2 hours.
If Roomba is scheduled to start
automatically through a program, any virtual walls that it needs to
control it's movements need to turn on automatically too. The
Scheduler Virtual Wall does this. It receives the same program that
Roomba does. The Virtual Wall comes on a few minutes before Roomba
does so that by the time that Roomba could get there, the wall is
already on. It will turn itself off in about 2 hours.
Roomba comes in several models that change from time to time. They are all fundamentally the same except for Dirt Dog. The differences are in appearance and accessory sets. There have been earlier models as well. The table below summarizes the some of the models that have been listed on iRobot's web site since January 2006. Not all of them are still available from iRobot, but some of these may still be available somewhere.
| Feature | Model | ||||||
|---|---|---|---|---|---|---|---|
| Scheduler | Discovery SE | Discovery | Sage | Pink Ribbon | Red | Dirt Dog | |
| List Price | $330 | $300 | $280 | $200 | $180 | $150 | $130 |
| Color | Blue/ Gray |
Dark Gray/ Gray |
White/ Gray |
Dark Gray | Pink/ Gray |
Red | Yellow/Gray |
| IR Remote | Scheduler | standard | standard | no | no | no | no |
| Dock | yes | yes | yes | no | no | no | no |
| Wall Mount | no | yes with charger | yes | yes | no | no | no |
| Virtual Walls | 2 Scheduler | 2 standard | 2 standard | 2 standard | 1 standard | 1 standard | none |
| Charger | 3 hour | 3 hour | 3 hour | 3 hour | 3 hour | 7 hour | 7 hour |
| Spare Brushes | yes | no | no | no | no | no | no |
| Spare Filters | 2 | 1 | 1 | 1 | 1 | 1 | n/a |
| Battery | 2 hour | 2 hour | 2 hour | 2 hour | 2 hour | 2 hour | 2 hour |
| Clean Mode | yes | yes | yes | yes | yes | yes | yes |
| Spot Mode | yes | yes | yes | yes | yes | yes | remote only |
| Max Mode | yes | yes | yes | yes | yes | remote only? | remote only |
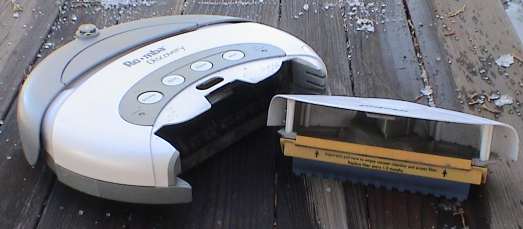
Roomba works very well. Even on a very dirty carpet, it picks up everything on the surface including some larger items. Mine has picked up buttons, coins, mini-pretzels, nails, bobby pins, all manner of crumbs, those little plastic tags used to close bread bags, a key fob with a ring but without keys, wire ties, small pieces of paper and LOTS of dust, crumbs, general dirt, carpet fiber and hair. It had trouble with a whole Kleenex tissue, a full size popsicle stick and a whole (empty) Cheetios bag. However, most vacuums would choke on these items as well.
If there is one serious problem with Roomba, it is that it picks up more stuff than it can hold. The dust bin is pretty small by full size vacuum standards and needs to be emptied after every cleaning cycle, at least for the first few passes through a given room. Emptying it is easy enough though.
Another problem is hair. Since my house hadn't been vacuumed at all in a while, there was lots of hair and carpet fiber there. The carpet fiber was mostly swept into the dust bin. However, the hair tends to wrap around the brushes. Once the brushes load up with enough hair, they won't sweep properly and Roomba will start missing other stuff like crumbs. The brushes are easier to get out to clean than a conventional vacuum. Some quick cuts with a pocket knife will cut the hair so that it can be fairly easily picked out of the brushes and brush bearings. During the second cleaning pass through the room the next day, it didn't need nearly as much attention as it did during the first pass. Once the major part of the crud was picked up, it could go a whole cleaning cycle without the bin or brushes needing to be cleaned.
Roomba is clearly a maintenance sweeper. It is not well suited to a really dirty room or stairs so that a conventional vacuum cleaner will still be needed. However for routine daily or maybe weekly cleaning, it does an excellent job and is not nearly as much hassle as a regular vacuum cleaner.
Those with cats and dogs, however, have mobile loose hair replenishment devices wandering through their homes. Roomba is very good at picking this stuff up, but it will need its brushes cleaned more often. I have neither a dog nor a cat but I suppose that both of them will have to find a way to deal with Roomba. A cat will probably head for high ground and wait it out. A dog could go nuts until it gets used to Roomba.
Brush cleaning is necessary, especially if there is lots of hair. Hair will get wound around the brushes and brush bearings and really gum up the works. Pay special attention to the little yellow bearing pieces on the ends of each brush. On the rubber brush, the yellow piece will tend to fall off, don't lose it. On the regular brush, the yellow piece won't come off so easily, but hair will still wind its way underneath it and bind the bearing. There might be enough hair in there so that the brush won't fit back in. The bearing piece needs to be removed and inspected for hair underneath. The yellow piece has 4 tabs holding it in place and one of the tabs is smaller than the other three. The slots on the end of the brush are similarly keyed so that the yellow bearing piece will only come off if rotated to the one correct position. If too much crud gets wrapped around the brushes, the brush mechanism may stall or drag so much that the motor or gearing may get overstressed. Roomba does sense motor current so that if something does stall, Roomba will shut down, but don't let it get this way. The extra drag has to be hard on it.
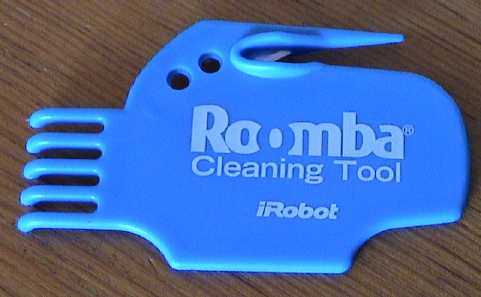 iRobot sells a special cleaning tool (about $5) for
the brushes that does work, but a sharp pocket knife actually works
better. Just turn it blade up and run it along the brushes
underneath the hair to cut it up and then pick the wads off the
brush.
iRobot sells a special cleaning tool (about $5) for
the brushes that does work, but a sharp pocket knife actually works
better. Just turn it blade up and run it along the brushes
underneath the hair to cut it up and then pick the wads off the
brush.
Roomba doesn't make nearly as much noise as a regular vacuum cleaner, iRobot claims that the noise level is about 80 dBA. This is not loud enough to totally drown out a conversation or a TV set, but it is easily heard. You can hear the noise it makes by watching a video clip linked at the bottom of this page.
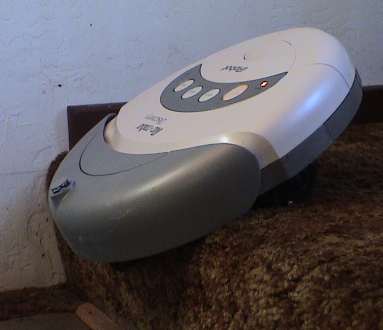
Roomba is 13" in diameter and 4" high. This allows it to get underneath some furniture and vacuum areas that haven't seen daylight in some time. It can also get under overhangs in most standard cabinetry so it can sweep along the baseboards. Since Roomba is round and can turn in place, it can get itself out of any place that it can get into although it may take awhile doing it.
There are maintenance parts and accessories available for Roomba but they tend to be expensive. Look carefully at the iRobot web site for bundles, discounts or other deals on parts and upgrades. Also consider getting a spare Roomba at the reconditioned price. When the first Roomba eventually breaks beyond economical repair, it's parts can be salvaged to keep the other one going.
Roomba has several behaviors, some of which can be commanded and some of which it determines by itself. Roomba doesn't appear to "map" a room. It does appear to respond to local events in a combination of systematic and random fashions.
Roomba's primary guidance mechanism is purely random. Since it does not generate an internal map of a room, it doesn't know where it has been, and therefore also does not know where it hasn't been. It does respond to particular local events in somewhat systematic ways, overall, it depends on working over an area long enough so that essentially random traverses will cover most or all of that particular area. If it doesn't get some spot during one cleaning cycle, it will probably get there on some subsequent cycle. If Roomba is used a few times a week, it will get everywhere that it can and eventually, the room will be cleaned.
If there is some particular spot that needs attention, there are a few ways to deal with it so that that spot gets done first. If Roomba detects a particularly dirty spot, it will pay attention to it by itself (dirt detect mode) or you can drive Roomba back and forth over a spot with the IR remote, or you can put Roomba down in the middle of an area that needs work and use the Spot or Clean modes.
Clean Mode. Roomba's "Clean" mode is a commanded mode and starts off in two different ways depending on where Roomba was when it was started. If Roomba starts from its dock, it will back off the dock and take off in some random direction until it bumps into something. From there it may go into a wall hugging mode or start crisscrossing the room.
If Roomba is placed in the middle of a room and started in clean mode, it will trace out an ever increasing spiral until it hits something. I believe it does this to determine the rough size of the room so that it can calculate about how long to spend in that area. After Roomba has measured a room and/or done some of the edges, it may go into a mode where it crisscrosses the room at angles to try to cover the whole area of the center.
In a small room, Roomba may decide that it has cleaned enough and seek out it's dock or stop in place in as little as 20 minutes. I usually don't see this behavior as the rooms in my house that it covers are large enough that it runs out of power before it decides that it is done.
Spot Mode. Roomba has a "spot" mode. It won't enter this mode by itself, it must be commanded into spot mode via the remote or the buttons on Roomba itself. In this mode, Roomba will first do a back and forth dance and then start to turn in place. It will then trace out an increasing spiral to about 6 foot diameter and then spiral back into the center, redo the little dance and then stop.
Max. Most Roomba models have a "Max" button that will cause the robot to intensively clean a room until it quits due to loss of battery charge no matter how small an area that it covers. I don't see much need for this mode as Roomba usually runs until it drains its battery anyway.
Battery Life. Roomba will run for about an hour, or maybe two, on a charge, give or take. The kind of floor that it is cleaning and other factors will strongly influence it's battery life. During this time it can traverse through two or three average to small rooms. If there is lots of dirt, Roomba will spend more time in the dirty areas which will tend to reduce the total area that it can cover. Even if Roomba cannot clean a whole area in one pass, it will eventually get everywhere and over a period of time, the floors will become very clean.
Exclusion Zones. There may be areas where you don't want Roomba to roam. In these cases a "virtual wall" can be placed to control Roomba's movement. The virtual wall is a battery powered device that comes with Roomba. The wall projects an IR beam in front of it. When Roomba detects the beam, it will turn away just as if it had hit a hard wall. There are two kinds of virtual wall. The regular virtual wall has a power button and must be turned on manually although they turn themselves off in a couple of hours. There is a "scheduler virtual wall" that can be programmed with the Scheduler remote to turn just before Roomba does so that Roomba can function properly without supervision.
Dirt Detection. Roomba has some internal sensors that tell it when it is picking up more than the usual amounts of dirt. The sensors are two metal plates inside the brush housing. Newer models may have only one plate. Dirt detection appears to work by a PIND (Particle Impact Noise Detection) process. When big enough pieces dirt are detected they bang on the plates and Roomba can "hear" them. Roomba will then go into a cleaning behavior where it will trace out a tight spiral pattern until it thinks that the area is clean. In some instances, it may wobble back and forth over an area as well. Dirt Dog does not do dirt detect.
Wall Hugging. Roomba will sometimes attempt to trace out the edges of a room to clean along the edges. When it hits a wall, it may turn left and start following the wall. There is an IR sensor set on the right side that allows Roomba to "see" the wall. In this mode, the side brush can sweep dirt from along the wall into the path of the main brush so that the dirt can be picked up.
Roomba also has a wall hugging mode on the left side. Since there is no IR sensor there for Roomba to use to see the wall, it feels its way along by bumping and turning. I've caught the white one doing this only once, but the gray one does it pretty consistently.
Roomba also uses this mode to feel its way around the leg of a piece of furniture. It will try to circle the whole leg, turning clockwise, so that the the side brush can sweep dirt away from the leg.
During one pass, I noticed that Roomba's wall hugging behavior was not working too well. I then noticed a wad of spider web that Roomba had found somewhere was covering one of the ports on the right side of the bumper. These are the optical ports for the wall sensor and it couldn't see the wall. I picked this stuff off and Roomba's wall hugging behavior returned immediately.
Virtual Wall and Base Station Avoidance. Roomba uses its 360 degree IR turret to detect the presence of a base station or virtual wall. These units also have IR turrets. Roomba will avoid bumping into either so that the placement of these items is not disturbed. Roomba may go into a funny dance when it is close to these items to try to clean those areas without actually causing a collision.
Cliff Avoidance. Roomba has four sets of IR sensors arranged around the front. Two lenses are imbedded in each of four rectangular slots. These look down so that Roomba can detect that is about to drive off a cliff. When a cliff is detected, Roomba will either immediately turn or back up. This feature works pretty well, however, one time Roomba didn't detect the top of a stair quite in time. It really tried to back up, but it fell over anyway and tumbled all the way to the bottom. The brushes popped out but Roomba was none the worse for the wear. After being reassembled it worked fine. On another occasion where there is only two steps down, Roomba drove off the top step and flipped upside down onto the middle step. It continued to roll over off the middle step to the lower floor, flipping over again. It landed on it's wheels and drove off.
While cleaning along the edge of the stairwell under a bannister, Roomba will back up to avoid the edge. If it had just turned to be travelling nearly parallel to the edge, it may back up into a bannister post. It doesn't have a bumper in back it cannot feel the post Roomba may ride up on the post and quit when it detects a wheel drop.
 The
next day, I ran it again and this time it caught itself just before
going over the edge at the top of the stairs. It just sat there
like this, beeping plaintively. It was actually pretty stable in
this position, I tried to give it a little push to send it over and
it was pretty well stuck in place. After a push back, it picked up
it's program and drove off. When Roomba detects a hard edge, such
as the molding under the bannister as shown in the videos below, it
backs up gracefully and continues on. However, it doesn't do quite
as well in this situation where the sculpted carpet wraps over the
edge at the top of the stairs. This edge is much less distinct and
when Roomba drives DIRECTLY toward the edge, the front wheel dips
before the cliff sensors read the edge. Then Roomba's back end
rears up and takes weight off the drive wheels so that Roomba
cannot back up as well. If the back wheels drop enough, Roomba
detects the wheel drop and it will stop in place, stuck, like in
the photo. When Roomba drives to the same edge at an angle, it does
much better. In this case, a cliff sensor can see the edge before
the front wheel goes over. In the video below, Roomba can be seen
rearing up and then recovering after driving to the edge straight
on.
The
next day, I ran it again and this time it caught itself just before
going over the edge at the top of the stairs. It just sat there
like this, beeping plaintively. It was actually pretty stable in
this position, I tried to give it a little push to send it over and
it was pretty well stuck in place. After a push back, it picked up
it's program and drove off. When Roomba detects a hard edge, such
as the molding under the bannister as shown in the videos below, it
backs up gracefully and continues on. However, it doesn't do quite
as well in this situation where the sculpted carpet wraps over the
edge at the top of the stairs. This edge is much less distinct and
when Roomba drives DIRECTLY toward the edge, the front wheel dips
before the cliff sensors read the edge. Then Roomba's back end
rears up and takes weight off the drive wheels so that Roomba
cannot back up as well. If the back wheels drop enough, Roomba
detects the wheel drop and it will stop in place, stuck, like in
the photo. When Roomba drives to the same edge at an angle, it does
much better. In this case, a cliff sensor can see the edge before
the front wheel goes over. In the video below, Roomba can be seen
rearing up and then recovering after driving to the edge straight
on.
For the next cleaning pass, I placed a virtual wall with its IR beam shooting across the top of the stair. Roomba would then turn away from the stair before reaching it. It would often turn parallel to the edge. In this case, due to Roomba's width, the IR turret on Roomba would then rotate back out of the virtual wall's beam and Roomba would then follow the edge of the beam to clean as close as it could to the edge of the stair.
Another cliff avoidance mechanism is a set of wheel drop sensors. When Roomba detects that a wheel has dropped far enough below the others, it will either back off and try to recover or if the wheel drops to far, Roomba will stop in place and declare a mission failure. This can happen if it runs up on some items on the floor and gets high centered or by running over the stairs as described above. Instead of just staying there and trying to get off forever, it will quit and call for help by beeping.
Before it declares itself stuck, Roomba may make some attempts to get itself unstuck. When Roomba bumps over objects that are just shorter than its front bumper, it may get high centered for awhile but if it detects that is is still moving and the wheels have not dropped, it will continue to work its way off the obstacle by randomly turning and trying to go forward and backward. Overall, it does a pretty good job of not being a bother by getting stuck too often.
The drive wheels are far enough apart such that Roomba cannot do stairs. A wheel will drop and it will quit.
Docking. For models with a dock, Roomba can dock itself for a recharge when it needs it. The dock projects two IR beams in a V shape. The beams are apparently coded so that Roomba can tell them from a virtual wall. When Roomba wants to dock, it will find one of these beams and follow it back to it's source by tracing the inside edge of the V. It tries to stay out of the beams so that it will follow the V gap between them. This V will lead it right back to the dock. In the case where it doesn't hit the dock at an adequate angle, it will back off, turn around and try again. Docking can be forced by manually driving Roomba back near the dock with the remote control or by pushing and holding the "clean" and "spot" buttons on Roomba together. It will then abandon it's cleaning program and search out the dock. Manual docking mode is indicated by the "spot" and "clean" buttons flashing rapidly together. Docking behavior is indicated by Roomba turning and dancing in front of the dock.
The docking behavior doesn't work every time. Sometimes Roomba simply runs out of juice while is too far from the dock and Roomba stops in place. At this point, it won't do anything and it must be picked up and placed on the dock. The docking mode will work best if the dock is positioned in a location where the IR beams sweep out toward the center of a room so that Roomba will tend to run across them in its travels. The range of the beams is something less than 8 feet. The IR beams from virtual walls can interfere with those from the dock. Make sure that the virtual walls are separated from the dock by at least 8 feet AND are not pointed back at the dock.
Roomba Bumper Cars. I set two Roombas loose in a constrained space to see how they would interact with each other. They do fine. Each treats the other as an obstacle such that if they collide at any angle, they will turn and head off in different directions.
Standby Power Drain. iRobot's instructions indicate that Roomba should be left connected to a charger when it is not in use. Even leaving Roomba disconnected from its charger for just one day will put a serious hurt on the battery. It would appear that Roomba's control electronics do draw significant power even when Roomba is off. If Roomba is to be left alone for extended periods, it might be better to remove the battery than to leave it trickle charging.
Roomba really isn't very smart. It has a set of behaviors that it applies to particular situations. There are some situations that it gets in that it cannot deal with gracefully. These are traps.
Wires, Cords and Shoelaces. Overall, Roomba is pretty gentle concerning wires that it may run across. It generally runs over them and goes on it's way. However, if the wire is very flexible, like some telephone wires or long strings like shoelaces, it will wrap them up around the brush and stall. Once, it found a 6" long thread from a carpet and wound it up. Since one end was still attached to the carpet, Roomba winched itself to a halt. If you hear an abrupt change in the sound Roomba makes, it has probably found something bad and needs attention.
Throw Rugs. Roomba really doesn't like throw rugs, especially on hard floors. Most of them are too light and Roomba either rolls the edge over when it tries to cross onto one or its wheel traction bunches up the rug into a wad beneath it and Roomba will stall. On a really heavy rug or doormat Roomba will do better. These are the ones with a heavy rubber backing and a rubber border. If Roomba has difficulty with a throw rug at all, it would be best to pick it up while Roomba is running. It might be a good time to take it outside and beat the dirt out of it anyway.
Low Overhangs. Roomba is about 4" high. There are usually things around your house that are just the same height. Roomba can drive under these things and get stuck. A round rung between chair legs is one example. If the rung is just the right height, the IR turret on the front of Roomba's bumper can slip under it and the round profile of the rung can drive Roomba's front end down before Roomba can react and back up. It may get wedged and not be able to work itself out. I have some wall heaters that are just high enough so that Roomba can slide underneath but in some spots, when the turret gets beyond the metal edge, Roomba's front end pops up just a little and it gets caught behind the edge. I put a piece of 1x6 pine underneath the heater so that Roomba will bump the wood piece before it can get underneath the heater.
Clothing. My teen aged boys tend to leave clothing just about anywhere. A sweatshirt piled on the floor can become a Roomba trap. Roomba can run up on the pile and wad up the cloth underneath it, similar to a throw rug, and get stuck. It may be necessary to scout a room for such hazards before Roomba is cut loose.
Roomba must be watched for awhile when it is exploring a new room so that these traps can be identified and mitigated with something solid or a virtual wall. Once that is done, Roomba can be left alone to do its work.
There are some things that Roomba does not do right, usually when it it plugged up with lint or other debris.
When Roomba stops for no apparent reason, it may issue an error code in the form of a series of beeps. These can be decoded through the table at the iRobot Troubleshooting page. Most of the errors are a result of Roomba being clogged with debris.
Continual Backing. Sometimes Roomba will get into a mode where it will stop, turn, back, stop, turn, and back forever. This is typically caused by a cliff sensor getting plugged with lint. This usually happens to the right one (under the horizontal brush). When this happens, Roomba is fooled into thinking that it is continually running over a cliff and it is trying to avoid a fall. The sensor is composed of and IR emitter and an IR receiver (the clear plastic lenses up inside 4 slots around the front). Both are focused at a spot that would be around floor level. Roomba is expecting a reflection from the floor. If Roomba actually drives to a cliff, the floor drops away and there is no reflection, therefore a "cliff" is detected. If too much lint gets up into the slot between the IR devices, the IR energy is absorbed or scattered before it can be reflected to the receiver and Roomba also interprets this as a cliff.
Some Roombas will also go into a continual backing mode if something inside (don't know what) gets contaminated with dust. Often they can be returned to service by blowing out the front section with canned air or some blasts with compressed air. Direct the high pressure air all around under and behind the bumper to blow out the dust that accumulates inside.
Roomba #9 (a used one I got from my father in law, he was tired of replacing batteries), had some different issues. One was the tendency to drive for a couple of feet and then spin in place between half and 3/4 the way around and then repeat. The canned air (Dust Off) treatment helped but did not fix it. It took repeated blasts of compressed air behind the bumper at 100 psi from many angles to finally get it to behave.
The Roomba Discovery SE models (dark gray) apparently have difficulty with some carpets that the Roomba Discovery (white) can handle fine. I had two white ones and two gray ones. Both white ones handled a mildly sculpted carpet without difficulty. Both gray ones would get confused by the carpet surface and think that they were driving off cliffs even though they weren't and they'd go nuts trying to back away from a phantom cliff. Since there are no sensors in back, the gray Roomba can then back into things, or even over a cliff, with generally bad results. As shown in the Roomba 3 movie below, I taped over the sensors with duct tape and the backing behavior vanished. However Roomba couldn't be used this way unless there was no cliff hazard.
Loss of Wall Hugging Mode. This one is also caused by an IR port being blocked. Look at the two holes on the right side of the bumper and make sure that they are clear.
Changes of the Running Sound. If the noise that Roomba makes changes abruptly, it has probably found something that it cannot toss back to the dust bin. Stop it immediately, flip it over and pick out whatever it cannot digest.
Jerky Movement. If Roomba starts up with a jerky forward movement, possibly jerks side to side and then quits, the wheel sensors are probably dirty. Use compressed air, or blow as hard as you can, around the wheel areas to blow out the dust.
3 Second Pauses. If Roomba suddenly stops with all lights out, then picks up again in about 3 seconds as if nothing had happened, this is also an indication of a wheel sensor problem. Blow the dust off the wheel mechanisms as above.
Loss of Run Time. A new Roomba will run up to 2 hours on hard floors, maybe 90 minutes on a tight or low pile carpet and less on softer surfaces. However, eventually the battery will degrade and the run time will become gradually worse until Roomba won't run at all. You can try to "recondition" the battery pack by allowing Roomba to charge fully and then run it until it dies. Then allow it to charge for 3 days and repeat this cycle, maybe several times. You MAY get some more life out of the battery, but do not expect miracles. A battery that is starting to lose capability is doing so because it is internally damaged or degraded. You can't fix this, you can only reverse part of the damage and forestall the battery's total death for a while.
Rechargeable batteries are inherently unreliable. Most will not last 2 years, some will die well before then. It doesn't matter much what technology the battery uses, ALL of them will die in much less time than we would like. Deal with it, you are going to have to replace the batteries at some considerable expense eventually. The NiMH technology used by iRobot is probably the has the best cost/performance characteristics for Roomba's kind of service. Until somebody invents a perfect battery technology, don't expect this to get much better.
Also note that ALL batteries have been reclassified as toxic waste in most states and cannot be just thrown in the trash. They must be disposed in a proper manner. Save all the dead ones, regular non-rechargeable ones too, in a plastic box (in case a dead one leaks some nasty stuff) and take them to a proper toxic waste recycler. You'll be amazed at the number of alkaline, cell phone, laptop computer, Roomba, power tool and other kinds of batteries that you will collect in just a year's time.
Run time can also be degraded by high loads. Hair and other junk wrapped around the brush bearings (the side brush too) can cause the bearings to bind and increase the motor loads which cause the motors to draw more current and flatten the battery even faster. Carpets take more work to drive over. This is the main reason why Roomba has shorter run times on carpet.
Missing Visible Dirt. Roomba relies on its main brush to sweep loose dirt into the dustbin. If the brush gets clogged (usually with hair and carpet fibers), it will become ineffective in pickup up particles. Flip it over, remove the brushes and clean them. While you have the brushes out for cleaning, look around for crud packed all around Roomba and pick it out.
Failure to Dock. Roomba needs to be able to see the IR beams from the dock in order to find it. It does not remember where the dock is. These beams reach out only 8' or so so that Roomba must drive through one while it is actually looking for the dock. This happens when the battery gets low, but Roomba may not start looking until the battery is near dead so it won't have much time to find the dock. Place the dock so that the V shaped IR beams sweep across a region that Roomba tends to travel through so that it will have the best chance of stumbling across it's dock during the short period that it is actually looking for it. You can test the docking behavior by using the remote control to drive Roomba near it's dock. As soon as the Spot and Clean lights start to flash, it's found the dock. Let it drive to the dock by itself.
If Roomba typically makes several passes at docking before it succeeds, there is something about the position of the dock that it doesn't like. There may be reflections of the docking beam from nearby objects. Try changing the angle of the dock or try another location. Roomba may also fail to dock if the charger contacts are dirty and Roomba doesn't detect the charger soon enough. Clean the posts on the dock and the two metal plates on either side of the front wheel.
The newer Roomba's with the caster front wheel do not dock properly with an older style dock. If you have a newer style, use the dock that came with it.
Roomba and Electrostatic Discharge (ESD). As Roomba drives around it can be an ideal electrostatic generator. It's plastic and rubber brushes rub on insulating floors and carpets. Roomba can pick up quite a charge. I've noticed a healthy spark on some occasions when I plug a charger into it. I also sometimes hear a load pop in my computer speakers when Roomba makes contact with it's dock. Sometimes, after seeing a good spark, the Roomba will just play dead. I think that the discharge probably crashed the control computer and made it non-responsive. Removing the battery for a second or two and plugging it back in seems to bring Roomba around.
The IR (infra red) signals that Roomba uses to avoid the virtual walls and docks can interfere with each other and other completely unrelated IR devices. The signals emitted by the dock and virtual walls can jam each other if the devices are placed too closely together. Roomba will see some of each and get confused. The dock and virtual walls will also interfere with the IR remote. If you try to drive Roomba near a virtual wall, it will see both and may just stop. If you try to drive Roomba near the dock, it will see some of the docking beams and start it's docking program.
The IR emitter on the Roomba dock does interfere with the Schedular remote. To program Roomba with the Schedular remote, the dock must be unplugged to shut off the IR beams, or Roomba must be moved 8 ft or more from the dock, or a view block (like a hand) must be placed between the Roomba IR turret and the dock's IR turret.
In the same fashion, the virtual walls and the dock can also jam TV remote controls. Place these devices such that they are far away from a TV set or such that the IR signal is shadowed so that it doesn't shine in the direction of a TV or your TV remote control may not work. A virtual wall definitely impacts the performance of my Zenith TV's IR remote and the Apple iMac's IR remote.
One of my docks appeared to have failed, every Roomba would approach it from an angle offset too far to the right. It was in warranty so iRobot sent me another one, but I determined that one of the docking LEDs had failed simply via observation with a video camera. Most digital and video cameras are sensitive in the infrared (IR) so that these cameras can "see" the IR LEDs. I was able to determine that the right docking LED was simply dead just by looking at it with my video camera.
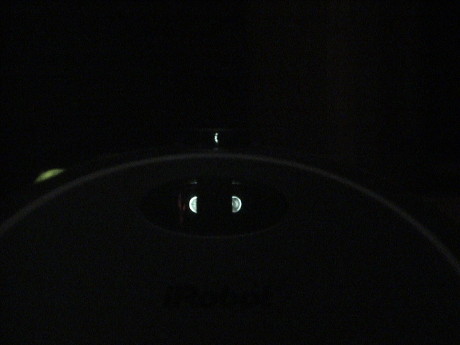 This is a photo, taken in a
darkened room, of a good Roomba dock. There are two LEDs visible in
the oval window, each is partially shadowed by a mask that blanks
out a region directly in front of the dock. Roomba follows the dead
region between the main beams right back to the dock. Also visible
is a dimmer IR beam in the turret lens. This signal is used by
Roomba to allow Roomba to avoid bumping into the dock from any
angle.
This is a photo, taken in a
darkened room, of a good Roomba dock. There are two LEDs visible in
the oval window, each is partially shadowed by a mask that blanks
out a region directly in front of the dock. Roomba follows the dead
region between the main beams right back to the dock. Also visible
is a dimmer IR beam in the turret lens. This signal is used by
Roomba to allow Roomba to avoid bumping into the dock from any
angle.
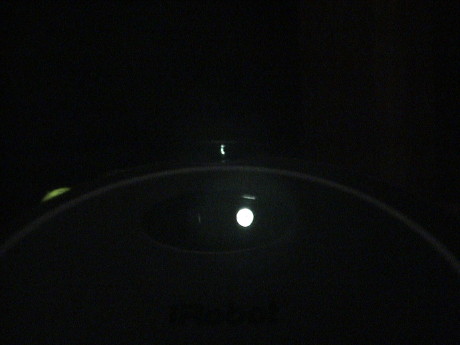 Offsetting the camera to the
right causes the right side docking LED to become fully visible and
the left one is completely masked. On the bad dock, the right side
LED just didn't work at all.
Offsetting the camera to the
right causes the right side docking LED to become fully visible and
the left one is completely masked. On the bad dock, the right side
LED just didn't work at all.
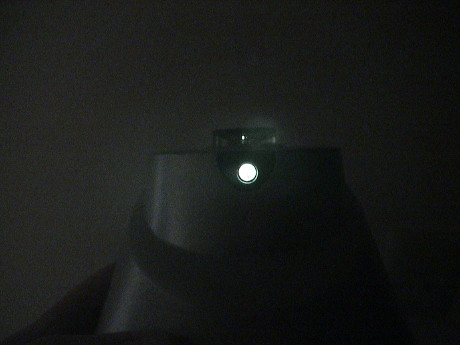 A regular virtual wall has a bright
pencil beam and a dimmer beam coming from the turret lens. It's
these IR beams that can cause interference with other IR
devices.
A regular virtual wall has a bright
pencil beam and a dimmer beam coming from the turret lens. It's
these IR beams that can cause interference with other IR
devices.
I shot some clearly much-less-than-professional video of Roomba in action showing some of its behaviors. There are three videos edited down 3 to 5 minutes. Roomba 1 covers portions of an hour of activity of one complete cleaning cycle. Roomba 2 is of the Discovery SE model showing some of its different behaviors. Roomba 3 shows some odd behaviors of the Discovery SE model on a particularly difficult carpet.
I've now got lots of server space and bandwidth so I encoded the movies in several formats using iMovie. The table below will allow you to pick a format most suitable to your own internet bandwidth and movie player software.
All of these formats will play in Quicktime for the Mac or PC. Some may play in PC video players. If you want Quicktime, you can get it with the latest version of iTunes (which includes Quicktime) for the Mac or PC at Apple.com. Click on the iTunes tab at the top of the page to get a free download.
| Movie Title | Video Quality | File Type | File Size | Codec | Frame Rate (fps) | Frame Size | |
|---|---|---|---|---|---|---|---|
| Size | MB | ||||||
| Roomba 1 | small picture, low frame rate, highly compressed sound | .mov | small | 3.3 | H.263 | 12 | 240 x 170 |
| excellent quality, small picture | .mov | large | 7.7 | H.264 | 30 | 320 x 240 | |
| watchable, good sound | .mp4 | larger | 9.8 | MPEG-4 | 30 | 352 x 288 | |
| larger but not well rendered, lots of video rendering artifacts | .avi | even larger | 59.9 | cinepak | 30.27 | 720 x 480 | |
| Roomba 2 | small picture, low frame rate, highly compressed sound | .mov | small | 3.2 | H.263 | 12 | 240 x 170 |
| excellent quality, small picture | .mov | large | 6.4 | H.264 | 30 | 320 x 240 | |
| larger but not well rendered, lots of video rendering artifacts | .avi | even larger | 54.1 | cinepak | 29.97 | 720 x 480 | |
| Roomba 3 Bad Behavior |
small picture, low frame rate, highly compressed sound | .mov | small | 4.2 | H.264 | 12 | 240 x 170 |
| excellent quality, small picture | .mov | large | 13.7 | H.264 | 30 | 320 x 240 | |
My first Roomba, a white one, died during one cleaning cycle. When I went to empty the dust bin, there was nothing in the top part of the bin. I then realized that the brushes weren't turning, the gearing had stripped. The easiest way to test for this is to remove the dust bin and let Roomba drive away. Look at the, now exposed, main brush to see if it is turning or not.
The unit was still within its 90 day (reconditioned) warranty so I called iRobot and they said that they would replace it. The replacement hasn't returned yet because, as of today, the broken one hadn't been delivered to their repair depot.
This one had the most miles on it, but I am still concerned that it had experienced a mechanical failure so soon, after just over 2 months of use. We'll see how the others hold up.
A new Roomba purchased at retail carries a 1 year warranty.
The replacement Roomba arrived on 31Mar06. This is an entirely new Discovery model, not a referb or repair. It appears to be identical except that the brush assembly is molded in yellow plastic and the side brushes are white. There is only one dirt detector sensor instead of two in the older ones. It also has the programming interface built in. It works fine.
It's been six months since the first Roomba invaded my house and now there are four of them, three at my home and one at my mountain cabin. The big vacuum cleaners hasn't been heard from since that fateful day although a DustBuster does get used on the stairs once in a while.
As time has gone by, the amount of dirt picked up by each has changed character and, for the most part, materially decreased in volume. The three Roombas at home run automatically twice a week, each as an area that it covers divided by stairs. One is used occasionally on two other small areas, also divided by stairs. The table below summarizes the status each Roomba.
| Roomba | Model | Status | Areas Covered | Typical Dustbin Contents | Notes |
|---|---|---|---|---|---|
| Roomba #1 | Discovery | RIP | died after two months, replaced under warranty by Roomba #5 | ||
| Roomba #2 | Discovery SE | RIP | Died and replaced with Roomba #6 | ||
| Roomba #3 | Discovery SE | ill as of Jan 09 | brush motor appears to be weak. The brush doesn't run at full speed and Roomba starts to act funny and shut down. | ||
| Roomba #4 | Discovery | good order | very old sculpted carpet, small area of hard floor at entry | dust, dirt and crumbs | Lots of decomposed granite particulates tracked in from outside. |
| Roomba #5 | Discovery | charging difficulties | newer green carpet | mostly green carpet fibers and dust, little else | This one has lost the ability to charge it's battery as of May 07. |
| Roomba #6 | Discovery SE | good order | living room green carpet | was starting to fail with wheel sensor problems, but a blast of compressed air around the drive wheels seems to have fixed it. | |
| Roomba #7 | Discovery Scheduler | new May 07 died Nov 09 |
Died in Nov 09, failed brush motor | ||
| Dirt Dog #1 | Dirt Dog | brand new (6Jun07) | runs wherever needed | shop debris, lots of dust | |
| Roomba #8 | Discovery Scheduler | brand new (17Jun07) | sparing Roomba #3 in the family room, #3 becomes a hot spare | combination of hard floor and old tight pile carpet | Dust, dirt, crumbs, dirt, pretzels, candy wrappers, coins, Nerf darts |
| Roomba #9 | Discovery, Green | used May 2010 | replaces Roomba #7 | combination of hard floor and old tight pile carpet | Dust, dirt, crumbs, dirt, pretzels, candy wrappers, coins, Nerf darts |
In the beginning, the brushes on each of them had to be cleaned at least every cycle, sometimes twice in one cycle. As time as worn on and most of the brush clogging stuff has been picked up, the brushes will go a month or more without requiring attention.
Alas, the second Roomba has also died. It picked up a tie string from a newspaper that got wrapped around a wheel and the brushes. This stalled the brushes. Roomba is supposed to be able to detect stalled brushes and shut down, but apparently it didn't as the battery was dead and the dust bin was empty indicating that the robot has run long enough to drain the battery without picking up anything. The brush gearing is still ok, but the motor or its immediate reduction gear is frozen.
This time the Roomba is out of warranty. I called iRobot and their policy with dealing with out of warranty repairs is to replace the robot with brushes for $95 plus tax. I keep the old battery and all of the accessories, they replace just the robot itself.
The replacement Roomba Discovery SE arrived a couple of days ago in good order. It is a brand new unit. This unit only carries a 60 day warranty. Unlike the other Discovery SE models, this one handles the troublesome carpet fine. The cliff sensors may not be set to be quite so sensitive as the other ones.
It's been a full year since the first Roomba arrived. The full size vacuum hasn't ventured from it's closet since them. There are still four Roombas in service. Two have failed, both main brush problems, and were replaced, one for free under warranty and one out of warranty for $95. One battery has also died and it was replaced for $50. Three of them run 2 days a week. The fourth one runs when manually started. Most often, they get stuck somewhere before they finish their routine, but in general, they do well enough to keep things clean.
Costco began carrying the Roomba Scheduler set for about $260.
The biggest routine maintenance problem is cleaning of the main brushes which has to be done every couple of weeks. The next issue is that lint packs up around the bumper, brush assembly and cliff sensors. It needs to be cleaned out occasionally.
While cleaning the paddle brush, one has to be careful that the little yellow bearing piece doesn't fall off as it will on some versions. I accidently dropped one in the trash while cleaning the brush one time. It fell into a Doritos bag and it took me awhile to find it again.
There are some things that the Roomba finds that it cannot digest. Cords are a common problem. It partially consumes telephone cords, iPod and cellphone charger cables left dangling, and ethernet cables. Playing cards and other large pieces of paper and cardboard can give it troubles. Pistachio nut shells seem to be just the right size to be picked up and jam the paddle brush. It doesn't seem to have any problem with Nerf darts or screw on bottle caps which are much bigger than the pistachio shells.
I've had no more big time stairway tumbles, but sometimes they go off the two step transitions in my entry hall.
Overall, Roomba is a success.
Costco applied a $50 rebate to the $260 Scheduler set making it $210. By the time I decided to get one to spare out one that is starting to fail, they were gone from the local store. I ordered one from Costco.com but it was $10 more with no shipping charge. It arrived yesterday in good order. This one comes with the robot, a Scheduler remote, 2 Scheduler virtual walls, a dock and a spare brush set. I needed the battery anyway because the one in the upstairs Roomba is dying.
Roomba #6 which was doing service in the living room sometimes just stops for 5 seconds or so, then it picks up and moves along as if nothing had happened. iRobot says that this is a symptom of a failing wheel drop sensor. However, as long as it still works, it'll be a spare. The new Roomba Scheduler will take over in that room.
I went to Costco today and they had the Scheduler sets again for $210. I bought the last one so that I could put an older Roomba (sans warranty) aside as a spare. However, Roomba #5 died at about the same time. I could spend $100 (including shipping) and get it replaced again, or I could spend $210 and get a new one with a full year warranty including another battery, a set of spare brushes, more virtual walls, another charger and dock and the scheduler remote. I didn't actually need most of this stuff, but the Roomba, battery and brushes total about $180 anyway so I bit.
The first Scheduler was blue gray in color and pretty much the same as a Roomba Discovery except for the color. The new Scheduler is gray and looks just like a Discovery SE except that it has the revolving front caster like the Dirt Dog. The older blue Scheduler has two dirt detect sensors, the newer gray one has only one sensor.
While the Roombas that I have are pretty much the same, there are differences. iRobot is clearly tweaking their product line. This table summarizes the differences between these robots. I am guessing that there are even more variants out there too.
| Roomba | Model | Buttons | Color | Dirt Detect Sensors |
Front Wheel Swivel? |
Notes | |||||
|---|---|---|---|---|---|---|---|---|---|---|---|
| Name | Number | Qty | Shape | Upper Body |
Lower Body |
Bumper | Brush Assy |
||||
| Roomba #1 | Discovery | 4310? | 4 | round | white | blue | light gray | black | 2 | no | model number uncertain |
| Roomba #2 | Discovery SE | 4210 | 4 | grouped | dark gray | light gray | light gray | black | 2 | no | |
| Roomba #3 | Discovery SE | 4210 | 4 | grouped | dark gray | light gray | light gray | black | 2 | no | |
| Roomba #4 | Discovery | 4211 | 4 | round | white | light gray | light gray | black | 2 | no | |
| Roomba #5 | Discovery | 4211 | 4 | round | white | light gray | light gray | yellow | 1 | no | |
| Roomba #6 | Discovery SE | 4221 | 4 | grouped | dark gray | light gray | light gray | black | 1 | no | |
| Roomba #7 | Scheduler | 4330 | 4 | round | blue/gray | light gray | light gray | yellow | 2 | no | |
| Roomba #8 | Scheduler | 4225 | 4 | grouped | dark gray | light gray | light gray | yellow | 1 | yes | |
| Dirt Dog #1 | Dirt Dog | 1100 | 1 | oval | yellow | black | black | yellow | none | yes | no vacuum function either |
I've had one Roomba EPS battery fully die and another was the process of dying last week but now it is totally dead too. These are, coincidentally, the two oldest ones, now only 18 months old and used roughly twice a week. iRobot has materially increased the list price of the batteries. The last one I bought cost $49.99. Now they are $69.99. However, Amazon.com still has them for $39.99 so I ordered two for stock. Like all rechargeable batteries, the EPS power packs will die with use but with a battery life of 18 months, this can get expensive.
The battery should be rebuildable. There are sites on the internet that indicate that the batteries contain just 12 NiMH sub-C cells. It would be easy to replace them except for the funny fastener that iRobot uses to hold the pack together. I'm going to have to make some stops at some tool supply stores to see if I can find one of these 3-point tools. Replacement sub-C cells can be found at Hosfelt or The NiCad Lady. The price varies but should be about $3 each for 3000 mAh cells.
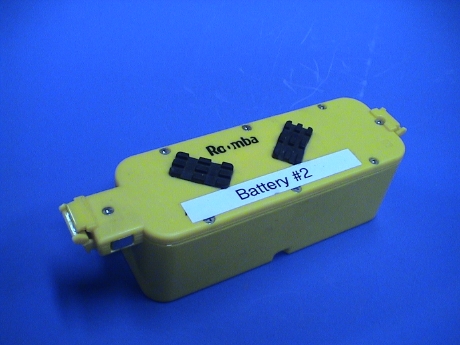
A couple of days ago, I ordered two more APS batteries from Amazon.com (currently $39.99, free shipping). The batteries arrived today. Coincidentally, when I got home from work, Roomba #3 was showing red after being on the charger all day. It's battery had died in place. This was Battery #3. My first three Roomba batteries have gone belly up after an average of 16 months of service. The text that follows documents this sad saga. Each Roomba and it's battery got a number and a label so that I could keep track of them.
Roombas #1 thru #4 were reconditioned sets (Amazon.com, $160) that came with new batteries and 90 day warranties.
After only 60 days, Roomba #1 died with stripped brush gears. It was replaced under warranty by Roomba #5 which then got Battery #1.
After 6 months, Roomba #2 died with a frozen brush motor. It's battery went to Roomba #6 which was purchased as an out of warranty replacement.
At about one year, Battery #1 died and was replaced by a newly purchased Battery #5 which went into Roomba #6. Roomba #5 got Battery #2 which wasn't feeling particularly well but this Roomba had the least work to do so that it could tolerate a less than ideal battery.
At about 18 months, Battery #2 in Roomba #5 died. Battery #5, which was in Roomba #6, got put back into Roomba #5 as Roomba #6 was taken out of service and was replaced by Roomba #7 (new Scheduler robot purchased from Costco 18May07). Roomba #6 is having minor wheel sensor difficulties so that Roomba #7 will do the day to day work as long as it's warranty lasts and Roomba #6 will serve as a spare.
On 20May07, two new batteries were purchased from Amazon.com for $40 each. Both of these new batteries arrived today.
Also today, Battery #3 which was in Roomba #3, died. It gets new Battery #8. Roomba #6 gets new Battery #6.
Roomba battery death can be slow or sudden. Batteries #1 and #3 just stopped working suddenly. The charger will show two green lights, but the light around the power button just stays red, never achieving an indicated charged state. Battery #2 died more slowly over a period of months. It would charge up, but the charge indicator would turn yellow shortly after it left the dock. Finally, it acted like #1 and #3, it would not indicate a charged state.
I might take a whack at rebuilding one of the first three once I fabricate a tool to get the little buggers open.
It would appear that there is something else going on with the Roomba batteries. I recharged all the batteries in Roomba #7 and tested them all in Roomba #7. Battery #5 is in good shape but Roomba #5 is having difficulties charging batteries due to an internal fault. In any event, I do really have some dead batteries. I tested then all in Roomba #7 over the same room so that the load should be about the same. I ran each battery into the ground and timed Roomba's run.
| Battery | Approx Purchase Date |
Run Time | Notes | |
|---|---|---|---|---|
| Date | (min) | |||
| 1 | Jan06 | 24May07 | <<1 | Dead in less than 10 sec |
| 2 | Feb06 | 24May07 | <<1 | Dead in less than 10 sec |
| 3 | Feb06 | 24May07 | 30 | Went yellow almost immediately |
| 4 | Mar06 | 9Jun07 | 83 | This one lives in a different house but still works fine |
| 5 | Nov06 | 24May07 | 70 | This is the first replacement battery and it is still doing well |
| 6 | 22May07 | 28May07 | 81 | works fine |
| 7 | 19May07 | 24May07 | 73 | works fine |
| 8 | 22May07 | 28May07 | 78 | works fine |
| 9 | 6Jun07 | 9Jun07 | 84 | Gray APS battery that came with the Dirt Dog |
| 10 | 17Jun07 | TBD | TBD | Yellow APS battery that came with Roomba #8 |
After I ran the test on Battery #5, I checked Roomba's temperature with an IR thermometer. I could see enough of the brush and wheel motors to get a reading of 130°F on each wheel motor and up to 160°F on the brush motor. These readings are only relative. Since the spot size of the IR thermometer is a little larger than the visible parts of the motor cases, the thermometer averages the cooler background in it's field of view. The actual motor temperatures are probably hotter yet. While this sounds pretty hot, I expected worse.
I've had a 3 day weekend with not much else on the agenda, so I ran some more detailed battery life tests. I have 6 Roomba's and 7 batteries, 6 batteries nearly new and one is clearly hurting. I also have a rebuilt one, #1, that was a total dud but now works fairly well. See later in the page for the rebuild info.
First, each Roomba was cleaned of all dust and hair on the brushes and brush bearings. I suspected that the previous test was affected by some of this extra load, especially under the side brush where I found some pretty significant crud. The test was done by charging up all the batteries and then running the Roombas together in a 10' x 16' area with high density flat surface pile carpet. The Roombas were all started together with a remote control and allowed to run until the batteries ran flat. This cycle was repeated enough times until every Roomba had run on every battery. Since the surface used is the same for every case, the load on the Roombas should be fairly consistent.
| Roomba Number |
Battery Number | ||||||||||
|---|---|---|---|---|---|---|---|---|---|---|---|
| #1(1) | #2(2) | #3 | #3(3) | #4 | #5 | #6 | #7 | #8 | #9 | #10 | |
| Run Time (min) | |||||||||||
| Roomba #3 | 50 | 8 | 40 | 87 | 95 | 89 | 86 | 89 | 85 | ||
| Roomba #4 | 24 | 86 | 88 | 86 | 85 | 92 | 79 | 91 | |||
| Roomba #5 | 29 | 88 | 91 | 92 | 85 | 92 | 87 | ||||
| Roomba #6 | 60 | 30 | 90 | 96 | 93 | 86 | 90 | 92 | |||
| Roomba #7 | 19 | 83 | 86 | 81 | 79 | 78 | 84 | ||||
| Dirt Dog #1 | 30 | 107 | 113 | 115 | 105 | 110 | 112 | ||||
| Roomba #8 | 85 | 94 | |||||||||
| Notes | (1) | Battery #1 was totally dead, rebuilt 24 Jun 07 with 3 new cells | |||||||||
| (2) | Battery #2 was totally dead, rebuilt 28 Aug 07 with 2 new cells | ||||||||||
| (3) | Battery #3 was weak, rebuilt 29 Aug 07 with 1 new cell | ||||||||||
A few things stand out from this data. Battery #3 is near death and is unstable. Roomba #7 must draw more current than the others as it has consistently lower run time by a few minutes. Also Battery #7 doesn't appear to have the same capacity as the others. Dirt Dog probably draws less current than Roomba due to the lack of a vacuum motor, therefore it runs longer.
Overall, I think that the Roomba 400 Series batteries do not last long enough. When new, their run time is fine, but after a year or so, many of them seem to die. I have some anecdotal evidence that if Roomba is NOT left on it's charger and the battery is pulled out instead, the service life of the batteries is materially improved. I think that just sitting on the charger is actually cooking the batteries.
A serviceable Roomba battery should run for up to 90 minutes or so and stay in the "green" power button state for a half hour or more. One with a failed cell will usually drop out of the "green" state in just a few minutes, or even start in the "yellow" or "red" state.
 My first two Roomba batteries are totally
dead, Roomba runs for less than 10 seconds on these two. This
indicates that there is at least one dead cell in each battery.
Since high capacity sub-C cells cost about $3 each, rebuilding a
whole pack is not very cost effective as long as new packs are
available on Amazon.com for $40 total. However, if only a few cells
are dead, then a pack may be recoverable at lower cost by replacing
only the bad cells. A pack rebuilt this way cannot be expected to
perform like a new pack, but at least the pack will regain some
functionality at a much lower cost that replacing all the cells.
Further, instead of 12 cells going into a landfill somewhere, only
a few will be discarded until the whole pack goes belly up.
My first two Roomba batteries are totally
dead, Roomba runs for less than 10 seconds on these two. This
indicates that there is at least one dead cell in each battery.
Since high capacity sub-C cells cost about $3 each, rebuilding a
whole pack is not very cost effective as long as new packs are
available on Amazon.com for $40 total. However, if only a few cells
are dead, then a pack may be recoverable at lower cost by replacing
only the bad cells. A pack rebuilt this way cannot be expected to
perform like a new pack, but at least the pack will regain some
functionality at a much lower cost that replacing all the cells.
Further, instead of 12 cells going into a landfill somewhere, only
a few will be discarded until the whole pack goes belly up.
The battery consists of 12 sub-C NiMH cells wired in series and a thermal sensor referenced the the negative lead of the battery pack. The thermal sensor is there so that Roomba knows when it has fully charged the pack. When the pack becomes fully charged, it will start to heat. There is also a circuit breaker in the pack to protect it against short circuits. NiMH cells have pretty good surge current capability and a shorted pack without overcurrent protection can easily do some serious damage, maybe even cause a fire.
 The first difficulty in getting the
pack apart is that iRobot uses an odd "tamper-proof" tool to
assemble it. The triangular keyed screws are very uncommon and I
could not find a tool anywhere that would fit them. Unlike other
tamper proof screws, a tool to fit these is fairly easy to
fabricated from a regular Allen key. A 3/32" Allen key looks like
the best starting point, but I didn't have one so I started from a
7/64" Allen key and carefully ground down the end with a Dremel
tool until it fit. Once the 8 screws are out, the lid can be
carefully pried off by breaking some weak glue joints. Some packs
may be glued shut more than others, these take a little more work
to get apart.
The first difficulty in getting the
pack apart is that iRobot uses an odd "tamper-proof" tool to
assemble it. The triangular keyed screws are very uncommon and I
could not find a tool anywhere that would fit them. Unlike other
tamper proof screws, a tool to fit these is fairly easy to
fabricated from a regular Allen key. A 3/32" Allen key looks like
the best starting point, but I didn't have one so I started from a
7/64" Allen key and carefully ground down the end with a Dremel
tool until it fit. Once the 8 screws are out, the lid can be
carefully pried off by breaking some weak glue joints. Some packs
may be glued shut more than others, these take a little more work
to get apart.
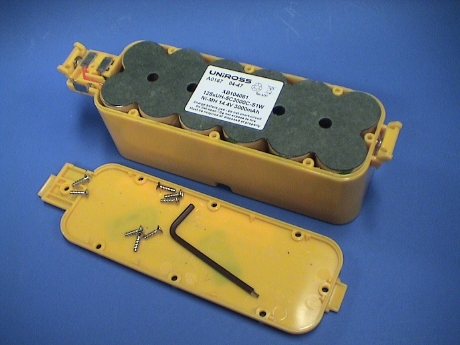 With the battery open, the cell
pack and the terminals will simply pull out of the housing.
With the battery open, the cell
pack and the terminals will simply pull out of the housing.
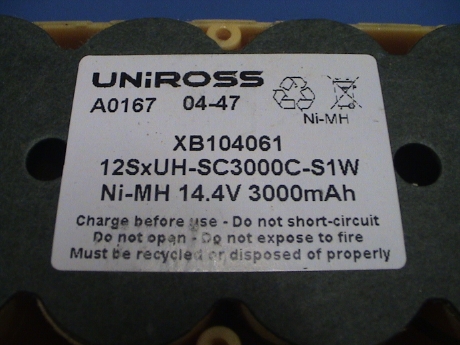 The label on the pack indicates a
capacity of 3000 mAh so a replacement cell should be selected with
that rating or higher. I used Panasonic
HR300SCP tabbed cells from
The NiCad Lady online store.
The label on the pack indicates a
capacity of 3000 mAh so a replacement cell should be selected with
that rating or higher. I used Panasonic
HR300SCP tabbed cells from
The NiCad Lady online store.
Panasonic also has some good application notes on the care and feeding of NiMH batteries, an overview and charging guide are available on Panasonic's OEM Battery web site.
 The pack has three terminals, red
is positive, black is negative and white is the thermal sensor.
This particular pack appears to have three dead cells. I partially
charged it from a power supply and a 10 ohm 20 watt resistor and
then used the 10 ohm resistor to discharge the pack. Ten cells have
a residual voltage on them during the discharge, two are zero
volts. I will fully charge the pack at about 500 mA and then try
that test again. Then I'll fully discharge and short out the bad
cells and recharge the remaining part of the pack to make sure that
the rest of it is still usable. Then I'll replace only the dead
cells.
The pack has three terminals, red
is positive, black is negative and white is the thermal sensor.
This particular pack appears to have three dead cells. I partially
charged it from a power supply and a 10 ohm 20 watt resistor and
then used the 10 ohm resistor to discharge the pack. Ten cells have
a residual voltage on them during the discharge, two are zero
volts. I will fully charge the pack at about 500 mA and then try
that test again. Then I'll fully discharge and short out the bad
cells and recharge the remaining part of the pack to make sure that
the rest of it is still usable. Then I'll replace only the dead
cells.
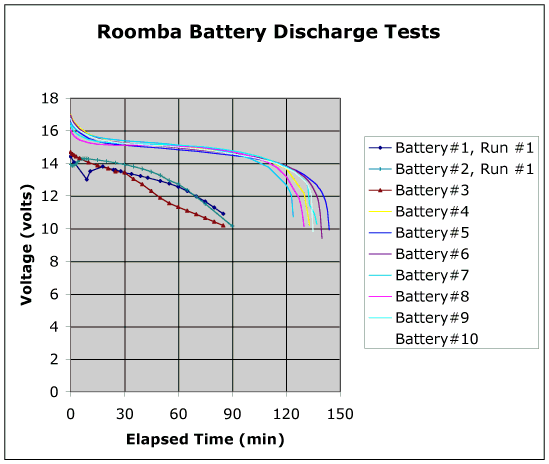 While Battery #1 was
apart, I put it on charge from a bench supply set to about 20 volts
with a 10 ohm 20 watt current limiting resistor. The charge current
could then be adjusted with the power supply voltage. The pack was
charged at about 500 mA for several hours and then trickle charged
at 100 mA for 6 days. The pack was the discharged through the same
10 ohm resistor (which got quite hot because it was dissipating a
full 20 watts) and the voltage on the pack and the individual cells
was monitored during the discharge. A 10 ohm load pretty closely
simulates the load that Roomba places on the battery when Roomba is
running on a hard floor.
While Battery #1 was
apart, I put it on charge from a bench supply set to about 20 volts
with a 10 ohm 20 watt current limiting resistor. The charge current
could then be adjusted with the power supply voltage. The pack was
charged at about 500 mA for several hours and then trickle charged
at 100 mA for 6 days. The pack was the discharged through the same
10 ohm resistor (which got quite hot because it was dissipating a
full 20 watts) and the voltage on the pack and the individual cells
was monitored during the discharge. A 10 ohm load pretty closely
simulates the load that Roomba places on the battery when Roomba is
running on a hard floor.
I found that the first 3 cells on the positive side of Battery #1 were running only 1 volt in the first few minutes, the rest of them were 1.25 volts where they should have been. Notice that the voltage dropped and then picked up again. This is very odd, it indicates that the internal resistance of one or more cells is changing in a unpredictable way. Further, at several points in the early part of the discharge, the pack voltage became unstable and fluctuated over a half a volt quite rapidly. After 30 minutes or so, the pack became stable and discharged without fluctuation. It should have held up it's output voltage better until the end of the discharge but the 3 weak cells were losing voltage. When the weakest cell was about a tenth of a volt, I terminated the discharge with the remaining 9 cells still maintaining 1.1 to 1.25 volts. The other two weak cells were about 0.25 volts.
Battery #1 should have run in Roomba for longer than 10 sec, however the instability in internal resistance may have allowed the pack voltage to drop below Roomba's cutoff voltage on some peak load. Both packs #1 and #2 would die as soon as Roomba backed off the dock at about the same time Roomba would have activated it's brush motor. The current spike may have dragged the voltage below the cutoff and caused Roomba to shutdown. Something is clearly different now as the pack can sustain a considerable load for over an hour where it's initial discharge test lasted less than a minute. It's going to go through another week long charge cycle and discharge test. The pack is clearly damaged but it might be partially recoverable.
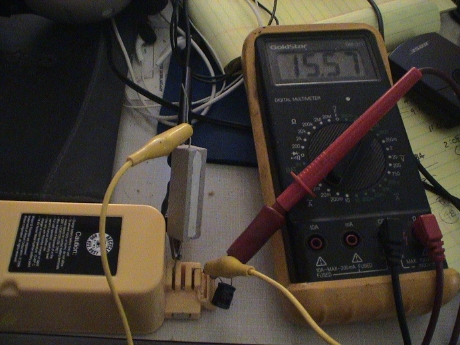 For reference, I have added a
similar discharge test data for several other batteries to the
graph. Except for Batteries #2 and #3, these do much better. They
look like a NiMH battery should. Under a constant load, the voltage
should decay rapidly to 1.25 volts/cell and then stick there for at
least 50% of the discharge time. Then the voltage will decay slowly
until the end where is just crashes as every cell gives up at the
same time.
For reference, I have added a
similar discharge test data for several other batteries to the
graph. Except for Batteries #2 and #3, these do much better. They
look like a NiMH battery should. Under a constant load, the voltage
should decay rapidly to 1.25 volts/cell and then stick there for at
least 50% of the discharge time. Then the voltage will decay slowly
until the end where is just crashes as every cell gives up at the
same time.
The capacity of a battery is the integral of the discharge curve. As an estimate, the average voltage is about 15 volts which implies 1.5 amp load current, more at the beginning, less at the end. The useful life is just 2 hours, so that this battery has an approximate capacity of 3000 mAh as stated on the label.
Batteries #2 and #3 are hurting, much like Battery #1. I suspect bad cells in all three of them. I've ordered some replacement cells and I'll work over #1 first since it is open already provided that it doesn't have some miraculous response to another deep discharge/trickle charge cycle. Such a response is highly unlikely.
The resistive discharge test is easy to apply to an assembled Roomba battery. The lead of the load resistor is pressed into one of the contacts and another wire is pressed into the other contact. The resistor sticks straight up to allow it to cool better, but be careful, the resistor will get VERY HOT. Mine has spots up to 600°F. I used a capacitor's lead for the other wire as it was sitting handy on my bench. The capacitor isn't doing anything but acting like a stiff wire. A clip lead is used to connect the other lead of the load to the other wire. A voltmeter is connected across the load to monitor the output voltage and the voltage is recorded every 5 or 10 minutes except at the very first and last part of the curve where it is recorded every minute.
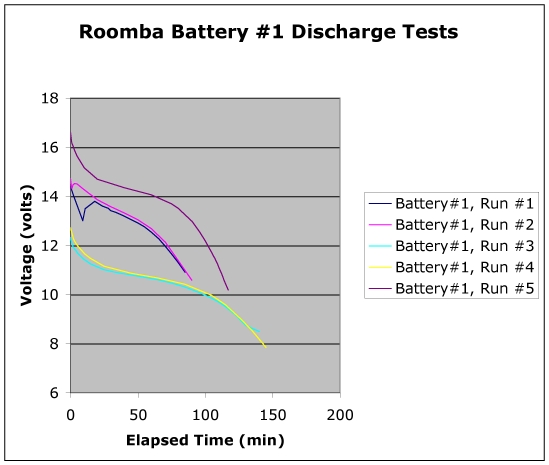 There is
some belief that a damaged NiMH battery pack can be "revived" but
running it through a few deep discharge/long recharge cycles. I
don't believe that this actually does any good and this data tends
to support that belief. Run #1 was after a deep discharge and a
week long trickle charge. Run #2 was after a 2nd deep discharge and
5 days of trickle charge. Except for the first part of the
discharge, the capacity of the battery is not materially changed.
That dip in Run #1 was probably the reason that Roomba shut off as
soon as it started it's brush motor. That part improved such that
Roomba MIGHT have been able to run through that, but beyond the
first few minutes, the battery is the same, badly hurting.
There is
some belief that a damaged NiMH battery pack can be "revived" but
running it through a few deep discharge/long recharge cycles. I
don't believe that this actually does any good and this data tends
to support that belief. Run #1 was after a deep discharge and a
week long trickle charge. Run #2 was after a 2nd deep discharge and
5 days of trickle charge. Except for the first part of the
discharge, the capacity of the battery is not materially changed.
That dip in Run #1 was probably the reason that Roomba shut off as
soon as it started it's brush motor. That part improved such that
Roomba MIGHT have been able to run through that, but beyond the
first few minutes, the battery is the same, badly hurting.
This battery has 3 obviously bad cells at the positive end. These cells warmed up quite a bit during the discharge, the other 9 did not. They also have nearly zero cell voltage, the others are above 1.2 volts. I've bypassed the first 3 cells and am charging the other 9. I'll then discharge the 9 cell pack to see if the other 9 really act like a NiMH pack, although at reduced voltage. If the other 9 cells are really still good, I'll cut the first 3 out and replace them. I can then see if I've got a real Roomba battery again. These cells are $3 each so that it is cost effective to spend $9 on a "hybrid" pack provided that the hybrid pack actually works.
Runs #3 and #4 are two essentially identical tests of the 9 cell pack. The voltage is lower because only 3/4 of the cells are there, but it looks more like an NiMH battery should. It isn't as flat during the majority of the discharge as the newer batteries, even these remaining cells are not in the best shape. There are several which are somewhat weaker than the best of them. This shows up in open circuit voltage at the end of the test and in cell temperature. Using an IR thermometer, the individual cells temperatures were measured. The warmer ones corresponded to the ones with the lowest voltage. This makes sense as when these cells start to develop higher internal resistance at the end of the discharge, they still see the full discharge current running through each cell. P=I2R. When the resistance increases, the power dissipated, and therefore the temperature, increases as well.
Run #5 is the result AFTER the pack had been rebuilt as described below. It's better than it was, but not as good as a new battery. The run time isn't as long on run #5 because the higher output voltage results in higher output current, therefore shorter discharge time.
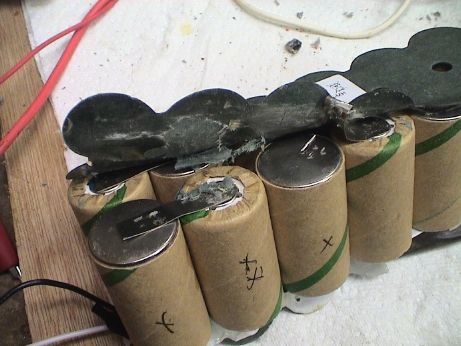 The pack is easy to disassemble.
The cells are strapped together with metal straps that are spot
welded to the cell terminals. It is easy to pry up the end of a
strap and then roll the strap up with a pair of needle nose pliers
to tear the welds. The cells can then be separated by gently prying
on the hot glue joints that hold them together.
The pack is easy to disassemble.
The cells are strapped together with metal straps that are spot
welded to the cell terminals. It is easy to pry up the end of a
strap and then roll the strap up with a pair of needle nose pliers
to tear the welds. The cells can then be separated by gently prying
on the hot glue joints that hold them together.
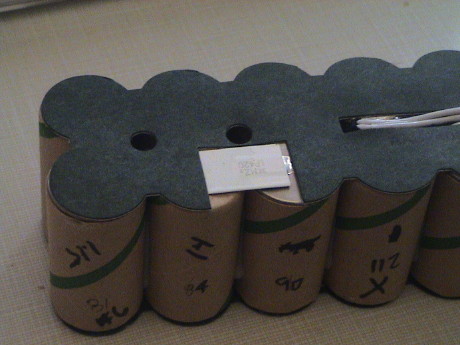 The white strip on the
bottom of the pack is probably a solid state circuit breaker. This
item is necessary to prevent the pack from possibly catching fire
if it is shorted out. If you have to replace one of the two cells
that it attaches to, very carefully peel up the contact strips from
the ends to break the welds. Try to leave the whole strip in one
piece and solder the ends back on the new cells.
The white strip on the
bottom of the pack is probably a solid state circuit breaker. This
item is necessary to prevent the pack from possibly catching fire
if it is shorted out. If you have to replace one of the two cells
that it attaches to, very carefully peel up the contact strips from
the ends to break the welds. Try to leave the whole strip in one
piece and solder the ends back on the new cells.
 Buried in the very middle of
the pack is a thermistor used by Roomba to sense battery
temperature. This is an important device and must be reinstalled. A
dab of hot glue stuck it back down.
Buried in the very middle of
the pack is a thermistor used by Roomba to sense battery
temperature. This is an important device and must be reinstalled. A
dab of hot glue stuck it back down.
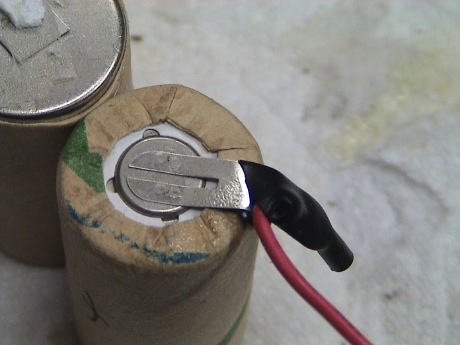 The red, or positive, lead connects
directly to the positive terminal (the smaller one) on the last
cell in the pack. It is simply soldered on so that the lead is easy
to remove and resolder to the new most positive cell.
The red, or positive, lead connects
directly to the positive terminal (the smaller one) on the last
cell in the pack. It is simply soldered on so that the lead is easy
to remove and resolder to the new most positive cell.
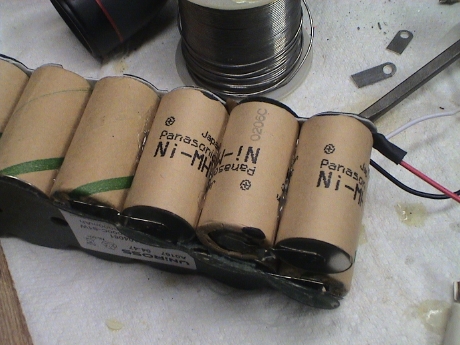 The new cells are held in place
with hot glue, just like the old ones. The straps were trimmed a
little and then simply soldered together. It is VERY important that
the cell polarity be maintained. If you aren't sure, draw a picture
of the pack or take some photos so that you can get it back
together the same way. The cells stack negative (case) to positive
(button cap) starting the black lead to the red lead. It doesn't
matter much that the cardboard insulators don't stick to the new
cells, they will be held in place by the APS battery shell once the
pack is reinserted in the shell.
The new cells are held in place
with hot glue, just like the old ones. The straps were trimmed a
little and then simply soldered together. It is VERY important that
the cell polarity be maintained. If you aren't sure, draw a picture
of the pack or take some photos so that you can get it back
together the same way. The cells stack negative (case) to positive
(button cap) starting the black lead to the red lead. It doesn't
matter much that the cardboard insulators don't stick to the new
cells, they will be held in place by the APS battery shell once the
pack is reinserted in the shell.
The rebuilt pack is charging again now, we'll see how it actually works when I reassemble the whole thing tomorrow.
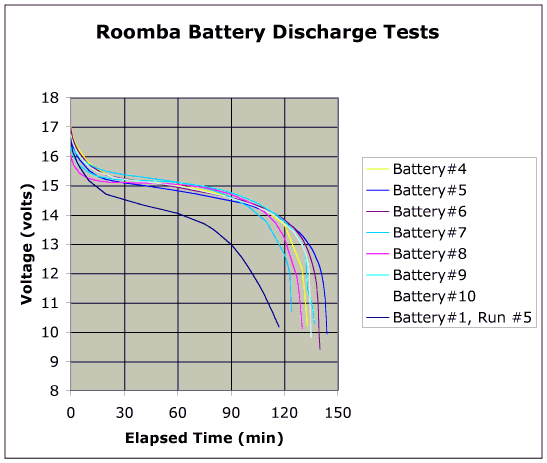 After a resistive discharge test, Battery
#1 is much improved, but it is still not close to the newer
batteries. The other 9 cells are indeed tired but at least it will
run a Roomba. When this pack becomes unserviceable, I'll probably
pull the new cells from it to rebuild one of the other dead
packs.
After a resistive discharge test, Battery
#1 is much improved, but it is still not close to the newer
batteries. The other 9 cells are indeed tired but at least it will
run a Roomba. When this pack becomes unserviceable, I'll probably
pull the new cells from it to rebuild one of the other dead
packs.
As expected, this partially rebuilt pack is not as good as a new pack. It ran for 50 minutes where 90 would be considered good on this floor in this room. The Roomba ran green for just as long as two others that were running at the same time, but rapidly went through the yellow and red phases before it quit.
I disassembled Battery #2 as well. This one was a little harder to get apart as it seems that the cover was glued on as well. It took some cutting with a utility knife and some prying to break the glue joint all around to get the cover off.
A discharge test of the battery showed that it was still hurting. I ran it down to 10 volts loaded so that any obviously dead cells would heat and be easily detectable with an IR thermometer. I measured each cell temperature just before the end of the discharge. When the discharge was done, the unloaded pack voltage bounced up to about 12 volts and then crawled upward to 14.5 volts. I then measured the no load voltage of each cell, and then measured each cell voltage with the load connected back to the pack for about one second per reading. It was pretty obvious that 2 cells are dead.
| Cell Number | No Load Voltage (volts) |
Loaded Voltage (volts) |
Temperature (°F) |
|---|---|---|---|
| 1 | 1.228 | 1.195 | 90 |
| 2 | 1.225 | 1.196 | 95 |
| 3 | 0.996 | -0.56 | 112 |
| 4 | 1.254 | 1.205 | 90 |
| 5 | 1.231 | 1.208 | 84 |
| 6 | 1.235 | 1.214 | 81 |
| 7 | 1.236 | 1.218 | 84 |
| 8 | 1.231 | 1.192 | 83 |
| 9 | 1.229 | 1.203 | 85 |
| 10 | 1.242 | 1.215 | 89 |
| 11 | 1.249 | 1.217 | 92 |
| 12 | 1.139 | 0.04 | 105 |
While the truly dead cells do have somewhat reduced open circuit voltage, the obvious indicator is loaded voltage. Even the temperature is not completely clear as the hot cells have probably heated the adjacent cells as well. The cells were numbered from 1 to 12 from positive to negative. Cells 2 and 4 straddle the hot cell 3 while cell 10 is across the pack from cell 3. Cells 1 and 11 also next to the hot cell 12.
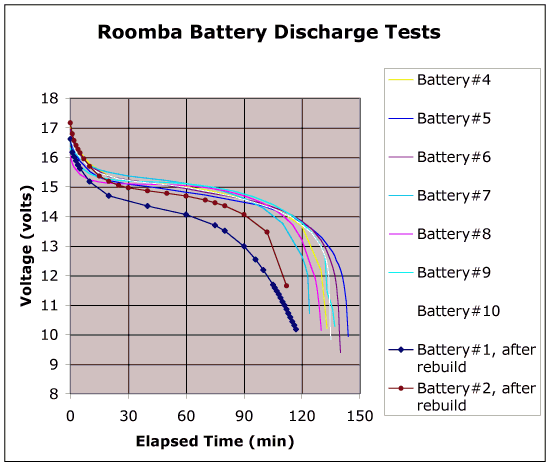 I replaced to two bad cells and the pack
has substantially recovered. It's not as good as a new battery
(remember, this battery is 20 months old and has seen heavy use)
but it is better than the rebuilt battery #1 which probably still
has a marginal cell in it.
I replaced to two bad cells and the pack
has substantially recovered. It's not as good as a new battery
(remember, this battery is 20 months old and has seen heavy use)
but it is better than the rebuilt battery #1 which probably still
has a marginal cell in it.
 I charged up Battery #3 and then took it
apart to do another discharge test to see which cells were bad and
found the same result as the other batteries. One cell is totally
bad, 3 are marginal and 8 are in good shape. The open circuit
voltage of the battery just after it was charged was 17.6 volts,
right where it should be (at 12 x 1.45 volts/cell) but it rapidly
collapsed to 14.4 volts. A properly working battery will start out
at about 17 volts and decay to 14.4 volts in about 5 minutes, this
one had died in less than 10 seconds. It then did the dip like the
other bad batteries have done and "recovered" some and ran at a
fair output voltage for little over half an hour. This corresponds
to how it worked in a Roomba. Since I have only one more
replacement cell, I'm not going to fix this one now, I'll wait
until I need some more stuff before I order more.
I charged up Battery #3 and then took it
apart to do another discharge test to see which cells were bad and
found the same result as the other batteries. One cell is totally
bad, 3 are marginal and 8 are in good shape. The open circuit
voltage of the battery just after it was charged was 17.6 volts,
right where it should be (at 12 x 1.45 volts/cell) but it rapidly
collapsed to 14.4 volts. A properly working battery will start out
at about 17 volts and decay to 14.4 volts in about 5 minutes, this
one had died in less than 10 seconds. It then did the dip like the
other bad batteries have done and "recovered" some and ran at a
fair output voltage for little over half an hour. This corresponds
to how it worked in a Roomba. Since I have only one more
replacement cell, I'm not going to fix this one now, I'll wait
until I need some more stuff before I order more.
This table shows the loaded voltages of the cells after the pack voltage had stabilized, and then when the pack was near 12 volts and the cell temperatures near the end of the discharge. Again, the worst cells run at the higher temperatures, with adjacent cells that are still good probably being heated by the bad cells. The following table shows the layout of the battery looking at the side which sits deepest in the battery housing (the side opposite the label). Cell #1 is the most positive cell, cell #12 is the most negative.
|
|
|
|
|
|
|
|||||||||||||||||||||||||||
|
|
|
|
|
|
|
 I did have one spare NiMH cell left over
from rebuilding Batteries #1 and #2 and since I was going to
reassemble #3 (to avoid loosing the parts) I replaced the really
bad cell #1 and ran a test, it didn't come out too badly. Cells #2
and #3 still heat and need to be replaced, I could probably pass on
cell #4.
I did have one spare NiMH cell left over
from rebuilding Batteries #1 and #2 and since I was going to
reassemble #3 (to avoid loosing the parts) I replaced the really
bad cell #1 and ran a test, it didn't come out too badly. Cells #2
and #3 still heat and need to be replaced, I could probably pass on
cell #4.
With only the one cell replaced, the run time when from a flakey 20 to 30 minutes to 40 minutes. The other two cells clearly need replacing as well.
Some time has gone by and I put lots of miles on the rebuilt batteries to see how they lasted. The answer is "only fair." After a little more than a year and maybe 50 cycles or so, Batteries #1 and #3 have totally died. After it's rebuild, #1 was never very good, it still had some marginal cells, these have probably died by now. Rebuilt Battery #2 seems to be hanging in there, it seemed to be ok after it's rebuild. Battery #3 was never completely rebuilt, it had known marginal cells in it.
 This time I tried a
whole new pack. This pack was available on Amazon.com for about
$28. The cells are 3800 mAh, or so it says on them, vs the standard
Roomba battery cells at 3000 mAh.
This time I tried a
whole new pack. This pack was available on Amazon.com for about
$28. The cells are 3800 mAh, or so it says on them, vs the standard
Roomba battery cells at 3000 mAh.
The pack comes fully assembled but the leads are about 8" long. They need to be trimmed and soldered back to the contact tabs in the battery enclosure. Take a photo of the old pack before you disconnect anything so that you can reassemble it in the correct way. The work is not difficult and only takes about 10 minutes if all the tools are available. The pack also comes with the special tool needed to remove the screws that hold the battery enclosure together, but there will be glue joints that have to be broken as well to get the enclosure apart.
 This is the discharge
curve into a 10 ohm resistor for the new battery. On it's first
full discharge, it is not as good as a stock Roomba battery even
though the cells are more highly rated. Based on the discharge
data, the capacity of the pack is closer to 2500 mAh instead of the
indicated 3800 mAh. However, it is good enough. Only time will tell
how well it lasts.
This is the discharge
curve into a 10 ohm resistor for the new battery. On it's first
full discharge, it is not as good as a stock Roomba battery even
though the cells are more highly rated. Based on the discharge
data, the capacity of the pack is closer to 2500 mAh instead of the
indicated 3800 mAh. However, it is good enough. Only time will tell
how well it lasts.
Subsequent running time tests in Roomba #5 show about 80 minutes worth of life as opposed to 90+ minutes from most of the other APS batteries and it doesn't seem to be improving over the first full cycle.
I tried to run a Roomba today with the rebuilt battery #3 and it died immediately, so much for Tenergy batteries. It has been only 6 months and it has crapped.
I ran a quick test of the remaining batteries to see which was alive and which was dead. I didn't test the batteries to see their total run time, just to see if they stayed in the "green" state long enough to clean a room, 20 minutes or so. It appears that if a battery has a bad cell, it will die VERY quickly, in less than 5 minutes, and if it has useful life, it will stay in the "green" state on the power indictor button for 20 minutes or longer. There doesn't seem to be much in between.
| Battery Number | Battery Rebuild State | Battery Condition |
|---|---|---|
| 1 | Rebuilt with 3 new cells | Lasted for over 2 years, then died again |
| 2 | Rebuilt with 2 new cells | Bad, goes to red immediately |
| 3 | Rebuilt with 12 cell Tenergy pack | Dead, shuts down immediately. Lasted only 6 months. |
| 4 | Stock | Good. Only charged for use, left removed from Roomba when not in use |
| 5 | Stock | Bad, goes to yellow immediately |
| 6 | Stock | Dead |
| 7 | Stock | Dead as of Nov 09 |
| 8 | Stock | Bad, goes to red after 2 minutes |
| 9 | Stock | Good. Only charged for use, left removed from Roomba when not in use |
| 10 | Stock | Dead |
| 11 | Stock | Brand new Oct 09, ran 80 minutes on a mix of hard floor and carpet. |
| 12 | Stock | Brand new Oct 09, ran 65 minutes, all on thick carpet. |
| 13 | Stock | Brand new Dec 09 but the Roomba that it was to go into died before the battery arrived. |
So I am sitting on a pile of 8 dead batteries. The only two old good ones are the ones that haven't sat on a charger except to receive an immediate charge. The three new ones were ordered from Amazon.com to get my other older Roombas back on the job.
Based on the fact that most of my Roomba batteries have died, some for a second time and that most are between 2 and 3 years old, it appears that the Roomba battery life isn't so good. The two older ones that are in the best shape are ones that never sat on their charger for very long. They spend long periods of time removed from the Roomba. I suspect that leaving Roomba sitting on it's charging dock for 24/7 is a bad thing. The batteries are slowly cooked to death. So I've changed my Roomba battery management process. When I need to run Roomba, I reinsert the battery and drop it on the dock to top it off and let it run until it recharges on the dock. Then the battery comes out again just as soon as it has charged up. If the Roomba has been run in the last week and recharged, they don't even need topping off to get good run times. A good battery seems to hold it's charge well when removed from the Roomba.
The Roomba 500 series robot (see below) doesn't have an easily removable battery but it also doesn't drain the battery as much just sitting there in the "off" state. I just push and hold the bottom part of the "Clean" button (where the power icon is) and it will shut off. When I plan to use it, it also goes back on the dock for a fill up.
 I have had this "500 Series"
Roomba for just a day, but I have some initial observations about
it. Another one of my 2nd generations ate it's brush motor and I
found this unit on sale. I'm not exactly sure of the model number,
but it one of the more basic ones.
I have had this "500 Series"
Roomba for just a day, but I have some initial observations about
it. Another one of my 2nd generations ate it's brush motor and I
found this unit on sale. I'm not exactly sure of the model number,
but it one of the more basic ones.
The newer model looks to be a pretty complete redesign. The whole thing is modular so that the various assemblies are easier to replace if necessary. The battery is one of those assemblies, it doesn't just pop off the bottom. You have to remove 4 screws on the bottom cover to access the battery.
Overall, the unit seems to be improved. It doesn't make as much noise as the older ones and it seems to clean better, especially along baseboards. The side brush design is much improved and gets down into the corner better, even when a carpet rolls down against the baseboard. The unit has a "light touch" mode of sensing larger obstacles, it will slow down a couple of inches before banging into something large and touch the object more gently. Smaller obstructions are not sensed as well and it still bangs into them fairly hard. The cliff sensors seem to do a better job of detecting a carpet rolling over the edge of a step and it doesn't seem to want to go over edges that the older ones will. It has some more modes to try to free itself from cords and tassels so that it may not get itself wrapped up as much.
The 3rd generation unit can be driven from the older remotes but this one will not accept programming from an older Scheduler remote.
The docks are completely different from the 2nd generation version and the newer and older ones will ignore the wrong dock. Even the contacts on the docks are at different spacing although they run at the same voltage. The newer one will, however, respond to the older virtual walls.
The newer one doesn't have a dedicated power button. Press and hold on the lower part of the Clean button to turn it off. This model doesn't draw as much "off" power as the older ones so it will sit for a while before it flattens it battery. Eventually, the battery will go flat, but it takes a month or more.
There is a demo mode that speaks a recorded female voice that demonstrates the Roomba's behavior. This will be of much use to anyone who already has a Roomba.
The rubber paddle brush is similar to the older unit but the main brush is quite a bit different. We'll see how it holds up against getting clogged with hair. The dust bin is about the same size the older units. Overall, the newer Roomba seems to pick up stuff more reliably than the older unit. Much of this improvement seems to be the result of the side brush design which is more forceful in sweeping crud from the right side into the path of Roomba's main brushes.
Roomba's behaviors are similar to the older units, but it's wall hugging modes seem to be improved. The newer Roomba does use two forward speeds at times.
After running it for awhile, I've concluded that it's still basically a Roomba, but it's performance and most of it's behaviors are improved.
Main Brushes. The main brushes don't seem to get wrapped up with hair as badly as the older units. There is a comb on the dust b bin that extends into the main brush. This rips most of the pet hair that used to wrap around the main brush off the brush so that the main brush doesn't clog on fiber nearly as much as the older ones. The cleaning effectiveness seems to be about the same.
Side Brushes. The side brush is much improved. It digs deeper and pulls more crud into the path of the main brush.
Dirt Detect. Roomba seems to enter the Dirt Detect mode more often and stay in that mode longer. This is good because the old ones often gave up on an obviously dirty area that much too easily. When Roomba is in wall hugging mode, Dirt Detect appears to be suppressed so as to keep Roomba from being distracted and moving away from the wall.
Cliff Avoidance. The cliff avoidance mode seems to be improved in that Roomba doesn't get fooled by soft edges (a carpet rolling over the edge of a stair) so that it doesn't fall over these edges like the older ones do.
Noise. The new version is perceptibly less noisy than the older ones.
Bumpers. The newer one can detect some oncoming obstructions and slow down before touching them more lightly than the older ones that just bang into everything. This seems to be a nice to have kind of thing but doesn't impact the way that it cleans.
Docking. Docking seems to be more reliable. The newer Roomba approaches the dock much more slowly so that it has a chance to line itself up better.
Battery Runtime. The runtime on a single charge seems to be about the same as the older units.
Battery Lifetime. The battery lifetime (before replacement is required) does not seem to be improved. Left on the dock, it will cook the battery like the older ones. Left off the dock even when turned off, it will flatten the battery too often or too deeply and the battery lifetime suffers too. Figure on a year to 18 months, same as the older Roombas.
Size. The new Roomba is just a little taller than the older ones. It will not get under some things that the older ones will. The diameter is the same.
Hang Ups. The newer Roomba seems to deal with low obstructions better than the older ones. When it gets high centered on something, it will work itself off more reliably.
Large Objects. The newer one seems to more reliably swallow larger pieces of crud without jamming the brushes.
Cords and Tassels. The newer one seems less likely to wrap a cord around it's brush and is actually able to disgorge some strings and cords by itself.
Cleaning Duration. This is one area where the newer one doesn't do quite as well as the older one. The newer one can spend so much time on a particularly dirty portion of a room that it may not even get to the whole room before it decides that it is done and shuts down in place. It has to be manually restarted to finish the room, maybe more than once. It will also quit even though it has been in Dirt Detect much of the time that it was running. It should figure that it isn't done until the Dirt Detect mode is rarely triggered.
Battery Accessibility. The battery on the newer one is not easy to swap out with a fresh one. This may be a good deal because Roomba needs a rest to cool down after running through one battery. Sticking another fresh one in and running it again immediately may be thermally stressful to a Roomba. This is also a bad deal because the battery cannot easily be pulled and left detached so that Roomba doesn't flatten it during longer periods of non-operation.
Brush Cleaning. Brush cleaning is generally easier than it is on the older ones. The little yellow end caps can now be simply pulled off to clean under them and they don't fall off as easily so it is less likely that you will lose them.
Filter cleaning. The vacuum filter folds out of the dust bin for cleaning. The newer design is a little more convenient that the older design.
Some of these behaviors are shown in a 5 min 11 MByte h.264 video clip of it running on a floor that was pretty dirty. Roomba spent a lot of time in Dirt Detect mode, but most of the other behaviors are shown in some from.
The brushes don't clog with fibers as much as the older ones, but they still get clogged eventually and need the fibers cut off.
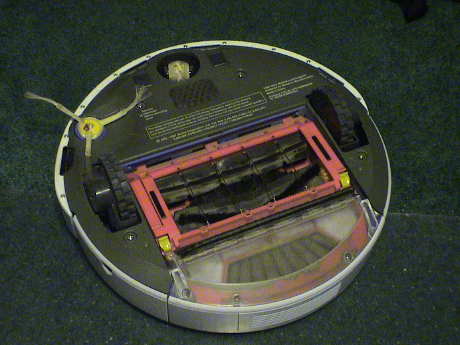 The bottom of this model is
better sealed with a full bottom cover. However, this cover blocks
access to the battery. There are five screws that need to be
removed to access the battery, four large captive ones and the
small one on the side brush. The side brush itself also has to come
off.
The bottom of this model is
better sealed with a full bottom cover. However, this cover blocks
access to the battery. There are five screws that need to be
removed to access the battery, four large captive ones and the
small one on the side brush. The side brush itself also has to come
off.
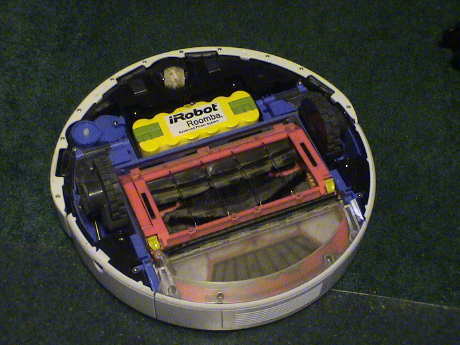 Once inside, a
bunch more screws are visible that allow removal of the major
subassemblies of the 500 series robot. At this point, the battery
will just fall out.
Once inside, a
bunch more screws are visible that allow removal of the major
subassemblies of the 500 series robot. At this point, the battery
will just fall out.
The older ones were very difficult to get apart, this one appears to be much easier to service. The battery itself is also different so that your older batteries, provided that any of them are still good, won't fit into the newer Roomba. If you buy new batteries, make sure that you get the right type.
The battery that came with the Roomba 500 Series died in less than a year. The robot would run 3 ft and stop. The battery from iRobot runs about $90, way too much. I got one from Amazon.com for about $33. That one appears to be OK.
Since I believe that leaving Roomba on it's dock is cooking the batteries after a period of time, I am leaving this one off the dock, turned off (press the button for a few seconds), between cleanings. I kick it back on the dock to allow it to charge before using it again. I have not been recharging it until I need to use it again. We'll see how that works.
| Battery Number | Battery Source | Date | Status |
|---|---|---|---|
| 1 | New with the Roomba | 20 Mar 09 | Lasted just 1 year |
| 2 | Replacement from Amazon.com | 25 Mar 10 | Good |
This page has been accessed times since 7 Jan 2006
© 2006-2010 George Schreyer
Created 7 Jan 2006
Last Updated June 6, 2010