 7 May 107 May 1016 May 10
[ Home ] [ Up ] [ Previous Page ] [ Next Page ]
7 May 107 May 1016 May 10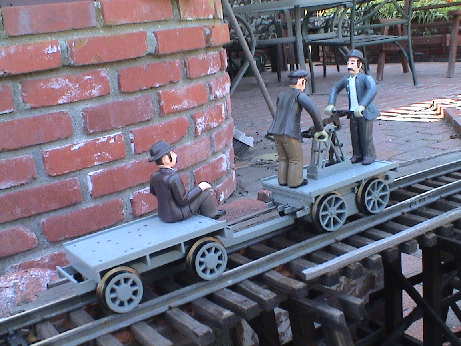 Bachmann has made
a generic large scale handcar for many years. My wife tried to buy
me one for Christmas of 2008, but TrainWorld was out-of-stock and
they quietly cancelled the order as they often do for back orders.
Once we figured out what happened, I ordered one from their sale
flyer for about $55 and they cancelled that order too. In early
February 2009, I managed to get an order placed that stuck. I had
to call them and insist that it be placed on backorder. They seem
to like to advertise loss leaders (or at least deeply discounted
items) that they don't have but don't want to actually ship. After
15 months on backorder, the handcar FINALLY came back in and they
actually shipped it for the originally offered price.
Bachmann has made
a generic large scale handcar for many years. My wife tried to buy
me one for Christmas of 2008, but TrainWorld was out-of-stock and
they quietly cancelled the order as they often do for back orders.
Once we figured out what happened, I ordered one from their sale
flyer for about $55 and they cancelled that order too. In early
February 2009, I managed to get an order placed that stuck. I had
to call them and insist that it be placed on backorder. They seem
to like to advertise loss leaders (or at least deeply discounted
items) that they don't have but don't want to actually ship. After
15 months on backorder, the handcar FINALLY came back in and they
actually shipped it for the originally offered price.
I'd heard lots of complaints from folks that had these puppies about how poorly they ran. I take this kind of thing as a challenge. Besides, I have a soft spot for the really small self powered stuff. This is what prompted me to order one in the first place.
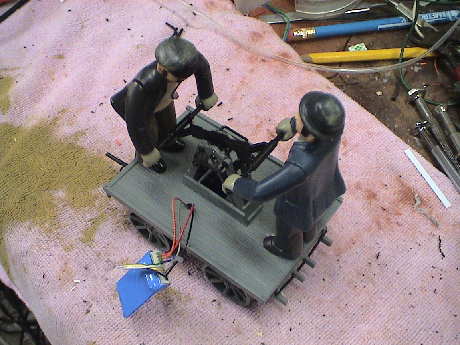
Based on the size of the figures, this thing is probably close to 1:20.3 scale.
The handcar comes with a bag of detail parts to populate the trailer. I haven't even looked at them yet. I'll do all the mechanical and electrical work before I attach those parts so that I don't break them off again during rough handling.
I ran my standard running current tests immediately. The handcar draws about 100 mA running light (with it's trailer), about 150 mA when manually restrained so that it slips and about 400 mA at full stall, all this at 20 volts.
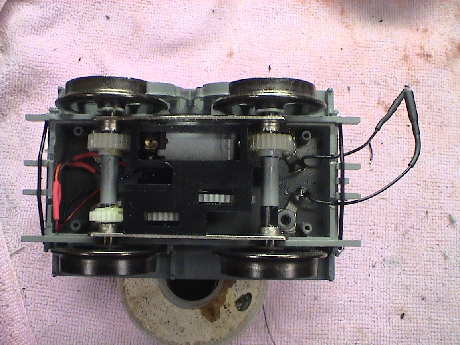
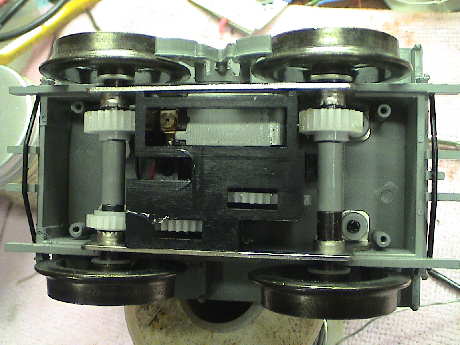 The drive train
consists of a small dual worm can motor driving both axles. From
one axle, another gear train drives the rocking arm mechanism. The
wheels ride in plain friction bearings punched into metal
frames.
The drive train
consists of a small dual worm can motor driving both axles. From
one axle, another gear train drives the rocking arm mechanism. The
wheels ride in plain friction bearings punched into metal
frames.
The result is that the handcar runs pretty smoothly with not a lot of noise. The wheel noise is louder than the gear train noise. I did lubricate all the gears and bearings before it ran much but it didn't make significantly louder gear noise out of the box.
There is a repeating bind in the mechanism that is obvious at only very low speeds. Once per wheel turn, the load increases and if the motor voltage is low enough, the mechanism will stop. The "front" axle is free, the bind is in the rear axle. In the photo, the "rear" end is to the right, under the guy with the brown coat. The axle gear wobbles a little and it may be pressing into the worm enough to increase the drag. The teeth are all clear in that area so it appears that the wobble is at fault. This extra pressure point will probably eventually wear down and become less of a problem.
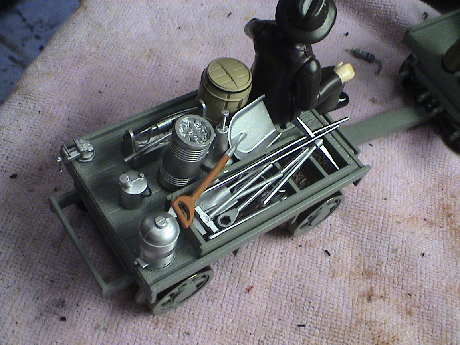
After I had added power pickup to the trailer and got it working, I could add the tools as I wouldn't be handling it much anymore. The tools are similar to the kit that comes with the Bachmann geared steam locos. They are all glued down with CA.
As expected, it sputtered on dirty track but it did not actually stall or derail except where it ran over a windblown leaf, twig or dead Korea grass runner. I hadn't cleaned the track in over a week so it was pretty well oxidized. After one pass with a pole sander on a short section the track was clean enough so that it ran fine on that section, about the same as other 4 wheel rigid frame locos. On my layout, that is good enough. If it will run well enough on lightly cleaned track, it will do well by itself. But since there are 4 more wheels available on the tender, it is a no-brainer to hook them up too.
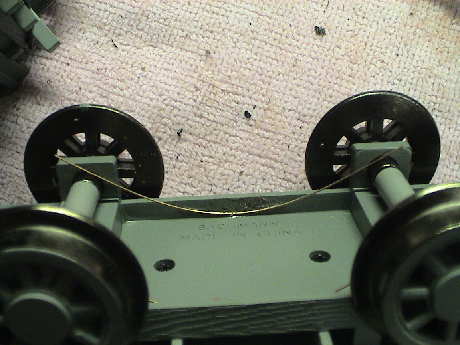 I
choose a cheap and dirty method. I attached two 12 mil phosphor
bronze wires to the trailer frame with CA. After this picture was
taken, I backed up the CA with a two small dabs of two part epoxy
on each wire. The wire was not preformed in any way, I just let it
take a natural bend when I clipped it in place to allow the CA to
set up. The wires do add a small amount of drag, but not a lot.
I
choose a cheap and dirty method. I attached two 12 mil phosphor
bronze wires to the trailer frame with CA. After this picture was
taken, I backed up the CA with a two small dabs of two part epoxy
on each wire. The wire was not preformed in any way, I just let it
take a natural bend when I clipped it in place to allow the CA to
set up. The wires do add a small amount of drag, but not a lot.
After the epoxy sets, I'll wire them back to the handcar with a couple of "D" connector pins to allow the little handcar to have 8 wheel pickup.
I haven't cleaned all my track so that when I do finish wiring in the trailer pickups, I can evaluate how the handcar runs with and without the trailer connected while on blatantly dirty track.
I could have soldered the power pickup wires in the handcar to the existing lugs near the front, but then I'd be routing wires past the gear train. This was some what of a problem when I had the HO DCC decoder stuffed in the back end so I decided to avoid the issue by adding two new lugs (junk box items) similar to the front ones at the rear. I attached my standard D connector pins to some short black wires and fed them out notches ground into the shell at the rear. The pins will ride underneath the drawbar. A similar set of wires is soldered to the phosphor bronze pickup wires in the trailer and lead forward.
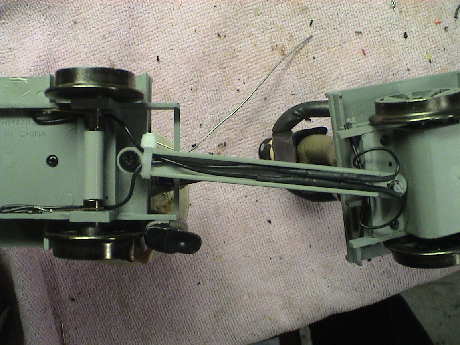 The trailer
to handcar connection hides underneath the drawbar. The trailer
wires are routed in a convenient slot under the front trailer axle
and soldered to the pickup wipers.
The trailer
to handcar connection hides underneath the drawbar. The trailer
wires are routed in a convenient slot under the front trailer axle
and soldered to the pickup wipers.
I tested this configuration with DC on my dirty track and there was no hesitation or sputtering at all anywhere. Without the trailer connected, it sputters. I can conclude that the extra pickups are a good thing.
The GIRR has been fully converted to DCC so that every piece of equipment that runs here needs a DCC decoder. The handcar's current consumption is well within the capability of a typical HO or N scale decoder. It'll be a straight forward electrical installation since there are no lights deal with. I'll unsolder the two motor wires from the tabs on the power pickup frames and attach them to the motor output of the decoder. Then the track wires from the decoder go back to the tabs that the motor wires came off of.
 The
problem is physical room. I found one place that I could almost fit
an HO decoder into, however, every time I put the bottom cover back
on, something binds. It is looking like an HO decoder will be a no
go but I'm still working at it.
The
problem is physical room. I found one place that I could almost fit
an HO decoder into, however, every time I put the bottom cover back
on, something binds. It is looking like an HO decoder will be a no
go but I'm still working at it.
I have formally given up on the HO decoder. It is one of those "missed it by that much" kind of things. I'll order a DN163 for it sometime in the near future.
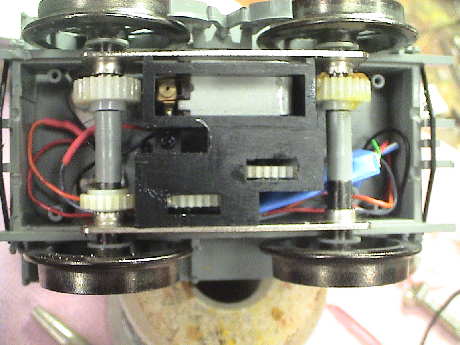
Don Dillard wrote me an email suggesting that I could put the decoder on the trailer, hidden in a box. The trailer is not the optimal place to put the decoder because I would need two more wires (for the motor) leading from the trailer to the handcar. However, there was a nice clear spot on the handcar itself for a crate. So I drilled a hole in the floor of the car to route four wires and hung an HO decoder there. The decoder is wired to the existing power pickups and the existing motor wires underneath.
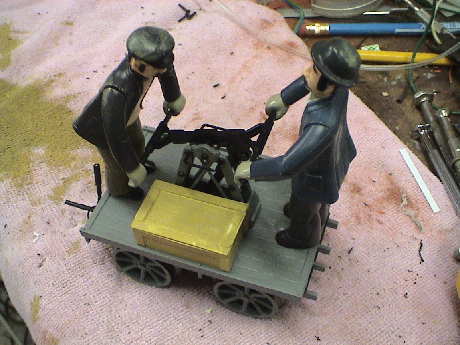 The crate
is made of 30 mil styrene sheet and 20 mil styrene strip, all
assembled with CA, then painted Depot Buff. The sheets were
"distressed" with a hobby knife and a razor saw. The crate is sized
to be a press fit between the edge rail and the rocker stand. This
solved all the issues and allowed me to use an existing HO decoder
that had an unneeded but burned out headlight function. The whole
installation took less than an hour, start to finish.
The crate
is made of 30 mil styrene sheet and 20 mil styrene strip, all
assembled with CA, then painted Depot Buff. The sheets were
"distressed" with a hobby knife and a razor saw. The crate is sized
to be a press fit between the edge rail and the rocker stand. This
solved all the issues and allowed me to use an existing HO decoder
that had an unneeded but burned out headlight function. The whole
installation took less than an hour, start to finish.
[ Home ] [ Up ] [ Previous Page ] [ Next Page ]
This page has been accessed times since 6 May 10.
© 2010 George Schreyer
Created 6 May 2010
Last Updated May 16, 2010