 30Jul06
Bachmann Passenger cars often have illuminated interiors. The constant lighting is implemented with a 9 volt battery. Even though the lights only draw about 90 mA, this load can flatten a fairly expensive alkaline battery in about an hour. Rechargeable 9 volt batteries are available, but they cost even more than the alkalines and they only last a little over half an hour.
Bachmann didn't provide track power lighting to keep the manufacturing cost down (early cars didn't even have metal wheels). Also, adding contact wipers to the wheels adds considerable drag which could tax a stock Bachmann Big Hauler.
It turns out to be fairly easy to add track powered constant lighting to these cars for about $10 dollars worth of parts, NOT counting replacement metal wheels.
[ Top ]
 An effective method to add constant lighting is to
replace the 9 volt battery with a track powered 9 volt regulator.
Fortunately this is easy to do as all the circuitry fits within the
battery compartment and you don't even have to open up the car. This
isn't a particularly neat installation, but it can't be seen when the
car is on the track so it doesn't really matter. The modification is
completely reversible so that it can be removed and a battery
reinstalled if desired (for what reason I don't know).
An effective method to add constant lighting is to
replace the 9 volt battery with a track powered 9 volt regulator.
Fortunately this is easy to do as all the circuitry fits within the
battery compartment and you don't even have to open up the car. This
isn't a particularly neat installation, but it can't be seen when the
car is on the track so it doesn't really matter. The modification is
completely reversible so that it can be removed and a battery
reinstalled if desired (for what reason I don't know).
 This is the circuit for a 9 volt
regulator using a commonly available 3 terminal adjustable regulator
IC. All the parts are available at Radio Shack. The regulator takes
track power from some source such as wheel pickups and regulates the
voltage to 9 volts. If the track voltage is less than 12 volts or so,
the lights will be dimmer. If you use Aristo PWC however, the 50 micro
farad capacitor will fully charge on the PWC peaks at the first crack
of the throttle and the lights will be at full intensity before the Big
Hauler starts to move.
This is the circuit for a 9 volt
regulator using a commonly available 3 terminal adjustable regulator
IC. All the parts are available at Radio Shack. The regulator takes
track power from some source such as wheel pickups and regulates the
voltage to 9 volts. If the track voltage is less than 12 volts or so,
the lights will be dimmer. If you use Aristo PWC however, the 50 micro
farad capacitor will fully charge on the PWC peaks at the first crack
of the throttle and the lights will be at full intensity before the Big
Hauler starts to move.
The regulator could probably be used without a heat sink because the lighting power is so low, but it gets pretty warm without one. A cheap TO-220 type heat sink keeps the regulator temperature under control. The cover for the battery compartment should not be replaced so that air can circulate around the circuit.
If you use DCC, you don't need this circuit although it will still work. Just insert a 100 ohm 1 watt resistor in series with the lights and the power pickups.
Parts
[ Top ]
Power can be supplied from any source available. Power can be wired back from the engine with connectors like those shown on my Power Connector Tips page. Power can also be picked up from the wheels on the passenger cars themselves. If this is done and if the cars are wired to the engine, the engine operation on dirty track will be considerably improved. However, the downside of adding power pickups to the cars is that power pickups add considerable drag unless you use the very expensive LGB ball bearing wheels with integral power pickups.
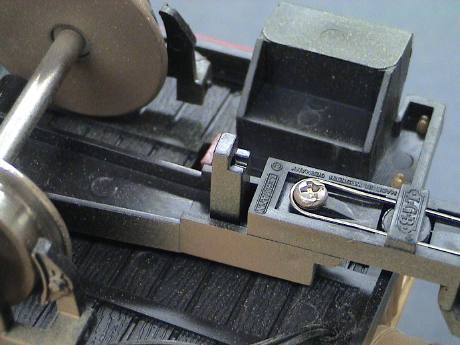
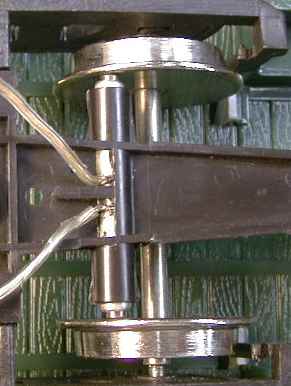 The Bachmann trucks have contact
pockets molded right into them, one set for each truck. These pockets
can be drilled out with a 13/64" drill and they will accept a 14 mm LGB
contact (LGB p/n 63120) easily. If they are drilled out a little
deeper, they will also accept the 16 mm contact. These come packaged 8
to a bag, four 14 mm contacts and four 16 mm contacts per bag for about
$10 a bag. This truck has been drilled for the 16 mm contacts. When you
drill out the pockets, DO IT BY HAND. A power drill
will take out too much plastic too fast and you'll probably drill
straight through. You might also melt the soft plastic. If you do drill
through, don't despair. Just cut a little piece of styrene and insert
it between the contacts to space them apart.
The Bachmann trucks have contact
pockets molded right into them, one set for each truck. These pockets
can be drilled out with a 13/64" drill and they will accept a 14 mm LGB
contact (LGB p/n 63120) easily. If they are drilled out a little
deeper, they will also accept the 16 mm contact. These come packaged 8
to a bag, four 14 mm contacts and four 16 mm contacts per bag for about
$10 a bag. This truck has been drilled for the 16 mm contacts. When you
drill out the pockets, DO IT BY HAND. A power drill
will take out too much plastic too fast and you'll probably drill
straight through. You might also melt the soft plastic. If you do drill
through, don't despair. Just cut a little piece of styrene and insert
it between the contacts to space them apart.
When you drill out the pocket, part of the wall at the a base will either break through or nearly break through so that you can cut out the thin wall left behind to provide a wire access. Solder a flexible wire to the back of the contact first and then thread the wire into the pocket and then push the contact in. Be careful when you are reassembling the truck as the contacts are very brittle and if you apply side pressure to the contacts, they will break.
You can't use the Bachmann metal rimmed wheels if your car is equipped with them. For some reason, there are round holes in the backs of the metal wheel rims that will catch the contacts and break them. Change out the wheels to some other kind of metal wheel and use the Bachmann metal rimmed wheels in some less critical application.
[ Top ]
 I've standardized on LGB knuckle
coupers for the GIRR Mountain Division. These couplers are a little
oversize, but they work very well after a little tune up. They also mount directly to
the existing Bachmann coupler mount. However, due to both their size
and the coupler mount, the cars are spaced very far apart.
I've standardized on LGB knuckle
coupers for the GIRR Mountain Division. These couplers are a little
oversize, but they work very well after a little tune up. They also mount directly to
the existing Bachmann coupler mount. However, due to both their size
and the coupler mount, the cars are spaced very far apart.
 This
section describes a modification that moves the cars a little closer
together. It isn't much, but it helps.
This
section describes a modification that moves the cars a little closer
together. It isn't much, but it helps.
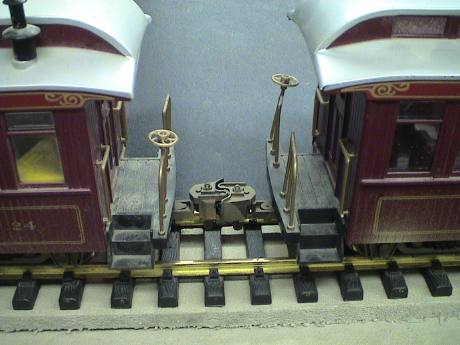
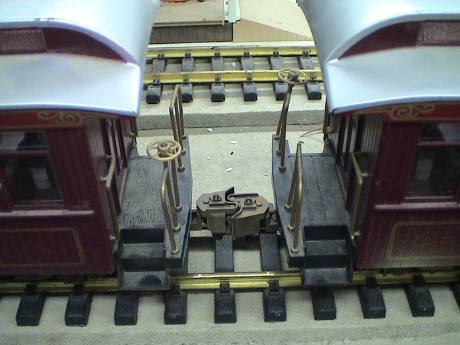
 Before the modification with the
cars on a 2' radius curve, the couplers get pretty close to the
platform so that the gap between cars cannot be narrowed to anywhere
near a prototypical distance, but there IS a little room, about 0.2" on
each side. A 0.4" total narrower gap is not a lot but it is visually
better.
Before the modification with the
cars on a 2' radius curve, the couplers get pretty close to the
platform so that the gap between cars cannot be narrowed to anywhere
near a prototypical distance, but there IS a little room, about 0.2" on
each side. A 0.4" total narrower gap is not a lot but it is visually
better.
My method for narrowing the gap is similar to the method that I have used for Aristo heavyweights and streamliners. I cut out a section of the coupler mount and reattach the mount with epoxy.
 The coupler mounts need to have a 0.2"
section cut out. It just so happens that the post that was used to
secure the centering spring on the original Bachmann knuckle couplers
is exactly 0.2" wide. With a razor saw, it is easy to cut down both
sides of this post to extract a 0.2" segment of the mount and then
attach the pieces back together with epoxy.
The coupler mounts need to have a 0.2"
section cut out. It just so happens that the post that was used to
secure the centering spring on the original Bachmann knuckle couplers
is exactly 0.2" wide. With a razor saw, it is easy to cut down both
sides of this post to extract a 0.2" segment of the mount and then
attach the pieces back together with epoxy.
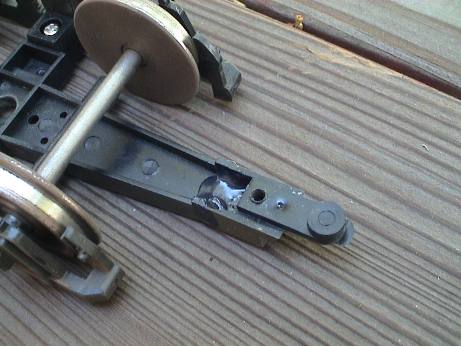 After the 0.2"
section is cut out it looks like this. The epoxy joint is sitting in
the sun, curing, in this photo.
After the 0.2"
section is cut out it looks like this. The epoxy joint is sitting in
the sun, curing, in this photo.
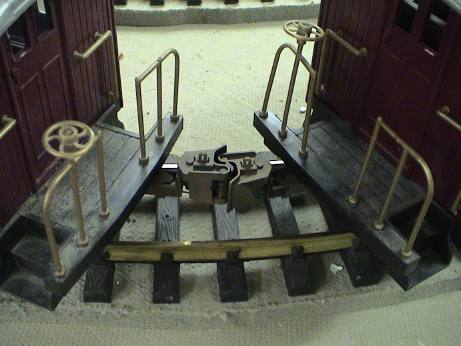
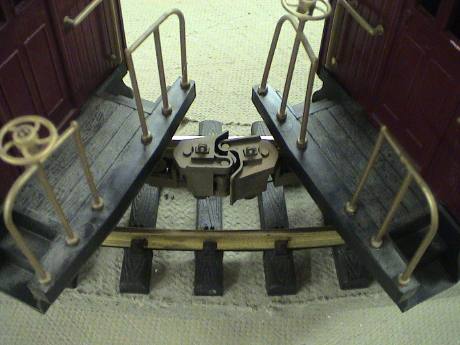 After the mod, the couplers just barely clear the
platform when the coupler is hard against the steps.
After the mod, the couplers just barely clear the
platform when the coupler is hard against the steps.
This page has been accessed times since Dec 26, 1998.
© 1998-2006 George Schreyer
Created Dec 26, 1998
Last Updated July 30, 2006