 22 Jan 0925 Aug 097 Sep 09
[ Home ] [ Up ] [ Previous Page ] [ Next Page ]
22 Jan 0925 Aug 097 Sep 09The folks at IPTrains sent me their TrainVision wireless on board video system for evaluation and review. This is an early production version, later versions may be a little different. You'll find that review on this page.
On board video is not a new concept. There are several companies also making or have made on board video cameras for model railroads. I never invested in any of their systems as I thought that they were immature and reviews of other systems often weren't so wonderful. There are some basic problems involved in getting the video back from the train that IPTrains may have solved or at least materially improved.
There are also several ways to get video from a moving train without the need a dedicated system. However each of those ways has a gotcha.
Many moons ago, I tried another wireless on board video system, the X-10 Wireless Security Camera for use on a large scale train. It worked, but only marginally well because the wireless link was susceptible to multipath distortion. This can be seen as dropouts in the video found at the link. The system worked well enough to view a engineer's eye view in real time but the amount of time it could be used was limited by the life of the batteries that ran the camera. Also, the video must either be digitized in real time or recorded on a video recorder for digitization later to make use of it on the web. Overall, it didn't work all that well. The very small images that I got from the X-10 camera were my doing in trying to compress the video to be usable on 1990's vintage internet connections.
Later, I tried pushing around a Sony MiniDV camcorder on a flatcar. This camera was actually small enough to work this way. My earlier video cameras were too big. This got rid of the dropouts, but to use the video on the web still required that the recorded video be digitized and uploaded as a static movie. There was also no option for real time viewing while using a camcorder.
The X-10 system and a camcorder both provide sound along with the video, the IPTrains system does video only. However, this isn't a real big deal for most railroads as the wheel noise tended to drown out everything else anyway.
TrainVision solution gets around all of the power problems by using a system that can recharge itself from powered track as it is running or standing. The battery supplied is also big enough to run the camera for hours without the benefit of powered or partially powered track. It is also big enough to work as the traction battery in a radio controlled locomotive.
The IPTrains system gets around the RF drop out and real time video problems by linking the video directly back to the web in real time using spatially diverse antennas and WiFi. However, dropouts can still happen but they occur much less often and are much less annoying as they simply result in a short frame freeze instead of video tearing. The link frequency is 2.4 GHz, high enough to be immune to most of the noise and intereference sources on a model railroad.
TrainVision appears to be targeted at battery/RC operation where the camera is operating 24/7. The 2.3 Ah battery supplied is much larger than the needs of the camera alone. It can also be used as the traction battery of a battery/RC loco. The way that TrainVision is configured, it is intended to run on partially powered track so that the battery is continually recharged during operation and the loco has the opportunity to derive power from the track sometimes to relieve the load on the battery. It works fine with DCC also as long as the track voltage is high enough, 22 to 24 volts.
Update, September 2009. IPTrains is now offering a 7.2 volt (6 cell) battery pack for users that don't need the big traction battery for radio controlled operations. The system will charage the battery when the track voltage exceeds 12 volts DC, AC, PWC or DCC. Since the battery has the same sized cells, it'll run just as long as the with the larger heavier battery. This makes the TrainVision system easier to install in track powered or DCC equipped locos.
TrainVision with the large battery will work less well with straight DC track power as there will usually not be enough track voltage to charge the battery although that may not be a big problem. In a straight track powered configuration, TrainVision's battery will not be running the locomotive and the battery is big enough to run the camera and wireless link for many hours. The engine can then be parked with the motor off on powered track to recharge the battery overnight.
With Aristo's PWC on the track, TrainVision may be able to charge it's battery in real time provided that the peak PWC voltage is high enough. To get enough peak voltage on the track would require 24 to 26 volts DC into a trackside TE receiver.
TrainVision uses an on board camera AND Linux based server linked back to the web via WiFi. A proper WiFi access point with diversity reception handles the dropout issues and the Linux server provides the video to the web in real time. The video can be viewed locally via streaming video or viewed remotely. It can also be recorded or digitized for use later right from a web browser.
To stream video out to the world in real time, you must have an internet connection with sufficient upstream bandwidth to handle it. My internet connection is highly asymmetrical so that I can't do this unless I change my ISP but I can see the video in real time on my local network by pointing my browser right to the server that is riding on the train.
The real upside of TrainVision is that you can sit inside where it is comfortable while you run your trains when it too hot, or cold or windy or buggy or otherwise unpleasant outside. I spent much of the time that I was making the videos on this website sitting in the comfort of my office while driving the test train from a wireless DCC throttle or JMRI throttle and watching the action on the computer.
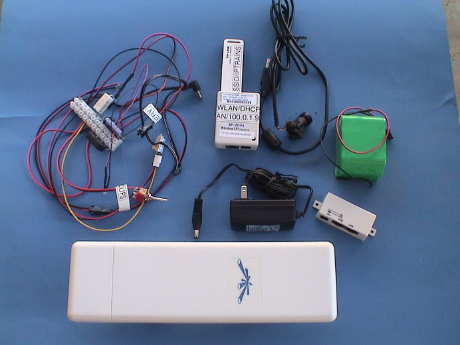 This is the kit provided
by IPTrains. Almost everything is here but if you use the IPTrains
wireless access point, you have to supply two CAT5 Ethernet cables.
You also have to provide a method to provide connectivity between
the Ethernet port of the access point and your ISP. Actually, any
WiFi 802.11g access point will work, the one that IPTrains provides
is configured for outdoor use and it provides excellent
coverage.
This is the kit provided
by IPTrains. Almost everything is here but if you use the IPTrains
wireless access point, you have to supply two CAT5 Ethernet cables.
You also have to provide a method to provide connectivity between
the Ethernet port of the access point and your ISP. Actually, any
WiFi 802.11g access point will work, the one that IPTrains provides
is configured for outdoor use and it provides excellent
coverage.
IPTrains uses off the shelf components and integrates them with some custom software and hardware to provide a complete video solution.
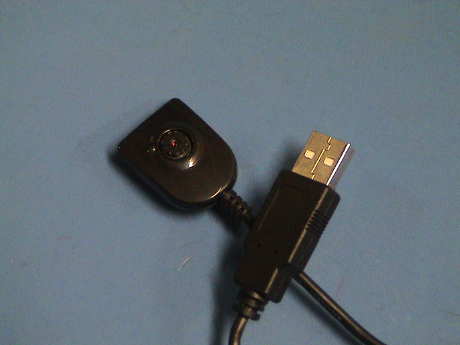
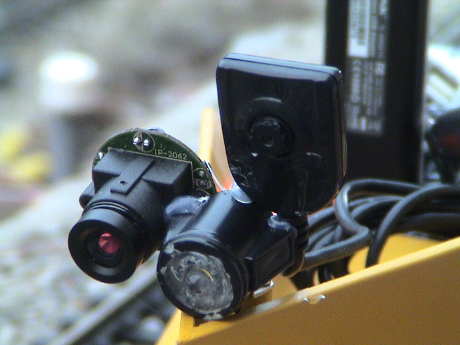
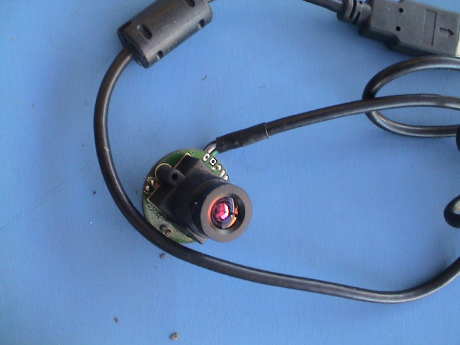 The camera itself is an OEM
USB camera intended for security video systems. It handles up to
640 x 480 images with a frame rate of up to 30 fps. The frame rate
will vary depending on several conditions. Very low light seems to
slow it down. There may be other conditions that limit the frame
rate as well.
The camera itself is an OEM
USB camera intended for security video systems. It handles up to
640 x 480 images with a frame rate of up to 30 fps. The frame rate
will vary depending on several conditions. Very low light seems to
slow it down. There may be other conditions that limit the frame
rate as well.
 The heart of the system is
this Linux based server. The server box itself has 2 USB ports, a
telephone port and an Ethernet port. Only the USB ports are used in
this system. The camera plugs into one, and the WiFi dongle plugs
into the other. The whole server runs from 5 volts provided by the
DC power assembly. If somebody views your video over the web, this
is the server that actually streams the video. The server boots
itself up when it gets power, the user doesn't have to do anything
to get it going.
The heart of the system is
this Linux based server. The server box itself has 2 USB ports, a
telephone port and an Ethernet port. Only the USB ports are used in
this system. The camera plugs into one, and the WiFi dongle plugs
into the other. The whole server runs from 5 volts provided by the
DC power assembly. If somebody views your video over the web, this
is the server that actually streams the video. The server boots
itself up when it gets power, the user doesn't have to do anything
to get it going.
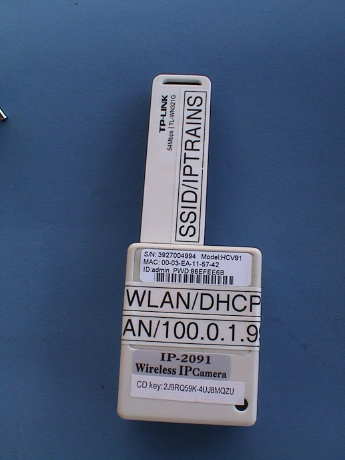
 Data from the
server is linked via WiFi (802.11g) to an outdoor access point.
Although ANY access point can be made to work, this one is
especially configured for the IPTrains system. It is intended to be
mounted outside right in the middle or along the edge of an outdoor
layout. There are brackets on the back to allow it to be mounted to
a pipe or post.
Data from the
server is linked via WiFi (802.11g) to an outdoor access point.
Although ANY access point can be made to work, this one is
especially configured for the IPTrains system. It is intended to be
mounted outside right in the middle or along the edge of an outdoor
layout. There are brackets on the back to allow it to be mounted to
a pipe or post.
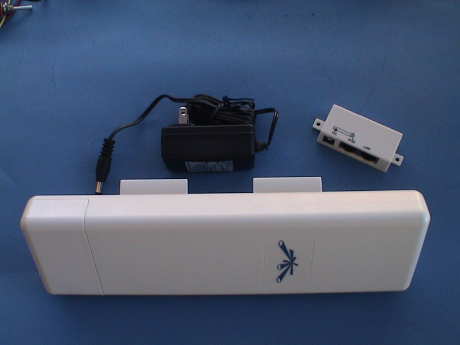
Power is provided to the access point via "Power Over Ethernet" or POE. The little box in the picture is where DC power is injected onto the one Ethernet cable that runs out to the AP. Power is provided by a wall wart. The adaptor and wall wart must be installed indoors, they are not weatherproof as the AP is.
 The DC power for
the system is provided by this power assembly. It accepts track
power and uses it to charge the battery. The track voltage should
be about 24 volts, but the system will charge on 22 volts. Either
DC or DCC is acceptable. This assembly also provides a power
switch, a track power indicator LED and a regulator to power the
server.
The DC power for
the system is provided by this power assembly. It accepts track
power and uses it to charge the battery. The track voltage should
be about 24 volts, but the system will charge on 22 volts. Either
DC or DCC is acceptable. This assembly also provides a power
switch, a track power indicator LED and a regulator to power the
server.
Although it looks a little messy, there are only three connections. There are two wires to connect to the track, a plug for the battery and a plug for the server.
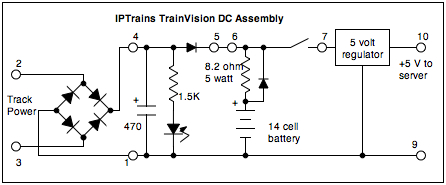 This is the schematic of the mess
shown above. The open circles are the terminals of the Euro style
terminal strip. If there isn't room to mount the whole strip in one
piece, it can be cut between terminals 5 and 6 and mounted in two
sections. Terminal 5 should jump to terminal 6 and terminal 1
should jump to terminal 9.
This is the schematic of the mess
shown above. The open circles are the terminals of the Euro style
terminal strip. If there isn't room to mount the whole strip in one
piece, it can be cut between terminals 5 and 6 and mounted in two
sections. Terminal 5 should jump to terminal 6 and terminal 1
should jump to terminal 9.
If the system is NOT used to power an RC locomotive, then it would be fairly easy to convert it to charge better on straight track power or PWC of any voltage. The battery is too large for the TrainVision system alone so that it could be reduced to 6 cells and the charging resistor increased to the 39 to 43 ohm range (2 watt). This would allow the system to start to charge at about 7 volts yet still limit the charging current to a safe 300 mA at 20 volts.
If you want to install the IPTrains TrainVision system in a loco that will also use a radio control system, then connect the RX power input through a switch between terminals 6 (+) and 1 or 9 (-) and have at it. The 2.3 Ah battery is sufficient to run most 2 motor locos EXCEPT USA Trains. The USAT locos draw too much current and the internal circuit breaker in the battery pack will trip. IPTrains can provide additional batteries to extend the run time or to drive larger locos such as the SD45 but even that configuration is not recommended for USAT.
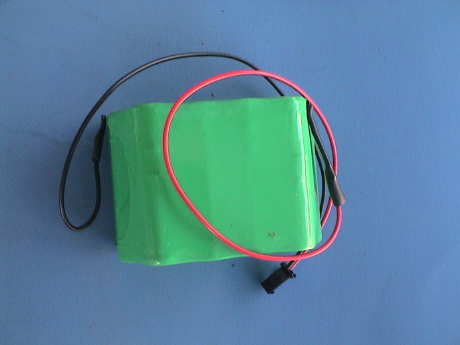 The battery is a 14 cell
NiMH pack which makes 16.8 volts under load. This 2.3 Ah pack could
ALSO be used to run an RC receiver to battery power a small to
medium sized loco such as a typical 4 axle diesel. It doesn't have
the capacity to run the larger locos but IPTrains can provide
larger batteries that can.
The battery is a 14 cell
NiMH pack which makes 16.8 volts under load. This 2.3 Ah pack could
ALSO be used to run an RC receiver to battery power a small to
medium sized loco such as a typical 4 axle diesel. It doesn't have
the capacity to run the larger locos but IPTrains can provide
larger batteries that can.
The system is intended to run 24 hours a day with the trains sitting idle on a powered track section to allow the battery to recharge. Sections of the actual layout can also be powered to allow the battery to recharge while in motion. If enough of the track is powered, then the system can run continuously with the battery providing power in areas that are not powered. I have yet to determine how long the system will run in a camera only configuration but it looks like the battery is good for many hours of dead loss operation.
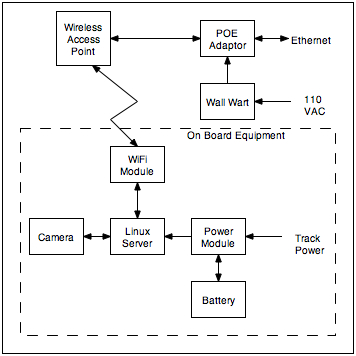 The
interconnection diagram for the system is pretty simple. Track
power is used to recharge the battery and run the system. When
track power is not available, the system runs from the battery. The
camera feeds video to the server which uplinks the video to a Local
Area Network.
The
interconnection diagram for the system is pretty simple. Track
power is used to recharge the battery and run the system. When
track power is not available, the system runs from the battery. The
camera feeds video to the server which uplinks the video to a Local
Area Network.
To view the video, simply type the IP address of the server into the browser window and your browser will connect to the server. The software on the server will provide the video. If you want to record the video, use a video capture program on your computer to snag the video into the format that you want.
I ran some tests to characterize the way that the battery charging circuits work in both the charged and discharged states of the battery. I also ran a test to see how long it would continue to produce video without any charging at all.
The charging system used by IPTrains is a pretty simple one. As a matter of fact, one of the owners of IPTrains attributes the circuit to me as I described it years ago on my Battery/RC Tips and DCC Tips pages. It is simply a parallel resistor and diode in series with the battery. The resistor limits the charge current when current is going in to the battery. The diode passes current back out of the battery with low drop when the input voltage is not high enough to produce a charge. They've set their system to run at 24 volts, but it will charge at about half rate at 22 volts. Charging begins abruptly at 21 volts when the battery is fully charged already and 17 volts when the battery is flat. If the track voltage is not at least 21 volts, then the battery will never reach full charge.
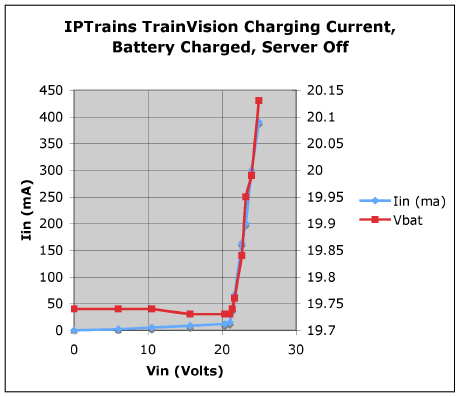 With the server turned
off all the input current is diverted to the battery. As the input
voltage is increased, the current stays very low until the voltage
reaches 21 volts, then the battery starts accepting charge in a big
way.
With the server turned
off all the input current is diverted to the battery. As the input
voltage is increased, the current stays very low until the voltage
reaches 21 volts, then the battery starts accepting charge in a big
way.
The small amount of current drawn before charging starts is the load of the LED that indicates that the track power is on.
 When the server is turned
on and drawing current, the "fully" charged battery was dragged
down a little as I was taking the data so that the battery voltage
appears to decrease with increasing input voltage up to 21 volts
where the current abruptly starts to increase again. This time, the
total current goes to higher values as the server is drawing
current too.
When the server is turned
on and drawing current, the "fully" charged battery was dragged
down a little as I was taking the data so that the battery voltage
appears to decrease with increasing input voltage up to 21 volts
where the current abruptly starts to increase again. This time, the
total current goes to higher values as the server is drawing
current too.
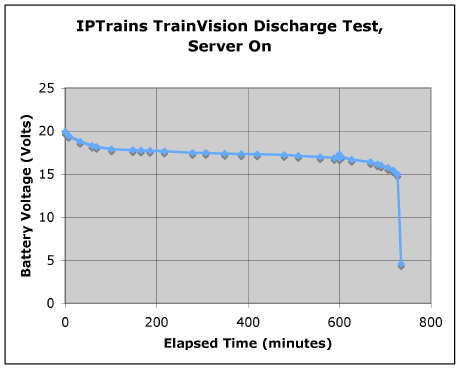 The
discharge curve of the TrainVision system is pretty normal. The
thing ran for 12 hours and 15 minutes before shutting down. This
corresponds to an amp-hour capability of 2.14 Ah at the constant
load of 175 mA that the system presents.
The
discharge curve of the TrainVision system is pretty normal. The
thing ran for 12 hours and 15 minutes before shutting down. This
corresponds to an amp-hour capability of 2.14 Ah at the constant
load of 175 mA that the system presents.
The small glitch at 600 minutes is when I turned it off overnight to go to bed. The battery voltage recovered just a little overnight but it returned to the normal discharge curve in a few minutes.
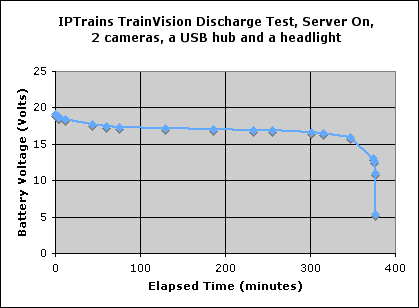 Fast forward in time 8 months. I
ran another discharge test on the, now older and used, battery.
This time there was higher load. There were two cameras connected,
a USB travel hub AND and LED headlight running at 20 mA. The run
time was about half as long. Most of this difference is likely due
to the increase in load. Since the discharge curve looks "normal"
with a steady voltage through the entire discharge and then a rapid
collapse at the end, it doesn't look like a bad cell is involved.
NiMH batteries typically don't just uniformly lose capacity over
time. They lose the capability to hold charge but this set seems to
hold charge as well as any.
Fast forward in time 8 months. I
ran another discharge test on the, now older and used, battery.
This time there was higher load. There were two cameras connected,
a USB travel hub AND and LED headlight running at 20 mA. The run
time was about half as long. Most of this difference is likely due
to the increase in load. Since the discharge curve looks "normal"
with a steady voltage through the entire discharge and then a rapid
collapse at the end, it doesn't look like a bad cell is involved.
NiMH batteries typically don't just uniformly lose capacity over
time. They lose the capability to hold charge but this set seems to
hold charge as well as any.
Rewind 8 months....
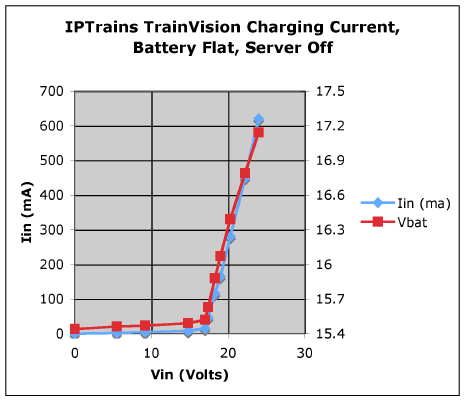 The recharge IV curve after
the battery was run flat looks pretty much the same as the fully
charged charging current tests EXCEPT that the battery voltage is
lower. Therefore, the charging current starts at a lower input
voltage and the charging current is higher. Since the battery is
flat, the voltage of the battery is lower at 24 volt as well. As
the battery picks up charge, the battery voltage will increase and
the current will decrease.
The recharge IV curve after
the battery was run flat looks pretty much the same as the fully
charged charging current tests EXCEPT that the battery voltage is
lower. Therefore, the charging current starts at a lower input
voltage and the charging current is higher. Since the battery is
flat, the voltage of the battery is lower at 24 volt as well. As
the battery picks up charge, the battery voltage will increase and
the current will decrease.
 After the discharge test, I set
the system up to recharge from it's flat state at the recommend
input voltage of 24 volts DC. The charge proceeded normally for an
NiMH battery. I deemed the charge complete when the voltage started
to increase abruptly. Doing a piecewise integration of the current
curve gives me 1.76 Ah, somewhat less than the total capacity of
the battery.
After the discharge test, I set
the system up to recharge from it's flat state at the recommend
input voltage of 24 volts DC. The charge proceeded normally for an
NiMH battery. I deemed the charge complete when the voltage started
to increase abruptly. Doing a piecewise integration of the current
curve gives me 1.76 Ah, somewhat less than the total capacity of
the battery.
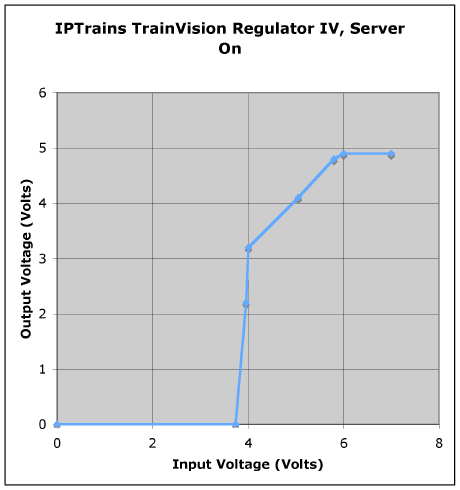 The 5
volt regulator that IPTrains uses has a fairly low dropout voltage
of about 1 volt. This would allow a 7.2 volt battery pack to power
the system if that is all that is running from the battery. If 2.3
Ah cells were used, then the low voltage pack would also last 12
hours.
The 5
volt regulator that IPTrains uses has a fairly low dropout voltage
of about 1 volt. This would allow a 7.2 volt battery pack to power
the system if that is all that is running from the battery. If 2.3
Ah cells were used, then the low voltage pack would also last 12
hours.
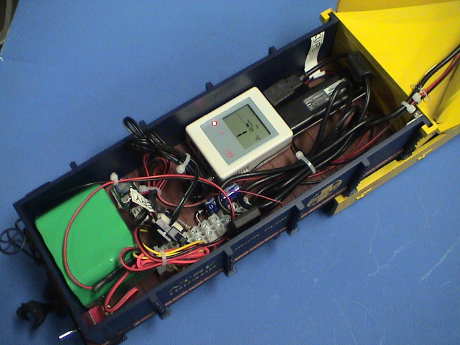
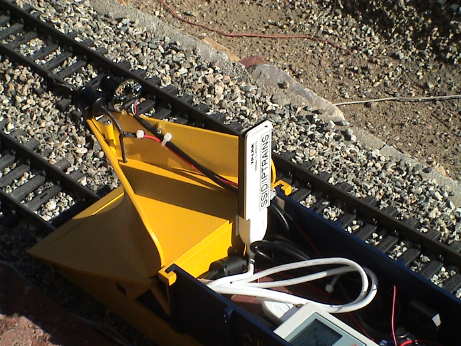
I am still playing with this camera system. When I am done testing on the bench, I am going to put it into a Aristo Snowplow. The snowplow has it's own power pickups and I can run the camera in front of any train that I choose. I'm going to mount the camera right next to the headlight on the engineer's side. The rest of the stuff will go into the gondola section of the car. The larger components will mount on the floor with double back foam mounting tape. There is lots of extra wire in the kit, I'm not going to trim it, that's what tie wraps are for. The only hole that I have to drill is for the power switch. I'll probably install it at the back of the car.
 This is the
installation in the Aristo Snow Plow. The car has plenty of room so
mounting the components was easy. I tapped power from the headlight
wires right behind the headlight.
This is the
installation in the Aristo Snow Plow. The car has plenty of room so
mounting the components was easy. I tapped power from the headlight
wires right behind the headlight.
When the server starts up, it reports some important information on the display so that the installation should be arranged to allow viewing of the display. The display is not backlit so that some light will have to get to the display to allow it to be viewed.
The server reports the subnet mask value, the IP address of the gateway that provides DHCP services, then the DHCP provided IP address of the server itself. It also reports frame rate. You'll need to know the IP address of the server to establish a connection to it.
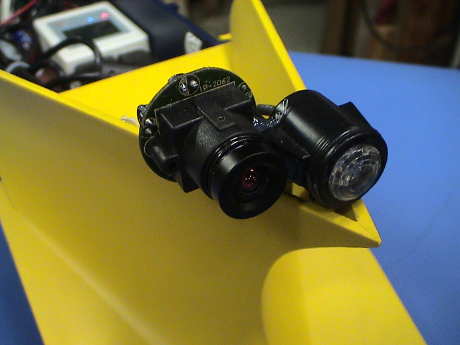 The camera
itself is mounted with a couple of small dabs of hot glue right
next to the headlight. It isn't perfectly level, but it is pretty
close. I'll tweak it later. Hot glue works ok in moderate
temperature environments, but in really hot places, the glue will
soften. Once the correct position of the camera is found, then it
can be mounted more securely with epoxy putty.
The camera
itself is mounted with a couple of small dabs of hot glue right
next to the headlight. It isn't perfectly level, but it is pretty
close. I'll tweak it later. Hot glue works ok in moderate
temperature environments, but in really hot places, the glue will
soften. Once the correct position of the camera is found, then it
can be mounted more securely with epoxy putty.
This camera is the low light version, the IP-2061, has a sensitivity to 2 lux. It is more sensitive than the human eye and it will make very dim scenes seem brighter than they really are. There is one video posted at my GIRR Video page that was done in total darkness after I had changed the stock snow plow incandescent lamp to a warm white LED running at 20 mA. The stock lamp didn't put out enough light to get any video, with the LED, you can actually see things.
I have done an initial investigation into capturing the video produced by TrainVision. A program called iMultiView comes with the system that allows video to be captured to a file. Unfortunately for me, this is a Windows program. I do not own a Windows computer anymore. Windows is nearly useless to me because I use a Macintosh but I do have a version of W2K that runs virtualized under Parallels on my wife's MacBook. The program appears to install, but it does not run properly. I am still trying to figure out what it is not doing properly.
However, there is a MUCH easier solution for Mac users. There is a shareware program called SnapZProX that will do screen captures of anything on the screen, including video. The program is REALLY easy to use. It captures the video right into a QuickTime movie file encoded as h.264. The only downside of this software is that it costs $69 beyond the 15 day free trial period.
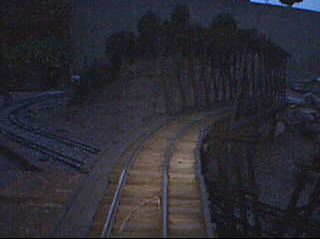
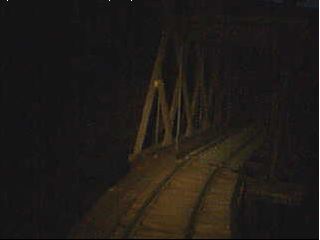
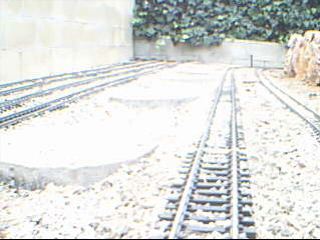
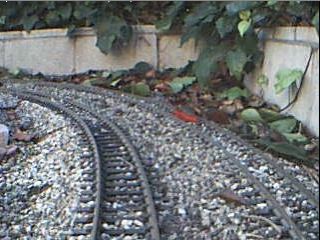
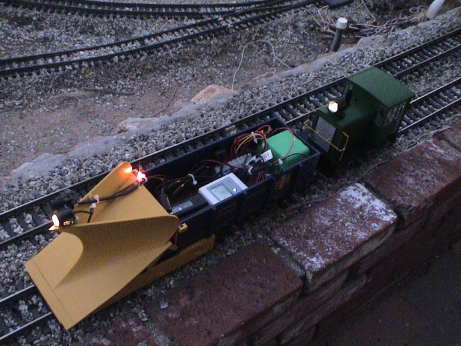 The
assembled car is ready for its first test run. I did this run at
about 5 PM and it was getting dark, this is the middle of January.
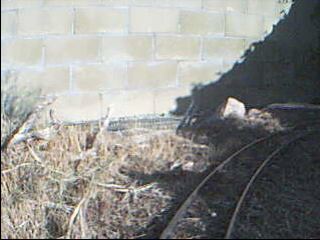
The images in the h.264 video make it look much lighter than it really was.
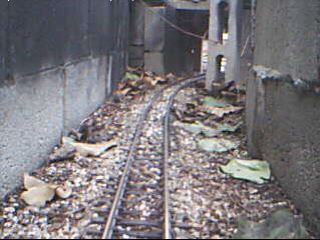
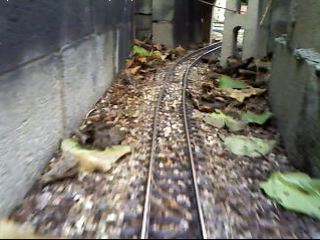
The camera has better low light sensitivity than the human eye.
This did, however, cause some smearing of the image while it was in
a shadowed area where the light was even lower as the camera was
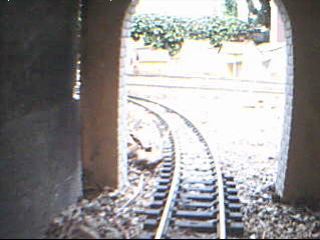
taking longer exposures to keep up with the loss of light. Then the
camera comes out of a tunnel portal and it is hit with more light
and it blooms badly until it adjusts to the new light level again.
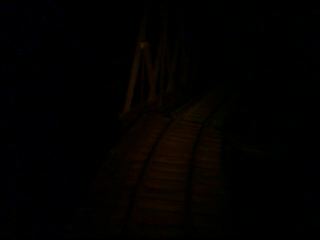
I did experience some dropouts in about that same spot in later
runs. The AP is not mounted in a very advantageous spot. It is
simply propped against a window inside the house looking out toward
the layout. I am going to mount it on a chin up bar that is high
above the layout and overlooks the whole thing. Dropouts in this
system result in stalls in the video where the image freezes until
the link is reestablished. I believe that the actual frame rate is
about 12 fps for this run. This is limited by the Java engine in my
browser more than anything else. The MultiView program for Windows
apparently does better, this camera is capable of about 20 fps.
The
assembled car is ready for its first test run. I did this run at
about 5 PM and it was getting dark, this is the middle of January.
The images in the h.264 video make it look much lighter than it really was.
The camera has better low light sensitivity than the human eye.
This did, however, cause some smearing of the image while it was in
a shadowed area where the light was even lower as the camera was
taking longer exposures to keep up with the loss of light. Then the
camera comes out of a tunnel portal and it is hit with more light
and it blooms badly until it adjusts to the new light level again.
I did experience some dropouts in about that same spot in later
runs. The AP is not mounted in a very advantageous spot. It is
simply propped against a window inside the house looking out toward
the layout. I am going to mount it on a chin up bar that is high
above the layout and overlooks the whole thing. Dropouts in this
system result in stalls in the video where the image freezes until
the link is reestablished. I believe that the actual frame rate is
about 12 fps for this run. This is limited by the Java engine in my
browser more than anything else. The MultiView program for Windows
apparently does better, this camera is capable of about 20 fps.
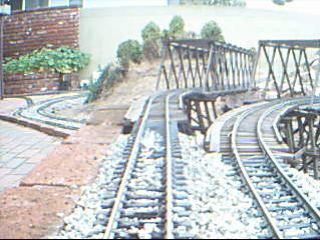
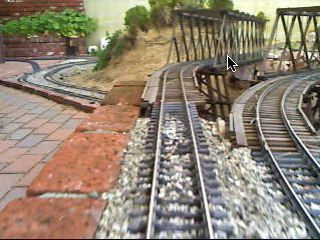
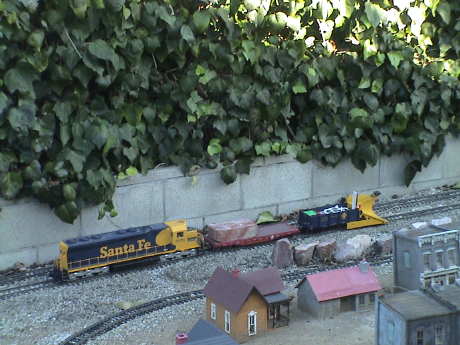 The next day
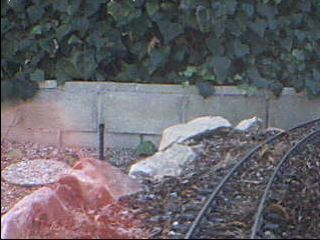
I made some further test runs with this train to determine what
actually worked best. The flatcar with the brick was a hack to keep
the SD45 from dragging the rear of the camera car off the track due
to coupler swing issues. I also used the flatcar to drive around my
camcorder for one run. At 640 x 480, the maximum capability of this
particular camera, the frame rate is too slow so I settled on 320 x
240. Smaller sizes didn't appreciably improve the frame rate. I
made several runs and posted all them to my GIRR Video page but two runs deserve
comparison.
The next day
I made some further test runs with this train to determine what
actually worked best. The flatcar with the brick was a hack to keep
the SD45 from dragging the rear of the camera car off the track due
to coupler swing issues. I also used the flatcar to drive around my
camcorder for one run. At 640 x 480, the maximum capability of this
particular camera, the frame rate is too slow so I settled on 320 x
240. Smaller sizes didn't appreciably improve the frame rate. I
made several runs and posted all them to my GIRR Video page but two runs deserve
comparison.
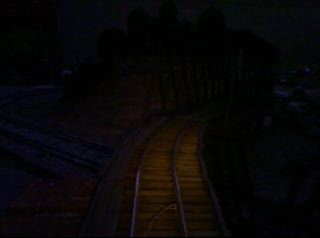
 The
reference movie run was done at 320 x 240 resolution
resulting in an average frame rate of about 12 fps. There were
several WiFi dropouts with the access point inside the house
overlooking the layout through a window. The link wasn't really
good and I wondered if the position of the WiFi dongle on the
camera car would matter so I remounted it as in the photo. This
made a material improvement as show in this video.
The
reference movie run was done at 320 x 240 resolution
resulting in an average frame rate of about 12 fps. There were
several WiFi dropouts with the access point inside the house
overlooking the layout through a window. The link wasn't really
good and I wondered if the position of the WiFi dongle on the
camera car would matter so I remounted it as in the photo. This
made a material improvement as show in this video.
I have a few issues with the TrainVision system, none are particularly serious, but some kind of improvements are possible.
Software. This is really an issue that impacts me but will probably not be a big problem for others. We run a nearly MicroSoft-free zone at my house. Everybody uses a Macintosh. The software that comes with the system is Windows only but it not absolutely necessary to have Windows to use the system. The video can be displayed in any Java enabled browser.
The viewer software, iMultiView, that comes with the server has more capability than a browser can provide. It can view the video at higher frame rates and it can save video files. However, I have not been able to get it to run properly on Windows 2000 running virtualized on a Macintosh. It partly works, but when it gets to the point of actually viewing a camera, the software gets to the point of displaying images and then just sits there. This looks like a deep down problem but maybe more pounding on it will reveal the secret to getting the software working. There is also a Utility program that comes with the TrainVision system. This one starts up but most of it is non-responsive. It does not find the camera on the net.
WIth the Windows version of IE running virtualized on the Mac I can get indicated frame rates of 23 fps or so by using ActiveX but I cannot save the video. Java on the virtualized IE runs about 7 fps. By using CrossOver (an implementation of Wine), I can also get a Windows version if IE6 running on the Mac, but then the AxtiveX frame rate is a little less than using Safari. iMultiView also does not run under CrossOver and the Utility starts up but is still unresponsive.
Frame rate. The TrainVision system as delivered can provide frame rates up to about 20 fps. This is limited by this particular camera. There are other cameras available that may do better. The frame rate is limited even more by the method used to view the video. The iMultiView program supplied (Windows only) produces the best frame rates but only with a pretty smokey computer running XP which I do not have. ActiveX in a browser is the next best but it is also Windows only. Java produces the lowest frame rates. I get about 12 fps. Running iMultiView under Windows 2000 virtualized in Parallels 4 or 5, It also runs about 12 fps but appears to be less steady than running in Java on a Macintosh browser. Windows hates Java, don't bother with it there.
The computer used to view the images can limit the frame rate even more. If the CPU isn't fast enough, the rates can slow down. If two users are viewing the same image, they split the server's attention and the rates go down again. Larger images involve more data and they result in lower frame rates.
I set up TrainVision to allow two sessions in two modes and I recorded the average frame rate and CPU utilization on two different computers, a dual core 2.0 GHz Intel iMac and a single core 1.25 GHz G4 PPC PowerBook.
| Image Size | Number of Sessions | Computer | Resulting Frame Rate | Total CPU Utilization |
|---|---|---|---|---|
| 320 x 240 | 1 | PowerBook | 5 fps | 80% |
| iMac | 12 fps | 30% | ||
| 2 | Powerbook | 4 fps | 70% | |
| iMac | 11 fps | 25% | ||
| 640 x 480 | 1 | PowerBook | 2.5 fps | 100% |
| iMac | 8 fps | 25% | ||
| 2 | Powerbook | 2 fps | 90% | |
| iMac | 7 fps | 20% |
The things to note are that the iMac blows the doors off the much slower PowerBook in all cases. Also when there are 2 sessions running, the frame rate goes down because the server is working harder but the CPU utilization also goes down because each computer is being fed data at a lower rate. The larger images have the same trend, but the frame rates are all slower.
To get the best rates, use the smaller images, limit the number of sessions allowed and use a fast computer. Java is slow, I cannot help the server now by not using Java, but at least I can use a faster computer so that Java is not the hang up at the computer end.
Lighting. The camera used by TrainVision has automatic exposure control, but it only has a limited rage of capabilities. It actually seems to do better in lower light situations than in very bright light. It especially has troubles when there is a wide variety of lighting in a scene. When a train leaves a dark area, such as a tunnel, blooming is expected. But where there is bright sun and shadow in the field of view, the camera has hard time dealing with it and often saturates in the light areas trying to keep some image in the darker areas. Try to use it when the lighting is most uniform, either all sun or all shade.
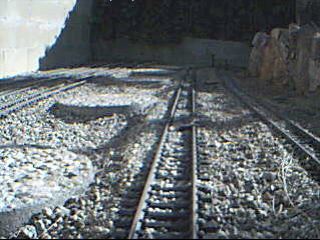
WiFi Access Point Placement and Link Quality. It turns out that the placement of the WiFi Access Point is pretty important to reduce dropouts. After I was convinced that the train side of the link was working, I installed the access point in a spot that I thought would work well, about 8' above the layout. I went to some considerable work to install the AP on a chin up bar that was mounted to the back of my house by a former owner. It didn't work. The AP has very poor coverage straight down and some of my main line ran right underneath it. I took it down and started looking for a better place to mount it.
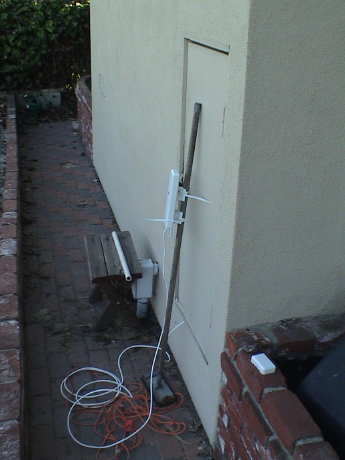 I hung it
on the handle of my pole sander so that I could set it up in
several locations to see what worked best. I could slide it up and
down the handle to set the height, turn it in any direction and
move it to different locations. This particular access point seems
to like being set about 4' off the ground and it doesn't like a
reflective backing such as the chicken wire that is inside the
stucco on my house. The best place seems to be on the wooden door
to my control cabinet. This is convenient because it'll be pretty
easy to get the Ethernet cable back to where it belongs from there.
The cabinet is also about halfway down the long side of the layout.
There are sill some dropouts when the train is on the backside of
Geologically Improbable Mountain but these are inconsistent, they
don't happen every time. I'm going to leave it with this temporary
mounting until I'll determine that this is the exact spot where it
wants to be. Then I screw a plastic sprinkler pipe to the door and
then clamp the AP to the pipe.
I hung it
on the handle of my pole sander so that I could set it up in
several locations to see what worked best. I could slide it up and
down the handle to set the height, turn it in any direction and
move it to different locations. This particular access point seems
to like being set about 4' off the ground and it doesn't like a
reflective backing such as the chicken wire that is inside the
stucco on my house. The best place seems to be on the wooden door
to my control cabinet. This is convenient because it'll be pretty
easy to get the Ethernet cable back to where it belongs from there.
The cabinet is also about halfway down the long side of the layout.
There are sill some dropouts when the train is on the backside of
Geologically Improbable Mountain but these are inconsistent, they
don't happen every time. I'm going to leave it with this temporary
mounting until I'll determine that this is the exact spot where it
wants to be. Then I screw a plastic sprinkler pipe to the door and
then clamp the AP to the pipe.
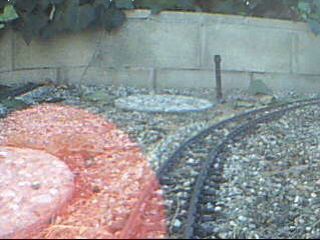
By the way, that orange cable on the ground is an Ethernet crossover cable. The AP will work fine if a crossover cable is used on the LAN side of the power injector. However, a crossover cable will not work on the cable between the injector and the AP. The AP won't get any power.
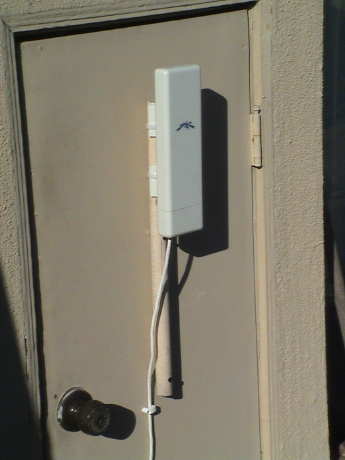 I finally
determined that the location on the door to my control closet was
as good as it was going to get so I mounted the AP to a piece of
plastic sprinkler pipe screwed to the door. The Ethernet cable runs
under the door (there is a sufficient gap) and back to my LAN.
I finally
determined that the location on the door to my control closet was
as good as it was going to get so I mounted the AP to a piece of
plastic sprinkler pipe screwed to the door. The Ethernet cable runs
under the door (there is a sufficient gap) and back to my LAN.
 IPTrains sent me
another camera to try. This one is called the CM-51. It is a little
smaller than the IP-2061, has poorer low light sensitivity but MUCH
better color and color saturation. The colors from the IP-2061 look
a little washed out. The CM-51 also doesn't bloom as badly coming
out of tunnels. This camera also supports 640 x 480. It also is
listed to support 1280 x 1024 but I haven't been able to get that
mode to work. At any resolution, the frame rate is about 10% less
than the IP-2061 camera.
IPTrains sent me
another camera to try. This one is called the CM-51. It is a little
smaller than the IP-2061, has poorer low light sensitivity but MUCH
better color and color saturation. The colors from the IP-2061 look
a little washed out. The CM-51 also doesn't bloom as badly coming
out of tunnels. This camera also supports 640 x 480. It also is
listed to support 1280 x 1024 but I haven't been able to get that
mode to work. At any resolution, the frame rate is about 10% less
than the IP-2061 camera.
 I mounted the CM-51
camera on the other side of the snow plow headlight, again with a
little hot glue. I was then able to make two test runs in the
nearly the same lighting conditions, late afternoon with a thick
overcast.
I mounted the CM-51
camera on the other side of the snow plow headlight, again with a
little hot glue. I was then able to make two test runs in the
nearly the same lighting conditions, late afternoon with a thick
overcast.
The IP-2061 movie was actually done second and the light was just a little dimmer but it looks pretty much the same as the previous shots, although with less blooming upon leaving the tunnels. The new CM-51 camera produced much better color in it's initial test run. In normal lighting, I think that this camera will produce better results. In near darkness, it doesn't do so well.
The camera just showed up in the mail recently so that I haven't been able to get any bright sunlight shots yet. I'll add some more stills when the opportunity arises.
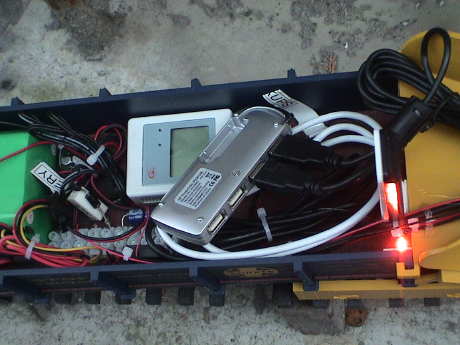 There are only two USB
ports on the server so when I added the 2nd camera, I had to add a
USB hub to connect it. This HP travel hub was available so it got
used.
There are only two USB
ports on the server so when I added the 2nd camera, I had to add a
USB hub to connect it. This HP travel hub was available so it got
used.
On the afternoon of a rainy day after most of the clouds had cleared, the whole layout was in shadow with uniform but not overly bright light. I ran two loops with one camera going each time and selected some spots where the weakness of each camera showed up so that I could compare the other camera in nearly the same lighting conditions. The CM-51 is mounted a little to the left and is pointed downward just a little in comparison to the IP-2061 so that the angles and fields of view are just a little different. I picked frames that were as close as I could get to make the stills.
Both cameras have some sort of exposure setting. The IP-2061 had "indoor" and "outdoor" modes. These are labeled as "anti-flicker." It was not clear to me that the anti-flicker mode ALSO sets the exposure mode. The first filtered light run in the table below was done in an indoor, or low light, setting, hence the overexposure. The CM-51 camera has settings for 1 to 10, 1 being the high light setting. In near darkness where the CM-51 runs out of gas, this setting doesn't do much. However, out of doors, it will run the camera between a good picture and one that is totally washed out.
| IP-2061 | Conditions and Notes | CM-51 |
|---|---|---|
|
The IP-2061 is optimized for low light conditions. It works where the other one won't. However, the price for this capability is loss of color saturation and the tendency to wash out in strong light, especially with light backgrounds. |
The CM-51 works much better in normal lighting conditions. It's color and color saturation is much better when there is enough light to run it. The color balance of the CM-51 seems to shift at the same times as it does an exposure correction. However, in darkness or near darkness, the CM-51 is fully useless. |
|
| Deep Twilight | ||
| Anti-Flicker (Indoor 60 Hz) | Camera Exposure Setting | 1 (outdoor) Testing later shows that in near darkness, setting the exposure to 10 doesn't do much. |
 |
LED Headlight running The CM-51 is out of it's league in this light, or lack thereof. If night running is desired, there is only one choice, only the IP-2061 will work. |
|
| Full Darkness | ||
| Anti-Flicker (Indoor 60 Hz) | Camera Exposure Setting | 1 (outdoor) Testing later shows that in total darkness, setting the exposure to 10 doesn't do much. |
 |
LED Headlight running In full darkness, the CM-51 is fully useless, the IP-2016 still provides a credible view as an engineer might see with only his headlight illuminating the track. |
 |
| Filtered Sunlight | ||
| Anti-Flicker (Indoor 60 Hz) | Camera Exposure Setting | 1 (outdoor) |
| IP-2061 video | The Movies | CM-51 video |
 |
Facing North All over the image, the CM-51 has much better color and color saturation |
 |
 |
Facing NE The image has a mostly light background and the IP-2061 image is badly overexposed. Note the weed to the right that almost disappears in the IP-2061 image. |
 |
 |
Facing SW The IP-2061 doesn't bloom as badly in this filtered light as it does in direct sunlight. The CM-51 didn't seem to bloom at all. |
 |
 |
Facing East This row of stepping stones virtually saturated out of the IP-2061 image. |
 |
 |
Facing South Inside a daylighted "tunnel" where the light is dimmer, the IP-2061 looks similar to the CM-51 with only a slight loss of saturation. |
 |
 |
Facing SW Exiting the daylighted tunnel, the IP-2061 bloomed enough such that the buildings in the image virtually vanished. |
 |
| Direct Low Angle Sunlight | ||
| Outdoor Contrast these against the ones above where the IP-2061 had an inappropriate exposure setting |
Camera Exposure Setting | 1 (outdoor) |
| IP-2061 video | The Movies | CM-51 video |
 |
With the sun behind the cameras, the lighting isn't going to get any better. The CM-51 produces an overall better image with higher contrast and more saturated colors. The CM-51 pictures just look more like the original scene. |  |
 |
Contrasting the IP-2061 image of some weeds vs. the one above with the inappropriate exposure setting, shows that the camera can produce a good picture in bright sunlight, just not as good as the CM-51. | 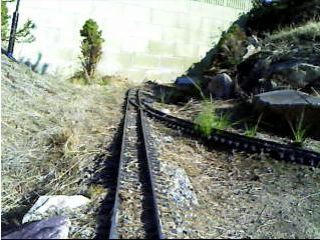 |
 |
To the eye the shadows in the CM-51 image are not deep but then again, the real shadows are not washed out like in the IP-2061 image. | 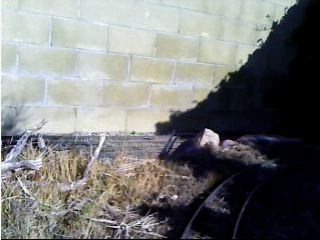 |
 |
Both camera's flare to some extent when sunlight illuminates the lens directly. The flares on the IP-2061 happen more often but when a flare does happen on the CM-51, it impacts more of the image. These are not at quite the same angle because the flares impact the cameras at different angles. |  |
 |
Both cameras bloom when exiting a dark area into a lighted one. The CM-51 recovers faster. |  |
 |
Another instance showing the impact of flaring. In this view, the cameras are looking into the sun. | 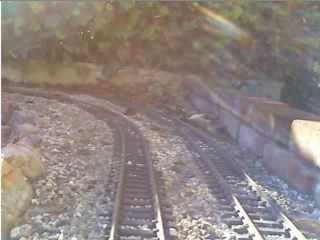 |
 |
In even lighting, the CM-51's color saturation is much better in both red and green. | 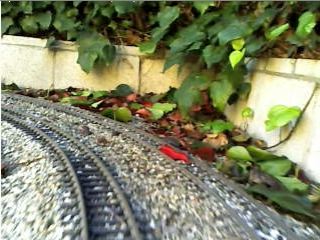 |
 |
The IP-2061 tends to saturate at high lighting while still picking out some detail in a deep shadow. The CM-51 favors the high lighting letting the shadows fall to black. Neither camera has nearly the dynamic range of the human eye. | 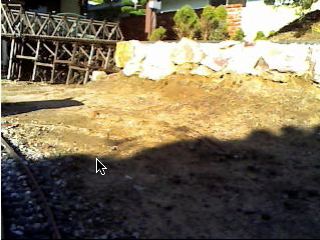 |
 |
Compare this image to the one of the stepping stones in the filter lighting example above. With an appropriate exposure setting, both cameras produced a similar result. | 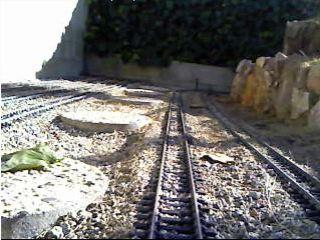 |
 |
This is another flare. The IP-2061 flared several times in between this image and the previous one of the stepping stones. The CM-51 didn't flare at all. | 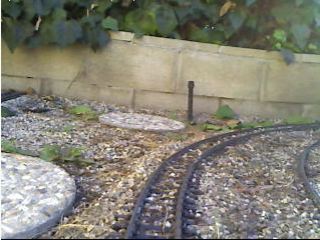 |
I use a Macintosh exclusively simply because the Mac OS is so vastly superior to Windows that I simply cannot stand Windows unless I simply must use it. However, this can cause difficulties in a Windows-centric world. The software that comes with the IPTrainVision system is Windows only however there are ways of dealing with it on a Macintosh.
Use Mac Only Software. This is what I had been doing for the first 8 months or so that I had the system. The video can be displayed in any Java capable browser window (I used Camino because is does straight Java a little faster than Safari) to view the images coming back from the cameras. Capturing video on the Mac required a 3rd party software package called SnapzProX ($69 trialware). This worked fine for the two weeks that the trial lasted and I didn't actually need to capture video after that. That is how all the video shown on this page was captured.
Boot Camp. The camera system comes with a Windows software package called iMultiView. An Intel Mac can run Windows by using an Apple provided utility called Boot Camp to create a Windows partition on some disk and then installing and dual booting into Windows XP SP2 or later. At that point, the Mac is a 100% Windows machine with the exception that an Apple provided driver allows Windows to actually see into the Mac disk to make file transfer easier. I don't have XP so I could not use this approach.
Virtualization. There are two ways to run an alternate OS on the Mac. Any OS that will run on an Intel architecture can be run within a virtualized environment on a Mac via the aid of Parallels or VM Ware Fusion. These software packages are about $80 each, only one is needed and they work about the same. I have Parallels.
In a virtualized environment, the alternate OS runs within a window in the Mac OS. With Parallels 4 at least, there is also a "coherence" mode that gets rid of the Windows desktop and just mixes the Mac and Windows windows together on the Mac desktop. I don't do that, I found it a little confusing so I keep all the Windows stuff in a single large window. Any OS, from DOS to Windows 7 or a PC Linux distribution can run in a virtualized environment with very good compatibility. I use Windows 2000 Professional because I have a legal copy and W2K.
CrossOver. There is an implementation in the Linux world of a Windows emulator called Wine. This has been ported to the Mac's underlaying BSD operating system (Darwin) and called Darwine. A GUI called CrossOver has been built on that to allow a Windows .EXE file to execute directly on a Mac without Windows present. It does this by intercepting calls to the Windows API's and translating them on the fly. This works for programs that make ONLY standard API calls. Many do including MicroSoft Office and others. Most of the Windows software that comes with model railroad stuff does something funny and most of it will not run under CrossOver.
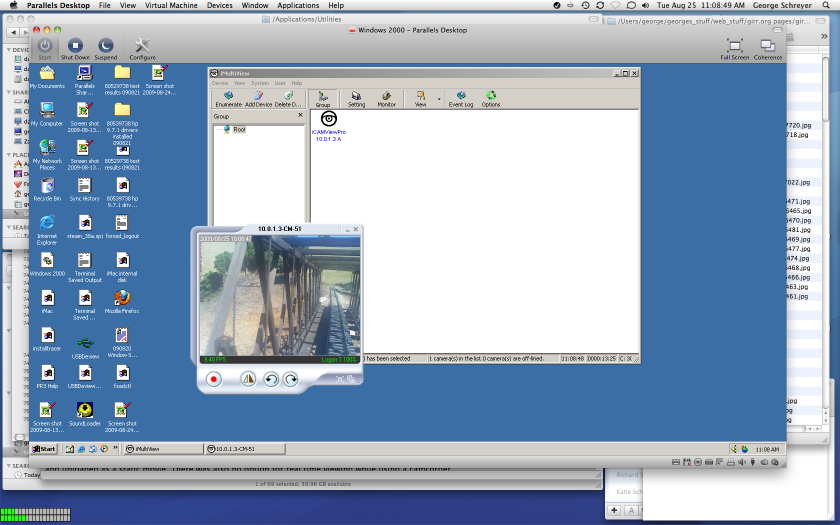 I
originally tried to run the iMultiView software that comes with the
camera kit in Parallels 3 under MacOS 10.5.x. It didn't work. This
is what drove me to use Mac only solutions. However, the problem
appeared to be in the Parallels 3 software. I got an upgrade to
Parallels 4 for other reasons and I finally tried it and it then it
worked. The Macintosh screen shot is the iMultiView software running under
W2K in a window in the MacOS. One advantage of iMultiView is that it will capture the video into a .WMV or .AVI format without the need for other video capture software. This video
is then stored in the virtualized Windows environment in a shared
folder. The contents of this folder are also available to the MacOS
so I can then just pick the video up from there and use it.
I
originally tried to run the iMultiView software that comes with the
camera kit in Parallels 3 under MacOS 10.5.x. It didn't work. This
is what drove me to use Mac only solutions. However, the problem
appeared to be in the Parallels 3 software. I got an upgrade to
Parallels 4 for other reasons and I finally tried it and it then it
worked. The Macintosh screen shot is the iMultiView software running under
W2K in a window in the MacOS. One advantage of iMultiView is that it will capture the video into a .WMV or .AVI format without the need for other video capture software. This video
is then stored in the virtualized Windows environment in a shared
folder. The contents of this folder are also available to the MacOS
so I can then just pick the video up from there and use it.
I processed the video in two ways because the .AVI file was so large. QuickTime X compressed the video into a .m4v video file. This is processed version that is less than 1/3 the size of the original .AVI file. iMovie was then used on that file to make a smaller one. These two files may play differently depending on the plug in's in your web browser. I'm still not getting the 20 fps frame rate that IPTrains says that I should get.
For the last few days, I have been working with IPTrains and trying to find the limits to the frame rate on the system. I don't get the rates that IPTrains says that they get, but I don't have a real PC either and I think that this is the basic problem.
This system is designed to work with Windows. It makes use of ActiveX which is not supported on a Macintosh. Even though the graphics hardware that Apple uses may indeed support the MicroSoft proprietary protocol, the Apple OS does not. Apple uses another graphics language, OpenGL, to interface with graphics hardware efficiently.
The software in the IPTrains webserver also supports Java to allow compatibility with non-MicroSoft systems. However, Java as implemented in the server is slower by about 1/2 than the ActiveX implementation. Where ActiveX should net about 24 fps give or take, Java gets about 12 depending on the speed of the computer at the receiving end. My wife's Core 2 Duo MacBook will do a little better because it's CPU is 8% faster by clock rate and the Core 2 Duo operates more efficiently that the Core Duo processor in my old iMac. Using an old 1.25 GHz PPC PowerBook, the Java frame rate drops to about 4 fps at best.
The Java performance on the Mac is limited first by the processor speed, and next by network performance and ultimately by the web server performance. I can get a little more frame rate performance by connecting the server via an Ethernet cable but this isn't practical for anything besides testing. I don't know what the ultimate Java performance of this system is, but I doubt that I'll ever see anything beyond 15 fps. I do see that in ActiveX mode, the server serves more bits per second by about 50% than in Java mode. This indicates to me that the wireless network can support higher data rates (it should, the ActiveX rate is about 10% of the capability of 802.11g) than are being served in Java so that the server is probably doing nearly it's level best serving Java at rates of about 15 fps.
I also noticed that when one client connects to the both cameras via Java, the frame rate doesn't collapse by half. It degrades by some, but not nearly half. In a single camera case, I was getting 9 fps on the iMac. With both cameras were connected, the two added together were about 15 fps. If a single computer wasn't enough to swallow all the server was capable of, then multiple clients should be able to swamp it. When TWO clients connect to the same camera, the frame rate also drops by some, but not nearly half. When the two clients connect to DIFFERENT cameras, the drop is similar. Since the server has to juggle more bits when dealing with multiple clients, it must have SOME headroom or it would drop in half. With an RF link and two cameras being served, the total frame rate delivered to BOTH clients is running about 16 fps. I then fired up FOUR client computers and ran both cameras, each camera to two clients. The net rate to all four of them together was about 16 fps. This looks like the capability of the server and network together. With the server connected to a wired LAN, the four clients aggregated a rate of 20 fps so it looks like the network is involved too.
IE and iMultiView in Windows both support ActiveX and I can run both in a virtualized OS using Parallels 4. It turns out that this can't help, actually it's worse. Since my hardware does not support ActiveX, Parallels must emulate ActiveX calls with OpenGL calls. This takes time and slows down the whole works. If I record a video in iMultiView as a .AVI file, I get a reported frame rate in the video of 24 and sometimes 30 fps. However by examination of the video frame by frame, I find that there are only 8 unique frames per second. The rest are padded out with copies of the most recent unique frame. I just get a much bigger video that is jumpy. Further, the unique frames that I do get don't come at even intervals. Sometimes, the frames come quicker, sometimes there is a gap of 8 to 10 duplicated frames that results in what looks like a short drop out in the video. It isn't at all smooth like Java is on the Mac.
IPTrains reports that their experience is the opposite of mine. Their experience is that Java is jumpy and ActiveX is smooth. I am guessing here, but MicroSoft doesn't much like Java and their implementation is known to be less than ideal. I expect that limitations in MicroSoft's Java implementation are causing jumpy Java video in Windows. Apple has tried very hard to optimize the performance of Java and it shows.
Recording in .WMV format is MUCH worse. In that format, I get just 2 unique frames per second. Useless.
Until I get a much faster computer, it looks like I must use Java and accept a smooth but slow frame rate running 11 or 12 real frames per second. All of the video shown on this site was recorded at 12 or 12.5 fps to control the overall size of the video. Sometimes there will be a padded frame to take the 11 to 12 fps real frame rate out to the rendered frame rate.
Those with Windows machines that support ActiveX natively will do better than 20 fps but I haven't seen that so I cannot comment on how well it actually works....yet. This will change shortly as my wife has purchased a Toshiba laptop to deal with another Windows centric problem. She needs to use ArcGIS (a very powerful mapping program) to support her work toward an MS in Archaeology. It doesn't install under her Parallels implementation due to memory and perhaps other limitations. This is a student copy that expires in 6 months. The real version of the program costs $15K but with her advisor's approval, she can get a student copy that does not expire for $250.
We could have purchased a retail copy of Vista ($240) and used Boot Camp with her MacBook but then she'd need an external disk as well as her internal disk is only 120G (the MacBook is an older one) and it is perpetually full. Further, her student copy of ArcGIS will install exactly one time. If the install fails, that's it and she needed it NOW so she could do her homework. While I am pretty sure that the installation of Vista on the MacBook would have worked, the retail cost of Vista is just too high for a crappy OS and most of that money would drop to MicroSoft's bottom line. Instead, we elected to pay a little more and get a dedicated piece of turnkey hardware where most of our money went to a variety of hardware manufacturers instead of MicroSoft.
A Toshiba laptop was being blown out at Costco for $550. It has a 2 GHz Core 2 Duo and 3 GB of RAM, enough to run ArcGIS minimally well. It comes with a Windows 7 upgrade and Word, PowerPoint and Excel. It only has the Intel integrated graphics chip set so it will be slow doing graphics rendering but it will work. She didn't want a Windows computer but because of our poor history with Windows and our continued excellent experience with the Mac, but time constraints indicated that this was probably our best choice.
With that computer, I'll be able to evaluate the ActiveX performance on run-of-the-mill hardware.
The computer arrived yesterday and the news she ain't so good. The plain Jane Vista box doesn't have enough smoke. It's performance is about the same as iMultiView running virtualized in Parallels on an iMac. Java in IE is very bad, slow and jerky. ActiveX performance is IE is no better than Java performance in Safari on a Mac.
IPTrains indicates that Vista is indeed a pig and the boxes that perform well run faster processors, better graphics and XP.
However, ArcGIS is installed and working so that the primary mission of this iron has been accomplished.
I did get a sample video from IPTrains that was recorded at 30 fps in iMultiView on some rather smokey PC hardware using XP. This 30 fps video actually had 21 unique frames in each second and 9 padding frames. While the video ran relatively fast, it did appear a little jerky due to the unsteady displayed frame rate. Many of the videos shown above appear about the same even though the actual rate is much less. I think that this is because each frame has new info in it and runs slowly but smoothly. The lack of a smooth rate stands out and makes a higher frame rate look worse than it really is.
Since the main limiting factor in getting a smooth video is the client hardware, the best thing to do is use the fastest hardware that you've got. If it's a PC, use XP or earlier and iMultiView. Vista (and probably Windows 7) are much slower. If it's a Mac (preferably with Snow Leopard) use Java in a browser.
Unsteady video is the most jarring and annoying visual characteristic. It is much worse than slow and steady video. The jumpiness comes from frame padding. If your actual video rate was an even 15 fps and the display (or recording) is at 30 fps, this will look fine because there will be one real frame and one padded frame occurring continuously and you will see what looks like a 15 fps video. When the actual rate is not an even divisor of the displayed rate, there are problems. The server and the client operate asynchronously. You might get two real frames in a row and then 3 padded frames, then another real frame and one padded frame continuing in an unsteady fashion. This is what you want to avoid. You want to display frames at the same rate that they are available to avoid padding as much as possible.
If you just want to view the video in real time, go for it. On a PC, set the Camera settings in iMultiView to 30 fps and let it rip. On a Mac, all current Java browsers seem to work about the same. In Mac OS 10.5, I found that Camino consistently provided better Java performance than any of the others by 10% to 20%. However, Camino 1.6.9 (the latest version as of the date of this writing) is broken in 10.6 due to a shift in the version of Java. This will get fixed but for now, any Mac browser that supports Java will work.
If you want to record video for later playback, then some more tuning is needed. You will need to match the frame rate of the capture mechanism to the actual achieved frame rate that you can get with your hardware. This is done to avoid frame padding. Padded frames just add to the file size and actually detract from the viewability. The method is basically the same on both the Mac and a PC. On the PC in iMultiView, you will use the frame rate control in the Settings>Camera tab. On a Mac, you will need to purchase SnapzProX ($69) to provide a mechanism to capture video at a rate that you select. Once a video has been captured at a higher frame rate, it is really hard to strip out individual frames and to end up with a steady rate. This can be done in iMovie on a Mac, but it is a manual process and REALLY time consuming. The higher end Mac video editing software (Final Cut Express and Final Cut Pro) MAY be able to do this, but these are expensive pieces of software. I don't know how to do this on a PC. The easiest way is to just initially capture the video an an appropriate rate in the first place.
On a Mac, the Java window in MOST browsers will display a frame rate on the lower left part of the window. It will vary but the average rate that you see is also a good indicator of the frame rate that you can use for video capture. On a PC in iMultiView, a rate is also shown, but this appears to be an unreliable indicator of the real frame rate. I've found that the actual rates achieved are often quite a bit less than what is indicated in iMultiView.
Somehow, you need to find a good capture rate. You can cut and try, or you can analyze some captured video for guidance, and then cut and try over a smaller range of target rates.
We'll start with the analysis approach on a Mac. Capture the video and import it to iMovie. From there, you can step through the video frame by frame and actually count unique frames. Step through several seconds of video with motion in it so that you can see unique frames. Count all the unique frames in a given second of video. This is the actual rate. You should get the same count in several different seconds. There is probably PC video software that can do this same thing but I don't know which titles can do it.
Once you have a count, or a wild guess, you can start tuning the rate via cut and try. Shoot several short segments and capture them at various rates around your expected rate. Then examine the result and determine what just looks the best. Once you've found the highest rate that doesn't appear to have unsteady jumps, then you have your rate.
With iMultiView running virtualized on a Mac, I've found that the rate setting is a little more difficult because when the frame rate setting is slowed, the capture rate seems to be impacted as well. I had to get down to 5 fps to get a "steady" capture. Faster PC hardware won't be so limiting.
If you upgrade your capture hardware, then you'll have to do this again to find the new "best" rate. Also note that the low light IP-2061 camera provides a slightly better rate than the better looking CM-51 camera. Light levels will also have an impact. Lower light slows down both cameras and at some point, they will start dominating the achieved frame rate although it may have to get pretty dim for this to be a serious problem.
[ Home ] [ Up ] [ Previous Page ] [ Next Page ]
This page has been accessed times since 13 Jan 09.
© 2009 George Schreyer
Created 13 Jan 09
Last Updated November 7, 2009