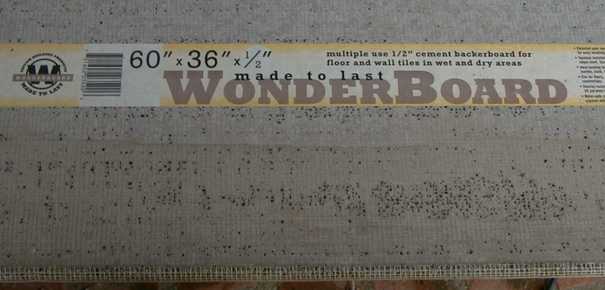
 WonderBoard is a concrete based sheet material that is
normally used as a backing for ceramic tile. It is nothing more than a
conglomeration of cement particles bonded with cement and captured
between two layers of fiberglass fabric.
WonderBoard is a concrete based sheet material that is
normally used as a backing for ceramic tile. It is nothing more than a
conglomeration of cement particles bonded with cement and captured
between two layers of fiberglass fabric.For some time, I have been searching for materials and methods to scratchbuild weather proof buildings. I don't want weather resistant, I want weatherproof. I intend to leave my buildings out all year. JigStones and corrugated aluminum cans can be used for such structures but they don't lend themselves to making Santa Fe mission style station. I have tried, with little luck, to use foam cores with a cement overcoat for such buildings. Then it occurred to me that WonderBoard would make a great core material for truly rugged outdoor buildings. It does make a great core, but WonderBoard doesn't lend itself to really fine detail. For 10' rule construction, it works fine. For finescale modeling, it's not so good.
WonderBoard is a concrete based sheet material that is
normally used as a backing for ceramic tile. It is nothing more than a
conglomeration of cement particles bonded with cement and captured
between two layers of fiberglass fabric.
The material is porous and it will soak up moisture, but because it is made of cement it is not degraded by moisture. It therefore can make a rot free core for structures that can survive out of doors. It will need to be sealed or protected to prevent intrusion of moisture so that subsequent freezing won't tear the material apart. On an exterior WonderBoard surface, this can be done with a layer of stucco, mortar or grout.
WonderBoard usually comes in 3' x 5' sheets either 1/2" or 1/4" thick. Both thicknesses are useful in building construction. You can find WonderBoard or similar materials in most home improvement stores in the ceramic tile section for about $9 a sheet in the 1/4" thickness.
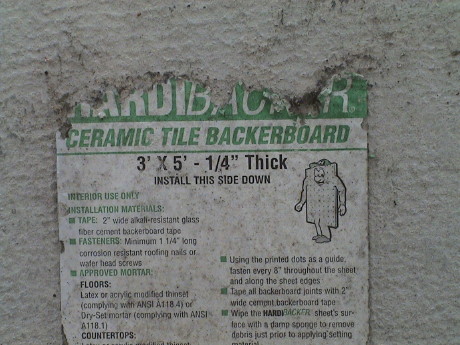 There are other backer board materials available, my local Home Depot also carries HardiBacker. This stuff is much less suitable for outdoor construction. It is not intended for outdoor use and it is not as stiff as WonderBoard. It can be scribed and broken, but not with as much reliability. It is also more brittle as it tends to break if bent just a little too much. WonderBoard just cracks and creaks when it is bent without being scribed. HardiBacker can be cut with a sabre saw though and it doesn't appear to tear up the saw blades as much as WonderBoard. When cut with a saw, or scribed and broken, the edges are much cleaner and don't require as much treatment.
 26 Dec 07 29 Dec 07 31 Dec 07
 WonderBoard is easily shaped, straight cuts are
straightforward. The fiberglass cloth on one or both sides is simply
scribed with a utility knife and the board will break easily on the
scribe. Then the sheet is folded on the mesh on the other side and the
knife is used again to cut the second mesh. Even relatively narrow
strips can be scribed off a whole sheet.
WonderBoard is easily shaped, straight cuts are
straightforward. The fiberglass cloth on one or both sides is simply
scribed with a utility knife and the board will break easily on the
scribe. Then the sheet is folded on the mesh on the other side and the
knife is used again to cut the second mesh. Even relatively narrow
strips can be scribed off a whole sheet.
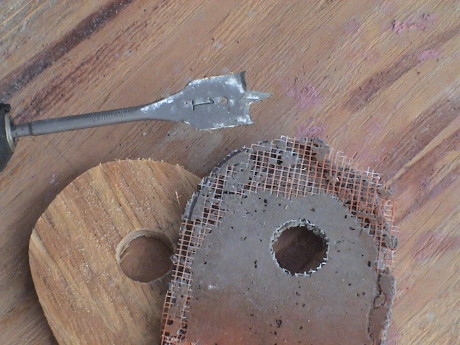
WonderBoard is really hard on regular utility knives. A carbide tipped scribing tool will last longer, but if you have replacement blades a regular knife works well enough.
Since the material is made of little chunks of concrete, don't expect a completely clean cut. You may have to use a pair of pliers to remove a little extra material here and there. Simply crush off the undesired material.
[ Top ]
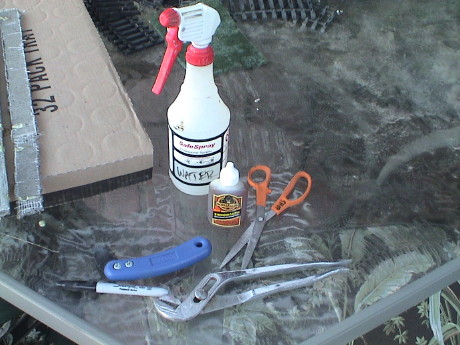 Most of the work that you do with
WonderBoard can be done with these simple tools. The blue scribing tool
is a carbide tipped knife that is especially designed to scribe
WonderBoard. A Sharpie or pencil is handy for marking scribe lines. The
slip joint pliers are good for nibbling off pieces that remain on a cut
edge and for breaking the scribe lines on narrow pieces. The scissors
are for trimming off the fiberglass mesh that didn't scribe completely
through after a break. The Gorilla Glue and water are for tacking
pieces together during construction. Most of the joint strength will
come from patching cement, such as RapidSet, that will be applied
later.
Most of the work that you do with
WonderBoard can be done with these simple tools. The blue scribing tool
is a carbide tipped knife that is especially designed to scribe
WonderBoard. A Sharpie or pencil is handy for marking scribe lines. The
slip joint pliers are good for nibbling off pieces that remain on a cut
edge and for breaking the scribe lines on narrow pieces. The scissors
are for trimming off the fiberglass mesh that didn't scribe completely
through after a break. The Gorilla Glue and water are for tacking
pieces together during construction. Most of the joint strength will
come from patching cement, such as RapidSet, that will be applied
later.
The carbide scribing tool may last a long time, but it doesn't produce the cleanest breaks. Use it for heavy work. A better scribing tool is a common utility knife and LOTS of replacement blades. A utility knife produces a cleaner cut and hence, a cleaner break. However, the Wonderboard will dull the blades quickly so prepare to get a new one several times a day.
When you are working with wet cement, protect your hands with latex or similar medical examination gloves. I use gloves made of Nitrile that I get at Costco, however you can get them by the box at any drug store. The Costco gloves seem to hold up better than latex. Cement will tend to draw the moisture right out of your skin, don't let that happen.
[ Top ]
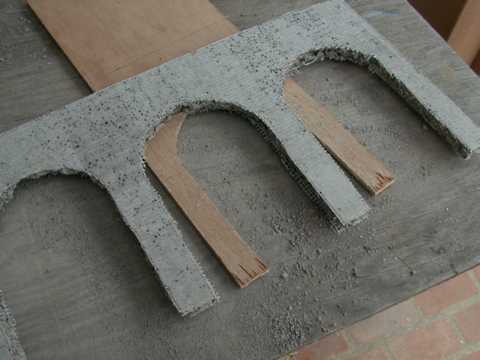 More complex shapes are possible in
WonderBoard as well. This row of arches was formed with the aid of a
plywood tool. It is possible to break out large sections with only
small sections left between them. Windows can be made the same way.
More complex shapes are possible in
WonderBoard as well. This row of arches was formed with the aid of a
plywood tool. It is possible to break out large sections with only
small sections left between them. Windows can be made the same way.
The tool is cut in the desired shape and then used to outline the cut in pencil on BOTH sided of the material. Then the tool is used to guide the scribing knife on BOTH sides of the material.
Since a line that isn't straight cannot be simply bent, the removal method is a bit more crude. The wood tool is placed underneath the WonderBoard sheet aligned with the scribe marks and a hammer is used to pound out the undesired material. The tool serves to keep the desired material from breaking while the undesired material is literally sheared out. The cut is a little rougher than the scribe and break method, but it works.
Ron Wenger wrote to say that he uses a sabre saw to cut WonderBoard. This works too, WonderBoard cuts easily but it is hard on the saw blades. Have spares handy. The stuff can be drilled with a masonry drill to allow a clean start for a sabre saw.
 Larger round holes are fairly easily cut into Wonderboard with a regular wood drill or even a hole saw. The drill or hole saw is used ONLY to cut through the fibers on both sides. Wonderboard will ruin a drill pretty quickly if you try to cut all the way through. The drill is also used to cut out a hole in a template. Then the hole is pounded out with a hammer just like with the arches.
[ Top ]
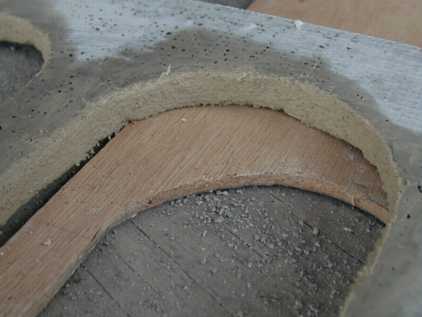 The broken edges of WonderBoard are very porous and
should be sealed. The easiest method is to seal them with mortar or
grout. The pieces should be sealed BEFORE a building is assembled. In
the process, the edges will also be squared up.
The broken edges of WonderBoard are very porous and
should be sealed. The easiest method is to seal them with mortar or
grout. The pieces should be sealed BEFORE a building is assembled. In
the process, the edges will also be squared up.
I use RapidSet Cement All to seal the edges but any good mortar mix should do. The first layer of sealing material should be mixed somewhat wet. If you mix in a paper cup, the stuff at the top will tend to be thinner anyway, use that to pour in the edge and then overcoat with the thicker mix at the bottom. The broken edge should be propped facing upward and wetted with a spray of water. The wet cement mixture can be poured or ladled on. It will soak down into the broken edge and strengthen the edge while providing a base for a thicker mortar that is used to square up the edge.
As the cement mix is thickening, it can be applied with a popsicle stick or other tool to build up the edge and square the corners. After the cement has set for half and hour or so, it can be shaped further with a small tool.
Don't be to concerned about excess cement mix that is slopped around. After the cement has been applied, scrape off the excess and spray the WonderBoard surfaces with water from a pump bottle. The excess cement will wash right off. Before the cement fully sets, after a half hour or so, scrape it off the sealed edges to further square them. A light spray of water will soften the surface to allow it to be smoothed. If a surface of a WonderBoard piece will be exposed to moisture, the surface can be buttered with a layer of cement as well to seal it.
[ Top ]
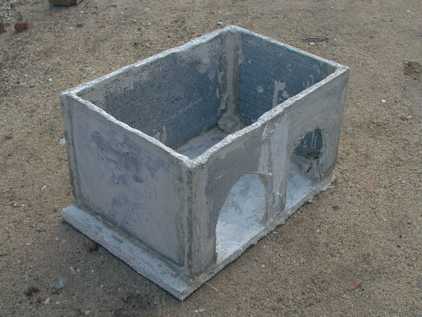 I knocked this little test building together to see if I
could assemble a building entirely from cement. I was successful to
some extent. It is clear that it would have been easier if the walls
and floor had been preassembled with small dabs of adhesive of some
kind. Mortar is a little difficult to use as it has no strength until
it sets up and working on the building before the cement has set will
disturb previously made joints. It might also be desirable to include
some reinforcement in the joints in the form of a wire or plastic mesh.
This building was strong enough without it, but over time, cracks may
propagate and break a whole joint. I didn't do that in this building,
I'll be evaluating the technique in later structures.
I knocked this little test building together to see if I
could assemble a building entirely from cement. I was successful to
some extent. It is clear that it would have been easier if the walls
and floor had been preassembled with small dabs of adhesive of some
kind. Mortar is a little difficult to use as it has no strength until
it sets up and working on the building before the cement has set will
disturb previously made joints. It might also be desirable to include
some reinforcement in the joints in the form of a wire or plastic mesh.
This building was strong enough without it, but over time, cracks may
propagate and break a whole joint. I didn't do that in this building,
I'll be evaluating the technique in later structures.
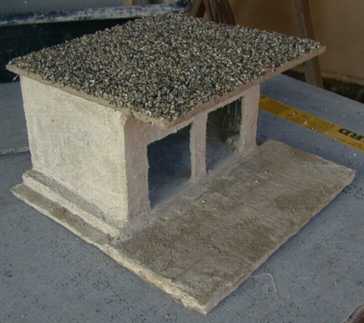 The building wasn't
originally intended to be anything, it was just assembled from scraps
of 1/4" WonderBoard on an 1/2" WonderBoard base. However, it looked
that it might actually make a usable building. By adding a larger base
of 1/4" WonderBoard (double thickness under the apron), a rock roof and
by squaring up the doorways it will make an acceptable auto repair
shop.
The building wasn't
originally intended to be anything, it was just assembled from scraps
of 1/4" WonderBoard on an 1/2" WonderBoard base. However, it looked
that it might actually make a usable building. By adding a larger base
of 1/4" WonderBoard (double thickness under the apron), a rock roof and
by squaring up the doorways it will make an acceptable auto repair
shop.
The walls have been coated with RapidSet to simulate stucco. Once the RapidSet is partially set, a light rubbing brings out the sand and roughs up the surface a little. The apron's cement overcoat has been scribed to simulate cracked concrete.
Even this little building is very heavy, probably about 10 lbs. It is clear that some attention needs to be paid to minimizing the materials used on larger structures so that they aren't so heavy that they cannot be moved around.
Update, June 2008. The test building had been sitting out on the layout for 8 years and, besides a coating of dirt, was none the worse for wear. It appears that the unreinforced joints are good enough. One just has to be patient during construction to allow new structural joints to set up completely (about 4 hours) before placing any stress on them. I have converted this building in to a gas station and garage with the addition some bits and pieces that I bought at the Big Train Show.
[ Top ]
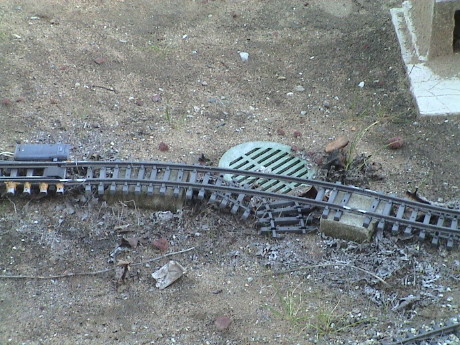 There is an intentional low spot on the
GIRR to direct rainwater into a drain. The track crosses directly in
front of the drain. Since the initial construction, the track has been
supported be two broken pieces of capping block. In 1996 this was
intended to be a temporary patch, but it became sort of permanent. In
the intervening time, the sun had destroyed the tie strips in that
area. While I was getting ready to fix the track, I finally built the
"stone" viaduct that was supposed to be at this location all along to
both look better and to sort of hide the drain.
There is an intentional low spot on the
GIRR to direct rainwater into a drain. The track crosses directly in
front of the drain. Since the initial construction, the track has been
supported be two broken pieces of capping block. In 1996 this was
intended to be a temporary patch, but it became sort of permanent. In
the intervening time, the sun had destroyed the tie strips in that
area. While I was getting ready to fix the track, I finally built the
"stone" viaduct that was supposed to be at this location all along to
both look better and to sort of hide the drain.
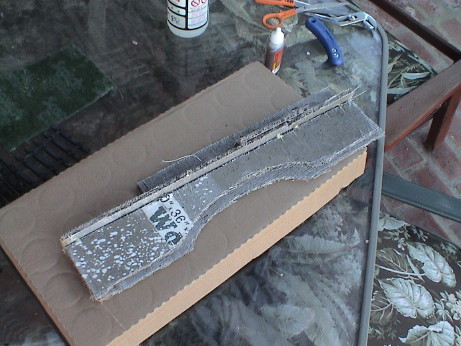 This is the start of a "stone" viaduct.
Two pieces of WonderBoard were cut and shaped to form the viaduct
edges. Two more narrow pieces are placed over the top as capstones.
Right now, some Gorilla Glue tack joints are setting up to hold the
edges together until I cement them with RapidSet. The RapidSet will
also be used to seal all the edges and to coat the surfaces. On the
sides, I will scribe grooves in an overcoat of RapidSet to simulate
joints between the stones making up the viaduct.
This is the start of a "stone" viaduct.
Two pieces of WonderBoard were cut and shaped to form the viaduct
edges. Two more narrow pieces are placed over the top as capstones.
Right now, some Gorilla Glue tack joints are setting up to hold the
edges together until I cement them with RapidSet. The RapidSet will
also be used to seal all the edges and to coat the surfaces. On the
sides, I will scribe grooves in an overcoat of RapidSet to simulate
joints between the stones making up the viaduct.
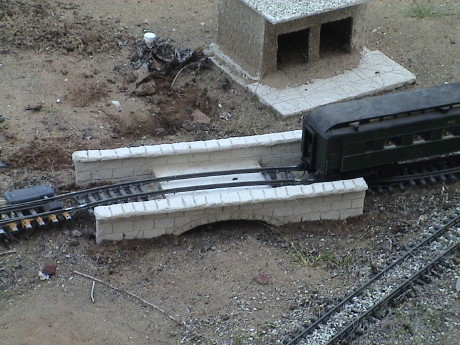 This is the viaduct set in place and positioned
so that it doesn't interfere with the heavyweight diner test car. It
has about a half inch of clearance at the worst spots. Note that there
are no ties in the center of the viaduct. I ripped those off to get
them out of the way and then lifted the track to put the viaduct down.
When the new tie strips arrive, I'll replace them and finish placement
and ballasting of the track. The original cement blocks that supported
the track are still there, they were at the right height and location
so I built the viaduct to fit between and mask them.
This is the viaduct set in place and positioned
so that it doesn't interfere with the heavyweight diner test car. It
has about a half inch of clearance at the worst spots. Note that there
are no ties in the center of the viaduct. I ripped those off to get
them out of the way and then lifted the track to put the viaduct down.
When the new tie strips arrive, I'll replace them and finish placement
and ballasting of the track. The original cement blocks that supported
the track are still there, they were at the right height and location
so I built the viaduct to fit between and mask them.
The viaduct was built with the 10' rule in mind so it isn't finished in great detail. The backside of the viaduct is essentially unfinished, it'll stay that way because it cannot be viewed without walking around behind. It was designed with cardboard cutouts to gauge the size and shape and few measurements were made. The "stone" patterns were gouged by eye and hand and are not very uniform but it presents itself well at this distance. This truly was a cut to fit job.
Also note that the drain grate cannot be seen anymore, at least from any practical viewing angle, yet rain runoff can still drain underneath the viaduct, just as it should.
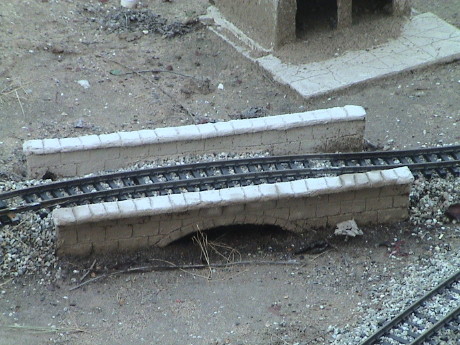 This is the finished product after the ties were replaced and the track was ballasted to fill inside the viaduct.
There are other techniques that can go along with WonderBoard but really aren't dependent on the material itself.
I want to make a Santa Fe mission style station, but I am thinking along real mission style construction. California missions were often built with brick made on site and then plastered over with a mortar or stucco like mix to hide the brick. The bricks are handmade and not very uniform. Often chunks of the overcoat would peel off exposing the brick underneath. This would often happen at corners where the overcoat gets whacked by passing traffic. This is fairly easy to simulate on a WonderBoard base.
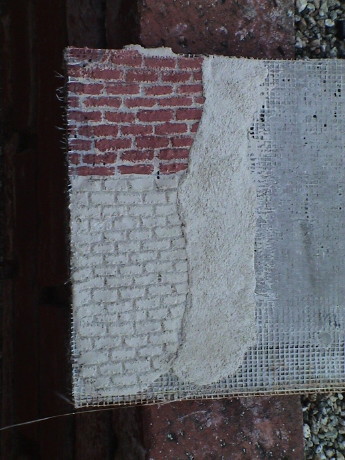 This is an experiment along those
lines. A thin later of RapidSet is spread over a WonderBoard surface.
It is then allowed to partially set and then a tool is used to scribe
out bricks. The cement that is
scribed out can be left to set in place, it won't adhere well to the
surface. After the cement has fully set, the mess of scribed out
cement is cleaned up and a brick relief is formed. The bricks can then be painted. Since the surface is fairly
non-uniform, dry brushing doesn't work real well unless you want to
simulate lime deposits on the surface as well. At the edge of the
painted part, I had not left a RapidSet layer. There, I simply painted
the brick pattern directly on the WonderBoard. Then the edge of the
"brickwork" is masked and another layer of cement is applied to seal
the rest of the surface to represent the overcoat and seal the
WonderBoard. Once this layer has partially set, the masking is removed
leaving a reasonably sharp edge representing the broken stucco. The
surface of the overcoat is rubbed to bring out the sand and hide
casting imperfections. That's it.
This is an experiment along those
lines. A thin later of RapidSet is spread over a WonderBoard surface.
It is then allowed to partially set and then a tool is used to scribe
out bricks. The cement that is
scribed out can be left to set in place, it won't adhere well to the
surface. After the cement has fully set, the mess of scribed out
cement is cleaned up and a brick relief is formed. The bricks can then be painted. Since the surface is fairly
non-uniform, dry brushing doesn't work real well unless you want to
simulate lime deposits on the surface as well. At the edge of the
painted part, I had not left a RapidSet layer. There, I simply painted
the brick pattern directly on the WonderBoard. Then the edge of the
"brickwork" is masked and another layer of cement is applied to seal
the rest of the surface to represent the overcoat and seal the
WonderBoard. Once this layer has partially set, the masking is removed
leaving a reasonably sharp edge representing the broken stucco. The
surface of the overcoat is rubbed to bring out the sand and hide
casting imperfections. That's it.
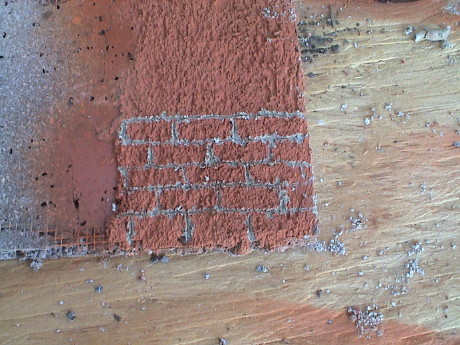
In this test piece, the part that is painted was done in a thin layer of cement. The unpainted part is thicker. Both seem to look ok so that the thickness of the layer representing the bricks is not too important. I used Floquil Oxide Red to paint the one section. Later I painted part of the other section with some paint that I found at Micheal's, a craft chain store. I could also use Rustoleum Terra Cotta spray paint, but it would have to be sprayed on a sheet of foil and then quicky brushed as it dries really fast.
 Another way to do bricks is to butter on a thin layer of RapidSet, let it set for a half hour or so, then hit the area with spray paint, in this case it was Rustoleum. The stuff dries really fast. Then simply scribe the mortar lines through the paint with a really narrow tool.
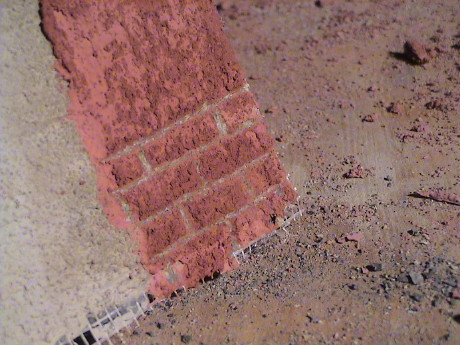 This is yet another way to make brickwork. In this sample, a layer of natural color RapidSet was buttered on the test piece and allowed to fully set. Then a another thin layer of RapidSet tinted 1% by weight with red oxide stucco tint was buttered on and allowed to partially set for 15 minutes. Then the brickwork was scribed through the tinted layer exposing the untinted layer. This has the impact of providing both the relief and the proper colors of the "brickwork" without the use of any paint at all. The tint is much less likely to fade in the sun as any paint.
[ Top ]
This page has been accessed times since 5 Nov 00.
© 2000-2008 George Schreyer
Created Nov 5, 2000
Last Updated June 8, 2008