A Santa Fe Mission Style Station
The GIRR is a fantasy railroad with the concept of being loosely
connected to the Santa Fe in the 1950's. This connection is made for a
few convenient reasons. The Santa Fe was one of three Class 1 railroads
(along with UP and SP) in the Los Angeles area. The only tracks that
went anywhere near my childhood home are those of the LA Harbor Sub of
the former Santa Fe. These are the real trains that I saw on a more or
less regular basis as I was growing up, hence, I like the Santa Fe.
Many other people like the Santa Fe as well so that the large scale
train manufacturer's will usually paint a version of anything that they
make in Santa Fe colors of some kind even if there was no prototype for
that particular piece of equipment on the real Santa Fe. This means
that there is a wide variety of equipment available, already painted
for the Santa Fe so that I can get and use a wide variety equipment
without needing to even think about repainting it. Further, Santa Fe
paint schemes are generally considered attractive.
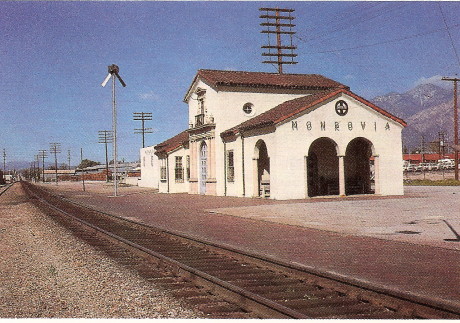 When it came to designing a passenger
station for the GIRR, it was natural for me to select the style that
the Santa Fe used all over southern California. This is the California
Mission Style. The photo is of a station in the San Gabriel Valley, the
Monrovia station. I picked this one to start with because it has the
attributes that I wanted and it is not too large. However, I didn't
intend to model this particular station, just one sort of like it.
When it came to designing a passenger
station for the GIRR, it was natural for me to select the style that
the Santa Fe used all over southern California. This is the California
Mission Style. The photo is of a station in the San Gabriel Valley, the
Monrovia station. I picked this one to start with because it has the
attributes that I wanted and it is not too large. However, I didn't
intend to model this particular station, just one sort of like it.
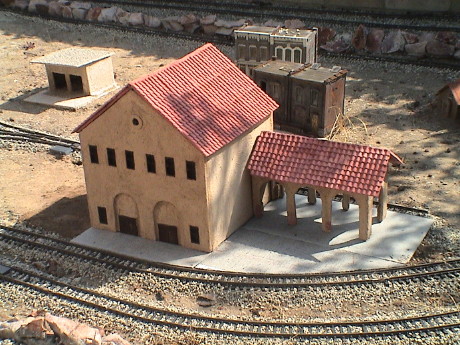
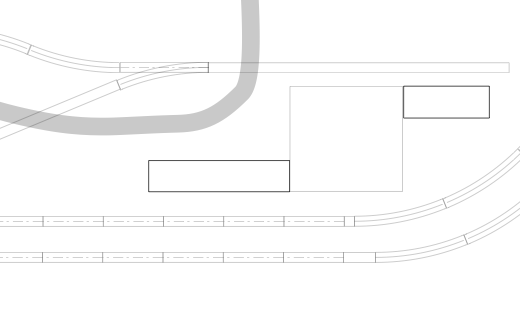 In the case of the GIRR, a station site was
reserved next to a siding on a main line. However, the site is
unusually constrained by a switch back track that eventually leads to a
freight shed and warehouse. I was
easily able to rationalize having a track on BOTH sides of the station
by deciding that it would double as another passenger loading track for
local equipment, in this case a Doodlebug. Therefore I needed a double sided
station. The arched breezeway of a typical mission style station would
be needed on both sides. I decided to build two breezeway structures
and offset a longer one to the passenger siding and a shorter one to
parallel the Doodlebug track. This also fit the area available which is
loosely shaped as a parallelogram.
In the case of the GIRR, a station site was
reserved next to a siding on a main line. However, the site is
unusually constrained by a switch back track that eventually leads to a
freight shed and warehouse. I was
easily able to rationalize having a track on BOTH sides of the station
by deciding that it would double as another passenger loading track for
local equipment, in this case a Doodlebug. Therefore I needed a double sided
station. The arched breezeway of a typical mission style station would
be needed on both sides. I decided to build two breezeway structures
and offset a longer one to the passenger siding and a shorter one to
parallel the Doodlebug track. This also fit the area available which is
loosely shaped as a parallelogram.
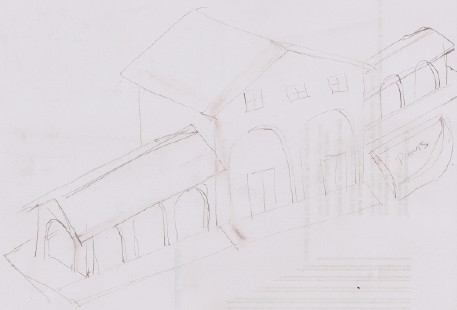 This is pretty much the extent of the original
plan for the station. I got the general concept down. Then I measured
the space available and decided on the size of the arches and started
to work. I estimated that the building would be large anyway and that's
the way it turned out. I wanted it to be imposing and that's what I
got.
This is pretty much the extent of the original
plan for the station. I got the general concept down. Then I measured
the space available and decided on the size of the arches and started
to work. I estimated that the building would be large anyway and that's
the way it turned out. I wanted it to be imposing and that's what I
got.
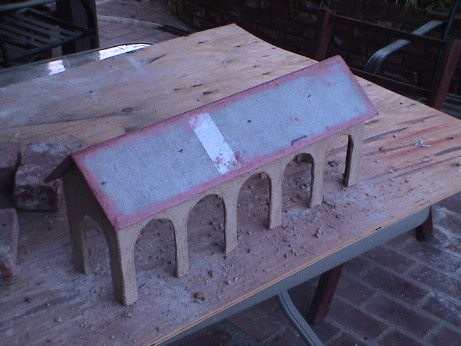
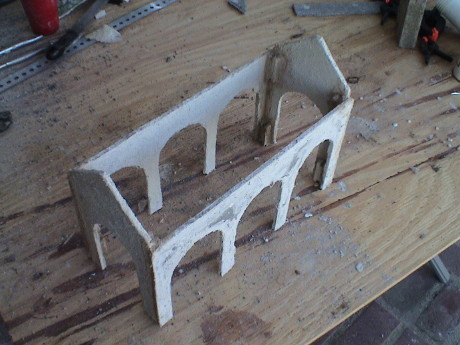 This is the
frame of the shorter arched breezeway after initial assembly. The
corners are internally braced with Jigstones, also cast in RapidSet.
The whole structure is built in three separate pieces, the two
breezeways and the central building. This is so that no individual
piece gets too large or heavy. The three pieces will be set together on
Wonderboard bases on the layout.
This is the
frame of the shorter arched breezeway after initial assembly. The
corners are internally braced with Jigstones, also cast in RapidSet.
The whole structure is built in three separate pieces, the two
breezeways and the central building. This is so that no individual
piece gets too large or heavy. The three pieces will be set together on
Wonderboard bases on the layout.
The construction method uses WonderBoard and RapidSet Cement All. I
don't intended to use any wood and minimal adhesives in this structure,
although I might use some cast resin window frames and doors on the
side that visitors will see which is also the side that will get little
direct sun.
Concrete has demonstrated it's stability out in the weather in other
structures that I have built. The structures are a little heavy, and it
is hard to model in fine detail, but for a 10' rule building that will
never come indoors, the weather resistance is the overriding factor.
When it absolutely, positively has to sit there and take it, it's hard
to beat concrete.
The RapidSet is used uncolored for structural joints that cannot be
seen or surfaces that are supposed to represent concrete. Since many
paints won't hold their color out of doors, I use stucco tint to color
the RapidSet where I want color. Stucco tints are especially selected
to be sun stable and not fade. They typically come in a 14 oz bag where
the whole bag is intended to be mixed with a standard 90 lb bag of
stucco base. This is about 1% by weight.
RapidSet is off white in color, pretty close to the pure white of
stucco base. Other cements, like Portland cement and Quikrete are too
dark in color and don't tint as well. I use the Rapid set tinted to
1.4% by weight for the roof tiles (red iron oxide) and 1% by weight for
the wall coatings (terra cotta). I have had no difficulty color
matching batches of tinted RapidSet. I mix by weight on a 5 lb postal
scale that has 0.1 oz resolution. The batches are 48 oz of dry cement
to 0.5 or 0.7 oz of tint. The precision of the scale is good enough to
match colors between batches. The weighed RapidSet and tint are dry
mixed in a gallon size Ziploc freezer bag and stored sealed until
needed. The color won't show until water is added to the mix.
Hand protection is a must when working with cement, the cement will
draw all the moisture from your skin. Use Nitrile exam gloves,
available at any pharmacy. These hold up much better than latex gloves.
I mix what I can use in a few minutes work in a paper or plastic cup
using a 4-1/2" coffee stirrer (popsicle stick) as a mixing tool. Water
is supplied from a pump spray bottle. It is easy to control the amount
of water applied simply by counting the pumps. Often, the mixture will
start to set in the mixing cup and get too thick. An additional spray
of water into the cup will soften the mixture again to allow it all to
be used. Discard the cup, stirrer and gloves after each session. Coffee
stirrers are available very cheaply in boxes of 1000 or more at
restaurant supply stores like Smart and Final.
 The subroof is also Wonderboard,
braced with small cutoffs of Wonderboard. The cutoffs conveniently came
from shaping the ends of the breezeway. The subroof is designed to sit
flush with the ends of the structure, the roof tiles will be attached
to the subroof with yet more RapidSet. I initially decided not to allow
the subroof to extend outward by sitting on top of the structure
because it would have been just too thick and disguising the edges
would have been difficult. The roof tiles then overhang the whole
structure. However, the tiles are brittle and then need the support of
the subroof so on the next parts of the structure, I am going to extend
the subroof to nearly match the size of the roof tile array.
The subroof is also Wonderboard,
braced with small cutoffs of Wonderboard. The cutoffs conveniently came
from shaping the ends of the breezeway. The subroof is designed to sit
flush with the ends of the structure, the roof tiles will be attached
to the subroof with yet more RapidSet. I initially decided not to allow
the subroof to extend outward by sitting on top of the structure
because it would have been just too thick and disguising the edges
would have been difficult. The roof tiles then overhang the whole
structure. However, the tiles are brittle and then need the support of
the subroof so on the next parts of the structure, I am going to extend
the subroof to nearly match the size of the roof tile array.
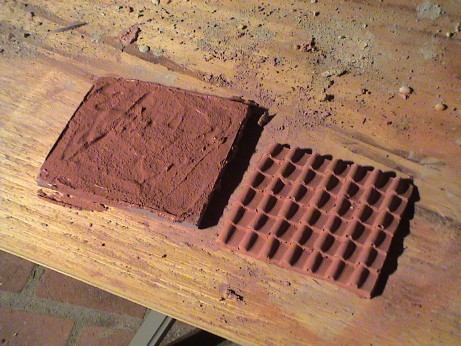 This is a roofing tile. This particular
one is a reject due to the bubbles and the fact that it is warped.
These tile sections tend to warp in the mold as they cure so I have to
weight the edges of the mold to get flat sections. The mold was made
using a piece of vacuum formed styrene sheet as the master.
This is a roofing tile. This particular
one is a reject due to the bubbles and the fact that it is warped.
These tile sections tend to warp in the mold as they cure so I have to
weight the edges of the mold to get flat sections. The mold was made
using a piece of vacuum formed styrene sheet as the master.
I found that I could weight the edges of the mold with some bricks
and the parts would come out flat, but they would often crack while
curing. The cement wants to shrink and this was causing the warpage,
but when the mold is constrained, the parts just crack instead. I found
that by spraying a layer of water on top of the freshly poured concrete
mix, the parts do not crack. I'm not sure exactly why, but it
works.
The bubbles are easiest to work out if some water is sprayed in the
mold before some of the wet cement is poured in. Only about 1/3 of the
mix should be poured and then spread throughout the mold. Then the thin
layer is poked and prodded with a coffee stirrer to work out the
bubbles that are still adhering to the mold. Then the rest of the mix
can be poured on and leveled with the coffee stirrer by skiving off any
excess cement. I've become pretty accurate in determining how much dry
mix to use so that the mold is just filled and there is virtually
nothing left in the cup when I am done pouring.
It takes 2 hours for a roof tile to set up hard enough to be
demolded without serious risk of breakage. Even then, the part is still
somewhat "green" and is darker in color than it will be when the excess
water fully evaporates. However, this is the time to use a file to
clean up the flash from the edges. Flash can still be filed off after
the part is fully set, but it's harder on the file.
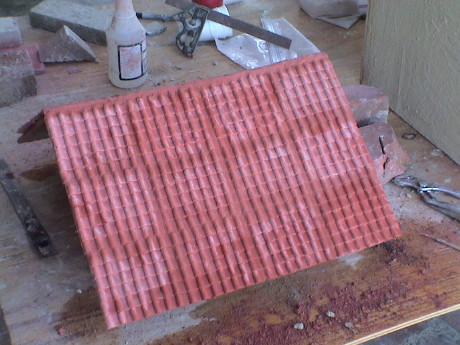
 The subroof is assembled and
ready to accept the tiles. It'll take a day or two of casting the tiles
to get enough to cover this part. It'll take a row of tiles 1 and 1/2
tiles high to cover one side of the roof, 3 and 1/2 tiles wide. I
therefore have to break some cast tiles (difficult) or cause some
defect that makes them break at the right spot. I found that I could
place a narrow coffee stirrer stick (trimmed to length) half way across
the mold to create a part line where the full tile will easily break. I
also have enough already broken parts such that I will get the right
size parts one way or another.
The subroof is assembled and
ready to accept the tiles. It'll take a day or two of casting the tiles
to get enough to cover this part. It'll take a row of tiles 1 and 1/2
tiles high to cover one side of the roof, 3 and 1/2 tiles wide. I
therefore have to break some cast tiles (difficult) or cause some
defect that makes them break at the right spot. I found that I could
place a narrow coffee stirrer stick (trimmed to length) half way across
the mold to create a part line where the full tile will easily break. I
also have enough already broken parts such that I will get the right
size parts one way or another.
The tiles will be grouted to the sub roof with the a mix of mortar
made from the same tinted RapidSet that the parts are cast in to blend
them together and, hopefully, hide the boundaries of the individual
tiles. Also, some minor casting defects can be filled in at the same
time.
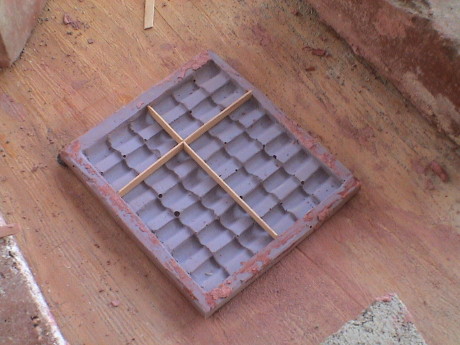 The top row of tiles are really
half height tiles. The end that doesn't overhang uses 2/3 width tiles.
It was too hard to break them cleanly so instead I pour them with a
separator in them. This setup makes the half height, 2/3 width tiles.
If I leave out the short sticks, it makes the half height tiles. The
bubbles in the mold have turned out to not be much of a problem. The
cement doesn't actually go into the bubbles anyway. Eventually, I made
another mold, this time being more careful to avoid the bubbles.
The top row of tiles are really
half height tiles. The end that doesn't overhang uses 2/3 width tiles.
It was too hard to break them cleanly so instead I pour them with a
separator in them. This setup makes the half height, 2/3 width tiles.
If I leave out the short sticks, it makes the half height tiles. The
bubbles in the mold have turned out to not be much of a problem. The
cement doesn't actually go into the bubbles anyway. Eventually, I made
another mold, this time being more careful to avoid the bubbles.
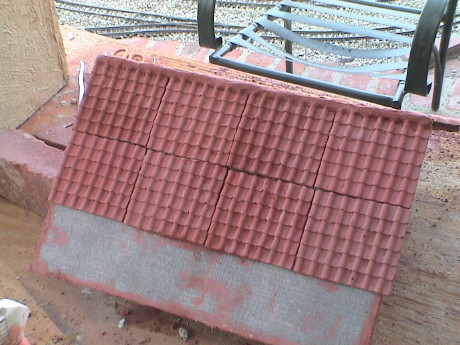
 Almost all the tiles on one side
are attached and grouted. I broke my last half height tile. I'm waiting
for a full size tile in the mold to set before I can make another half
height tile. Then, the roof on this side will be complete and I'll do
the other side. Grouting the parts together turned out to be pretty
easy. I mortar behind the tiles with a thick layer of tinted Rapid set
and place the tile. After just a couple of seconds, it'll stick in
place well enough so that I can grout around the edges in in the gaps
between the tiles. I make a big mess this way but in 5 minutes, the
cement has set up enough so that I can start scraping the excess off
with old dental tools. The joints clean up quite well. The last tile on
the end has been on there for less than 10 minutes. I've cleaned up the
joints around it and it isn't going anywhere.
Almost all the tiles on one side
are attached and grouted. I broke my last half height tile. I'm waiting
for a full size tile in the mold to set before I can make another half
height tile. Then, the roof on this side will be complete and I'll do
the other side. Grouting the parts together turned out to be pretty
easy. I mortar behind the tiles with a thick layer of tinted Rapid set
and place the tile. After just a couple of seconds, it'll stick in
place well enough so that I can grout around the edges in in the gaps
between the tiles. I make a big mess this way but in 5 minutes, the
cement has set up enough so that I can start scraping the excess off
with old dental tools. The joints clean up quite well. The last tile on
the end has been on there for less than 10 minutes. I've cleaned up the
joints around it and it isn't going anywhere.
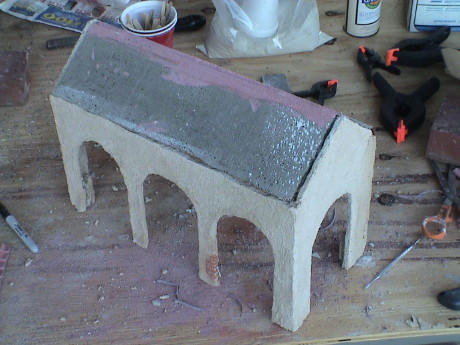
 This is the almost completed
smaller breezeway. After the other parts of the buildings are done,
I'll attached it to a base but I want to see how it will lay out before
I decided on the final size for the base.
This is the almost completed
smaller breezeway. After the other parts of the buildings are done,
I'll attached it to a base but I want to see how it will lay out before
I decided on the final size for the base.
Next up, the main building. I've revised my plan just a little bit
to make the roof an integer number of tiles in both directions. This
will avoid the hassle of casting them in partial sections.
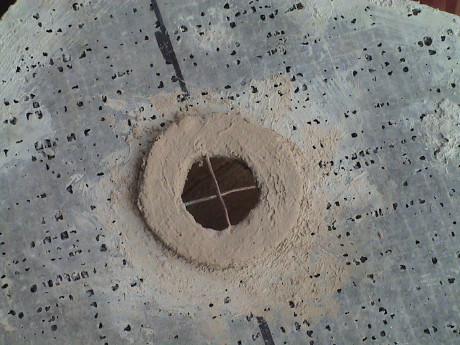 WonderBoard doesn't lend itself
to really fine construction details, but one detail that I wanted was
the round window often seen in mission style architecture. A sample can
be seen in the lead photo on this page.
WonderBoard doesn't lend itself
to really fine construction details, but one detail that I wanted was
the round window often seen in mission style architecture. A sample can
be seen in the lead photo on this page.
A 1" hole was cut in the front face of the station, see the method
at WonderBoard Tips, and
ridged with tinted wet cement. The cement was allowed to set for a few
minutes and shaped by hand. Two pieces of 18 ga copper wire were
pressed into the wet cement. The detail isn't wonderful, but it will
look fine at 10'. I'll eventually paint the wires with Floquil Engine
Black.
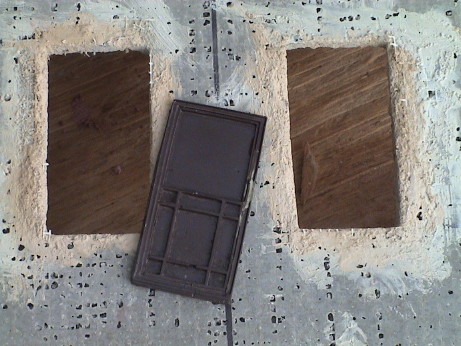 The windows can't really be done
in cement so I am using resin castings. These are painted with
Rustoleum with a layer of primer underneath the paint. The holes for
the window frames were made with the scribe and pound method. This
leaves a pretty rough cut but the edges clean up pretty well with
tinted RapidSet. The hole was finally sized with a file if it was too
small or by applying some RapidSet and allowing it to partially set up.
Then the test window (cast thicker than the real windows for strength)
was simply pressed through to skive off any excess cement.
The windows can't really be done
in cement so I am using resin castings. These are painted with
Rustoleum with a layer of primer underneath the paint. The holes for
the window frames were made with the scribe and pound method. This
leaves a pretty rough cut but the edges clean up pretty well with
tinted RapidSet. The hole was finally sized with a file if it was too
small or by applying some RapidSet and allowing it to partially set up.
Then the test window (cast thicker than the real windows for strength)
was simply pressed through to skive off any excess cement.
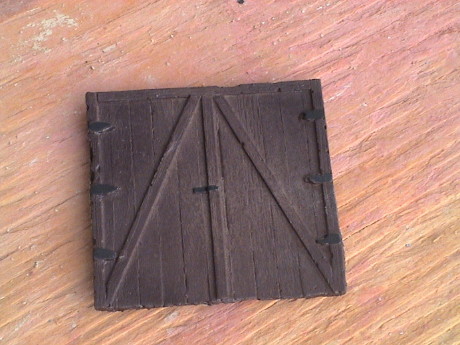 The doors on the station are
cement castings made from a homemade master. They were then painted
with the same Rustoleum as the windows and slightly detailed with some
Floquil Engine Black on the hinges. Two of these will be attached to
the front of the station with more cement and two more to the sides
leading to the breezeways.
The doors on the station are
cement castings made from a homemade master. They were then painted
with the same Rustoleum as the windows and slightly detailed with some
Floquil Engine Black on the hinges. Two of these will be attached to
the front of the station with more cement and two more to the sides
leading to the breezeways.
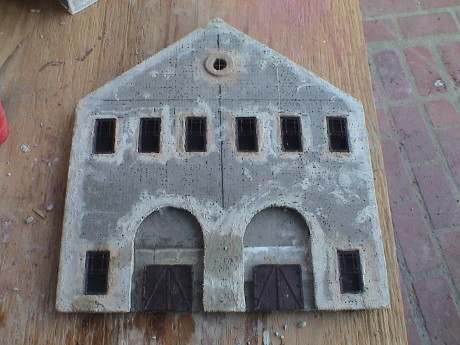 This is the whole front of the
main station building before being overcoated with stucco. The doors
and windows are in place. The windows have "shadow boxes" behind them
in the form of slabs of Wonderboard painted black.
This is the whole front of the
main station building before being overcoated with stucco. The doors
and windows are in place. The windows have "shadow boxes" behind them
in the form of slabs of Wonderboard painted black.
Even though the doors are cement, they are painted. The window
frames are Alumilite resin castings and painted. I tried to figure a
way to secure the frames with just cement, but it just didn't work out.
I used a fillet of plumber's epoxy behind each window frame to fix them
in place. The doors are attached with cement.
The next step is to mask the doors and windows and stucco all of the
wall panels for the stations and assemble the core. Then the removable
roof will be assembled and tiled. With the exception of the base, this
will complete the core.
 I don't intend to illuminate
this building but if I ever change my mind, I can break out the view
blockers and install individual room scenes or a bigger shadow box and
lamps.
I don't intend to illuminate
this building but if I ever change my mind, I can break out the view
blockers and install individual room scenes or a bigger shadow box and
lamps.
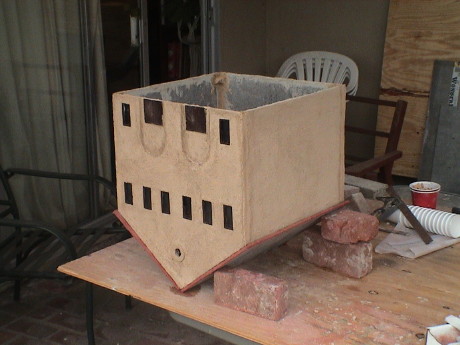
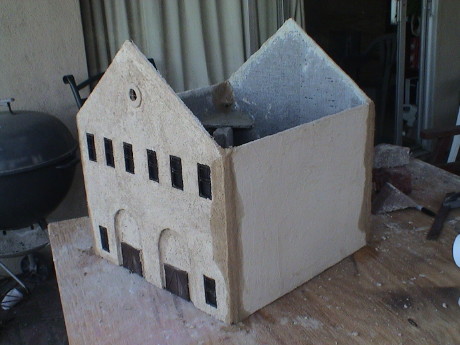 This is the assembled core
building. It is bigger than I thought it would be, but at least the
doors are to scale. The corners look dark because they are wet, I just
finished applying a coat of stucco to fill in the joints between the
front and side walls. I also added some interior corner braces, one can
be seen at the back. I do not want these joints to break so it will sit
just as it is overnight before I touch it. Then I'll carefully turn it
over and add more cement under the corner braces.
This is the assembled core
building. It is bigger than I thought it would be, but at least the
doors are to scale. The corners look dark because they are wet, I just
finished applying a coat of stucco to fill in the joints between the
front and side walls. I also added some interior corner braces, one can
be seen at the back. I do not want these joints to break so it will sit
just as it is overnight before I touch it. Then I'll carefully turn it
over and add more cement under the corner braces.
There is no detail on the sides or back now. I'll add two doors,
inside the breezeways, once I determine their final placement. There
will never be any detail on the backside. The roof is next.
 The subroof is sized to accept 4
roof tiles wide by 3 high minus a quarter inch on each side so that the
tiles overhang the subroof by just a little bit. To make sure that it
has the right angle and position, I assembled the subroof upside down
using the building core as a fixture. The subroof panels are supported
by bricks used as props.
The subroof is sized to accept 4
roof tiles wide by 3 high minus a quarter inch on each side so that the
tiles overhang the subroof by just a little bit. To make sure that it
has the right angle and position, I assembled the subroof upside down
using the building core as a fixture. The subroof panels are supported
by bricks used as props.
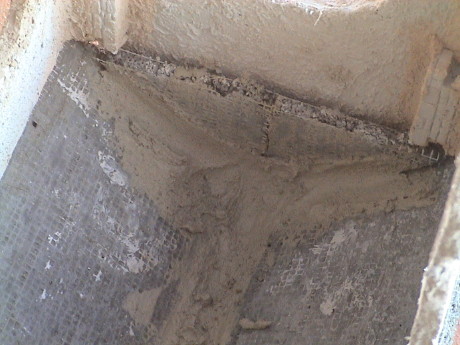
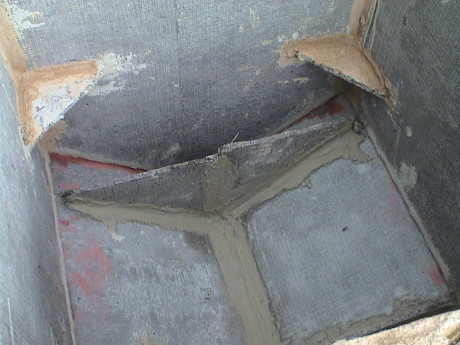 The interior of the subroof is
braced with the cutoffs from the front and rear walls of the station
core. It's all held together with RapidSet. Once the subroof has set
up, the building will be lifted off and the subroof will be propped
upright to allow the roofing tiles to be grouted in place.
The interior of the subroof is
braced with the cutoffs from the front and rear walls of the station
core. It's all held together with RapidSet. Once the subroof has set
up, the building will be lifted off and the subroof will be propped
upright to allow the roofing tiles to be grouted in place.
 The roof is close to complete in
this photo. The other side is missing four tiles, it'll take just a
little while longer to finish. The grouted areas are still wet so that
they show up, when the roof fully dries, the joints will nearly
vanish.
The roof is close to complete in
this photo. The other side is missing four tiles, it'll take just a
little while longer to finish. The grouted areas are still wet so that
they show up, when the roof fully dries, the joints will nearly
vanish.
This part of the assembly goes really fast, it took less than 15
minutes to install the tiles on this side. The grouting is done in one
pass. It leaves a pretty big mess of grout where it doesn't belong. As
soon as the last joint is grouted, I start scraping off the excess
grout, working across the grout lines in the same order that they were
applied.
 This is the unfinished side just
to show that the tile split lines are plenty obvious until grouted.
Compare it to the previous photo.
This is the unfinished side just
to show that the tile split lines are plenty obvious until grouted.
Compare it to the previous photo.
The ridge line across the top of the roof is simply a bead of tinted
Rapid set applied and formed by hand, then cleaned up with a sculpting
tool.
Just for grins, I weighed the roof and the core. The roof, in its
incomplete state, weighs 16 lbs. That will probably grow by at least a
pound when it is finished. Except for the base, the core is finished,
it weighs 21 lbs. I am guessing that the base will weigh about 5 lbs so
the total central structure should be about 43 lbs. This does not
include the breezeways. I am not too concerned about this building
blowing away in the wind.
 Two thirds of the project is
complete. I've decided not to permanently attach the structures to the
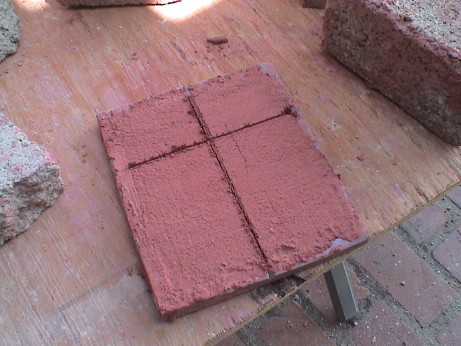
bases, they are strong enough as they are and they don't need more
weight. I still have to clean up the edges of the base sections, pave
them with cement and scribe some cracks in the paving. I'm also going
to cut a triangular shaped planter in the tapered section next to the
track.
Two thirds of the project is
complete. I've decided not to permanently attach the structures to the
bases, they are strong enough as they are and they don't need more
weight. I still have to clean up the edges of the base sections, pave
them with cement and scribe some cracks in the paving. I'm also going
to cut a triangular shaped planter in the tapered section next to the
track.
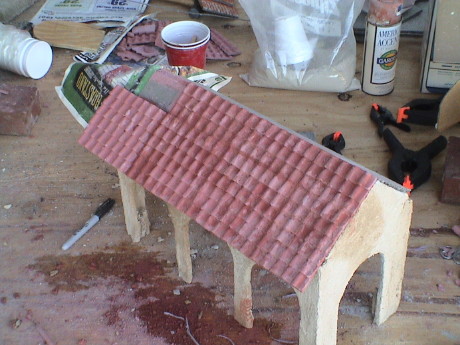
 This is the longer breezeway
ready for roofing tiles. It took about a day to build it up to this
point. When I have enough tiles for the whole thing, they'll all go on
in about an hour and the building will be finished.
This is the longer breezeway
ready for roofing tiles. It took about a day to build it up to this
point. When I have enough tiles for the whole thing, they'll all go on
in about an hour and the building will be finished.
 I was still having yield
problems with the partial tiles, the sticks in the mold helped, but
they weren't an adequate solution. Then it occurred to me that I could
just score the cast part in the green state to make a break line. I
waited an hour for the part to partially set but still be soft and
scribed the back with a utility knife, but I found that I could
actually cut all the way through the part down to the mold. Then I let
the part set fully hard and demolded it. It worked fine and at that
point, the yield was nearly 100%.
I was still having yield
problems with the partial tiles, the sticks in the mold helped, but
they weren't an adequate solution. Then it occurred to me that I could
just score the cast part in the green state to make a break line. I
waited an hour for the part to partially set but still be soft and
scribed the back with a utility knife, but I found that I could
actually cut all the way through the part down to the mold. Then I let
the part set fully hard and demolded it. It worked fine and at that
point, the yield was nearly 100%.
 Once I had enough roof tiles,
the rest of it went quickly. By the next day, it was all done. I also
paved the bases with "cement" and scribed some cracks. I cut a hole for
a planter and lined it with Jigstones.
Once I had enough roof tiles,
the rest of it went quickly. By the next day, it was all done. I also
paved the bases with "cement" and scribed some cracks. I cut a hole for
a planter and lined it with Jigstones.
I used just short of two full sheets of 1/4" Wonderboard and 50 lbs
of RapidSet on this project. There is little else in it except for 8
Alumilite window frames.
This project has been in the plans for 10 years. It took several
months of experiments to develop the processes I would use before I
started construction. Then it took 2 weeks to actually build the thing,
but it's done.
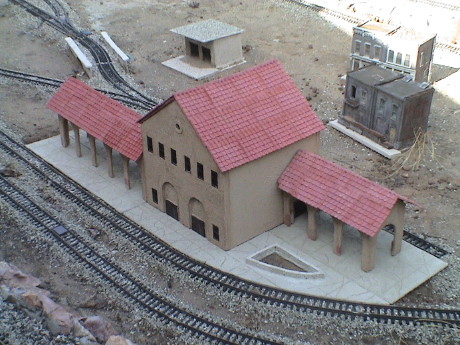
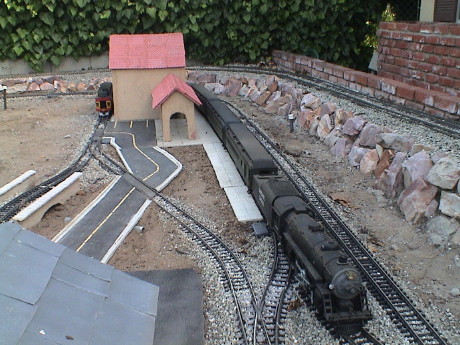 After I had run some trains to the station I realized that the platform wasn't long enough so I added about 3' of simple platform to the north end.
However, I discovered another minor miscalculation. I had set the platforms right close to the rails, too close. While the trains clear them fine, my pole sander and track cleaning cars do not. I need to move them back by about 3/8" from the edge of the rail to allow a little clearance. This may involve a little grinding on the edges of the platforms and a little repositioning.
This page has been accessed  times since 23 Mar 08.
© 2008 George Schreyer
Created 23 Mar 08
Last Updated June 10, 2008