 27 Dec 08 7 Sep 07
This page describes the installation and use of a Soundtraxx Sierra sound system. The Sierra worked quite well and was reasonably priced, but time marches on. As of September 2008, the Sierra went out of production and was not replaced by an updated stand alone sound system.
27 Dec 08 7 Sep 07I purchased a Soundtraxx Sierra sound system to install in an Aristo C-16 (about $150 from Tony's Train Xchange). The Sierra system is available with a ROM with recorded C-16 sounds. There are also ROMs for several other popular narrow gauge prototypes. As of June 2000, the Sierra is available with diesel sounds for Alco and EMD prime movers.
I feel that the Sierra is the best value available overall in large scale sound system. The sound quality is at least equal to the much higher priced Phoenix system and it has more sound features, is more programmable and provides some lighting features as well. Its sound quality is MUCH better than the lower priced digital systems (Dallee and PH) but it costs only about $30 to $50 more. The Sierra works well with both DC track power and PWC track power. It integrates well with any kind of DCC decoder or R/C receiver with the addition of a few inexpensive external components.
Overall, the Sierra sound system is quite good, but it has one really annoying characteristic. The track voltage controlled whistle triggers much too often, especially when PWC is used to power the track. There are adjustments that reduce the sensitivity of the triggering and eventually I did find a combination of settings that suppressed the voltage controlled grade crossing signal, so much so that I can't even make it happen now. That's OK, its better without the whistle signal.
To realize the full capability of the system, you MUST pay careful attention to the treatment of the speaker. Some of the less expensive systems (PH and Dallee) don't sound much better with a high quality speaker than they do with a typical 3" speaker. The Sierra has capability that a cheap 3" speaker (i.e. the one that comes with it) can't reproduce. I recommend that you fire the unit up on your workbench before you install it and connect it to a good speaker in a good cabinet just to see how different it sounds. At that point, you should be convinced to go to extraordinary lengths to optimize the speaker installation to the maximum extent possible.
 The obvious place
to install the system in a C-16 is in the tender. The C-16 tender
is just wide enough to hold a 3" speaker and it is molded with very
heavy walls so that it makes a good speaker enclosure. There are no
significant air leaks once the tender body is fastened down. The
tender floor is flat and relatively free of obstructions. I
considered installing a large oval speaker in a trail car but since
I didn't have one handy, I elected to do the best that I could in
the tender. Eventually, I did find a better speaker that would fit,
see below.
The obvious place
to install the system in a C-16 is in the tender. The C-16 tender
is just wide enough to hold a 3" speaker and it is molded with very
heavy walls so that it makes a good speaker enclosure. There are no
significant air leaks once the tender body is fastened down. The
tender floor is flat and relatively free of obstructions. I
considered installing a large oval speaker in a trail car but since
I didn't have one handy, I elected to do the best that I could in
the tender. Eventually, I did find a better speaker that would fit,
see below.
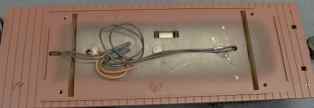
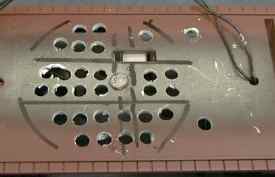 The tender
floor must be drilled to let the sound out. I placed the speaker (a
2 watt Radio Shack 40-252) and marked it. Then I removed the trucks
and the brake rigging underneath and marked the locations of the
floor beams. I then drilled a pattern of 5/16" holes. One extra
5/16" hole was drilled to mount the power switch and a 1/4" hole
was drilled to mount the external volume switch (a regular
center-off momentary SPDT sub miniature toggle switch can be
purchased separately).
The tender
floor must be drilled to let the sound out. I placed the speaker (a
2 watt Radio Shack 40-252) and marked it. Then I removed the trucks
and the brake rigging underneath and marked the locations of the
floor beams. I then drilled a pattern of 5/16" holes. One extra
5/16" hole was drilled to mount the power switch and a 1/4" hole
was drilled to mount the external volume switch (a regular
center-off momentary SPDT sub miniature toggle switch can be
purchased separately).
The volume switch is also used for programming the Sierra so if you bottle the Sierra up inside something, this switch is necessary. If you are using DCC, then pins 1 and 3 can be connected to some DCC decoder function outputs as well to allow the volume to be set remotely. Programming is also possible remotely but that can get confusing without being able to see the two LEDs on the Sierra board. If you can see the board through a window or hatch or something, the remote programming is practical and you can avoid mounting yet another switch. Note that to set the volume, you need to turn the function on and then off quite quickly. If you just press function for Vol- and leave it, the Sierra will enter programming mode just as if you held down the F1 button.
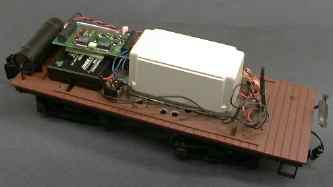
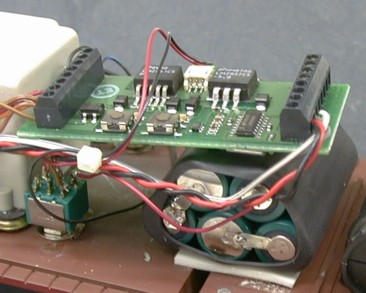
 The battery is
mounted at the rear with double stick foam tape and the sound board
is mounted on top of the battery with another piece of foam tape.
The power switch is just glued to the tender floor with CA. The
volume switch mounts with its supplied nut. Power for the system is
taken from the track power wiring that was already in the
tender.
The battery is
mounted at the rear with double stick foam tape and the sound board
is mounted on top of the battery with another piece of foam tape.
The power switch is just glued to the tender floor with CA. The
volume switch mounts with its supplied nut. Power for the system is
taken from the track power wiring that was already in the
tender.
Soundtraxx recommends that an optional external battery charging jack be installed so that the battery can be charged offline. I found that with Aristo PWC on the track, charging the battery offline is not necessary. The battery begins to charge at the first crack of the throttle so that it tends to stay charged even with extended slow speed running.
The Sierra can be run from a battery powered loco main battery instead of its own battery. The Sierra draws about 250 to 400 mA (excluding any lighting loads) from the battery terminals at input voltages above about 6 volts, so that if it is run directly from your loco's battery power, it will be a significant drain on your main battery. It could be connect to the loco motor and run from its own battery at low speed and charge from the motor control circuit at higher speed but it'll still draw a fair amount of power. It could also run dead loss from its own battery (about 45 minutes run time) by connecting the motor controls through optoisolators as shown in the Sierra Tech Note #6.
The Sierra system can use a voltage controlled "auto exhaust" feature to set the chuff rate. It can also use a reed switch and wheel mounted magnets. Since I broke the reed switch trying to adjust its position, I initially used auto exhaust. The auto exhaust feature can be adjusted for start voltage and maximum chuff rate. It will work well enough on either pure DC or pulsed power, but not with the same settings.
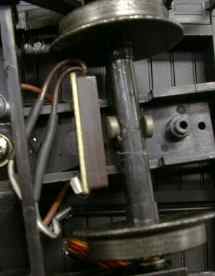 Auto
exhaust works OK, but it doesn't track the engine speed really well
in all situations. I eventually installed a left over reed switch
that had come with a PH sound system on the front truck with Zap-CA
CA. I mounted two magnets with Zap-CA CA to the front axle. This
particular reed switch actually worked better than the original
switch as it worked at a larger distance from the magnets. Since
the tender wheels are smaller than the drivers, two magnets on a
tender axle result in about 3 chuffs per turn of the drivers. This
is OK, because the sound system really doesn't tolerate a chuff
rate much higher than that anyway.
Auto
exhaust works OK, but it doesn't track the engine speed really well
in all situations. I eventually installed a left over reed switch
that had come with a PH sound system on the front truck with Zap-CA
CA. I mounted two magnets with Zap-CA CA to the front axle. This
particular reed switch actually worked better than the original
switch as it worked at a larger distance from the magnets. Since
the tender wheels are smaller than the drivers, two magnets on a
tender axle result in about 3 chuffs per turn of the drivers. This
is OK, because the sound system really doesn't tolerate a chuff
rate much higher than that anyway.
Sierra provides only two triggering magnets with the sound system, but you can get more suitable magnets at Radio Shack (p/n 64-1895) for about $1 a pair.
Several other sound features are controlled by track voltage. The bell will come on and go off again at settable voltages. The whistle will toot two times for forward and three times for reverse when starting and toot once after stopping. The compressor rate is determined by the rate of decrease in track voltage (stopping faster indicates that you used more air and the compressor will run faster). After the system detects that it has been standing for awhile, "Fireman Fred" will shovel some coal and then use a grease gun. If the system detects an increase and then a decrease in input voltage, it will blow a grade crossing whistle signal. It is this effect that is so annoying because it seems to blow too often.
The whistle has three modes, voltage controlled, switch triggered, and switch controlled. In the voltage and triggered modes, the forward, reverse and stopped signals play automatically. In voltage mode, the grade crossing plays at an increase then a quick decrease in track voltage. In trigger mode, the grade crossing signal plays when triggered by a switch. In controlled mode, it plays as long as the whistle input is held closed, but the automatic forward, reverse and stop signals then do not play. This is intended for direct DCC control. I would like to see a fourth mode, one that combines the voltage and control modes so that the common movement related signals are automatic, but it is still possible to "play" the whistle under remote control.
The C-16 version of the Sierra system has a "controlled" whistle that changes in pitch. This makes using the controlled mode to blow whistle signals difficult as the system does not respond well to attempts to blow a short signal. If you try to blow a very short signal, the whistle doesn't sound very good. Holding the whistle a little longer and it starts to shift pitch. Stopping the signal while the pitch is shifting sounds terrible. I abandoned the attempt to use the controlled whistle signals for this version of the Sierra. Other models with different whistle recordings may respond better.
All of the accessory features can be controlled by track voltage and there are settings that determine when they turn on or off. These settings are dependent on the kind of track power that you use. They can be set to work properly with either pure DC or PWC, but not both. If you set up for PWC, then the features will activate with pure DC at much higher engine speeds.
The Sierra has 20 different settings to turn on, or off, or to adjust the various sound and lighting features. These are programmed with the aid of two switches and two LEDs. Setting all of this stuff takes time and patience but at least the instructions are reasonable. I would recommend NOT permanently reinstalling the shell until you are sure that you've got it the way you want it. You can use the external volume switch to do the programming, but to really be sure of what is going on, you have to be able to see the two LED indicators on the circuit board.
The Sierra has two lighting control outputs that can be used to drive a flickering firebox among other effects. The system is designed to switch 6 volt loads because the lighting power is derived from the Sierra's 6 volt battery. There is a 100 mA current limit on each of the lighting outputs. You can use LEDs or GOW bulbs that run from less than 6 volts with a current limiting resistor. Running lighting effects will impact the battery life of the sound system.
If you are going to use the outputs for a flickering firebox, Radio Shack sells 6 volt 60 mA lamps that come three to a package, one green, one red and one yellow. They are brighter than most LEDs and project light in all directions. Toss the green one and use the other two in the firebox. The red one works best for the constant flickering firebox. The bulb is a little too pink by itself, but a light coat of Caboose Red on the bulb makes it just right. Use the yellow one for the "smart" flickering firebox light. It will come on when Fireman Fred opens the firebox door and tosses in more coal (or wood in my case).
There is another sound feature of the Sierra that I didn't use. This is the coupler clank. If you mount your coupler so that it has a little forward and backward slop, and mount a microswitch behind it that will close when the coupler is tapped, the sound system can produce a "clank" sound that represents coupler knuckles banging together.
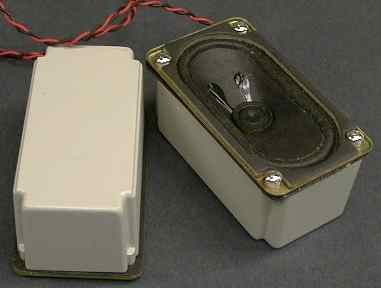 Even the moderate
quality Radio Shack speaker sealed in the tender shell left me
unimpressed. The sound was better than with Sierra's speaker but it
was still too tinny. It didn't sound nearly as good as the system
was capable of, but I thought it was the best that I was going to
get with a speaker inside the tender. Then I stumbled across these
2" x 3.5" oval speakers at a local ham radio and computer swap
meet. They were $1 each and are rated at 8 ohms and 6 watts. They
even come with their own enclosure. After testing one, I was
astounded how much better it sounded. I then kicked myself for not
buying the whole case that the vendor had. Maybe he'll be there
again next month.
Even the moderate
quality Radio Shack speaker sealed in the tender shell left me
unimpressed. The sound was better than with Sierra's speaker but it
was still too tinny. It didn't sound nearly as good as the system
was capable of, but I thought it was the best that I was going to
get with a speaker inside the tender. Then I stumbled across these
2" x 3.5" oval speakers at a local ham radio and computer swap
meet. They were $1 each and are rated at 8 ohms and 6 watts. They
even come with their own enclosure. After testing one, I was
astounded how much better it sounded. I then kicked myself for not
buying the whole case that the vendor had. Maybe he'll be there
again next month.
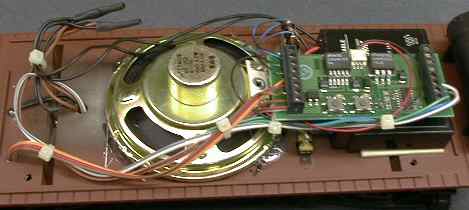
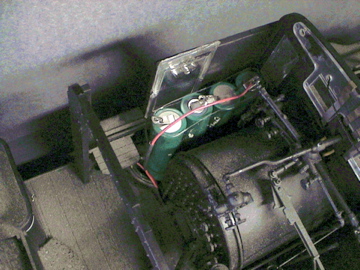
 I was
very lucky that the swap meet speaker and its enclosure just fit in
the C-16 tender. I had to reroute some wires that went to the front
truck, but the new speaker and its enclosure were not difficult to
install. The improvement was so dramatic that I have abandoned the
thought of using a speaker in a trail car.
I was
very lucky that the swap meet speaker and its enclosure just fit in
the C-16 tender. I had to reroute some wires that went to the front
truck, but the new speaker and its enclosure were not difficult to
install. The improvement was so dramatic that I have abandoned the
thought of using a speaker in a trail car.
The moral here is pay attention to your speaker. The selection and installation of the best speaker that you can get will make or break the sound quality of this top end sound system.
[ Top ]
The Sierra draws current from the track when it can. If there isn't enough track voltage available, it draws power from its battery until the track voltage is high enough again to provide enough power. It also tries to recharge its battery, but the battery usually tends to discharge over time. You need at least 8 volts on the track before any load at all is taken off the battery and about 10 volts before any serious charging occurs.
The current drawn by the Sierra varies greatly over time depending on what kind of sound the system is making and how loud the system is set. The table below lists approximate currents for various Sierra modes.
| Sierra State | Sierra Current approximate at mid volume (-) indicates discharge |
Notes |
|---|---|---|
| Normal Running Sounds | -40 to -100 mA | |
| High Density Sound |
-200 to -300 mA | Whistle or Blowdown |
| Max at full volume | ~ -700 mA | Everything going |
| Standing Idle | -20 to -30 mA | Blower or engine idle |
| Sleeping | -17 mA | After it shuts down |
| Charging | +60 mA | Max Track voltage, normal sounds running |
Since the running sound takes 200 mA or so and the max charging rate is only 60 mA, if you run slow, you can only do it for about 1/3 of the time or the Sierra's battery will eventually loose charge. Even sitting idle, the Sierra will flatten a fully charged battery in about 24 hours.
[ Top ]
I purchased a Soundtraxx Sierra Alco diesel system at the 2000 Queen Mary Big Trains Show. This was their first diesel release. When installed in a regular track powered loco, it worked fine on DC track power with a good match between the locomotive speed and the engine sound. It worked well enough with PWC on the track, but not quite as well as with DC. However, when I tried to interface it to an Aristo 5490 onboard receiver and later a Lenz and then a Zimo DCC decoder, I had serious difficulties.
When run from some motor controllers the Sierra just gets all out of whack. It can't tell a stop from a start, can't tell direction and the sound doesn't track the locomotive speed well at all. It needed some signal conditioning interface circuits to overcome these difficulties.
I spent a period of a year mucking around with the interface before I got it right. The final version of the interface should work with ANY Sierra (steam or diesel) and ANY R/C receiver or DCC decoder. Check out the next section for links to specific Sierra installations where these problems were solved.
 In normal operation the Sierra senses the voltages
on pins 7 and/or 8 to determine what to do. It will also charge
it's battery from these pins. If pins 7 and 8 are connected to the
track or across a motor, the differential voltage between the pins
is used. At low differential voltage, the Sierra senses the voltage
to determine the diesel notch or chuff rate to use and to detect
the locomotive direction. Higher voltages between these pins allows
the Sierra to charge it's battery as well. With extended running at
low speed, below 8 volts, insufficient power is available to keep
the Sierra's battery charged and after maybe 45 minutes or so, the
battery will run flat and the sound system will start making a
popping sound. If this happens in straight track powered
installations, then the Sierra must either be run faster for longer
periods or it must be taken out of service to charge the battery
off line.
In normal operation the Sierra senses the voltages
on pins 7 and/or 8 to determine what to do. It will also charge
it's battery from these pins. If pins 7 and 8 are connected to the
track or across a motor, the differential voltage between the pins
is used. At low differential voltage, the Sierra senses the voltage
to determine the diesel notch or chuff rate to use and to detect
the locomotive direction. Higher voltages between these pins allows
the Sierra to charge it's battery as well. With extended running at
low speed, below 8 volts, insufficient power is available to keep
the Sierra's battery charged and after maybe 45 minutes or so, the
battery will run flat and the sound system will start making a
popping sound. If this happens in straight track powered
installations, then the Sierra must either be run faster for longer
periods or it must be taken out of service to charge the battery
off line.
Up to 8.2 volts input, the Sierra only draws a few mA from the track. This is enough for it to sense track voltage, but not enough for it to start charging its own battery. Above 8.2 volts, the system can start to charge its battery AND run itself from the track, consequently the current shoots up. At 19.2 volts, the Sierra simply shuts down and drops back to idle.
The easiest installation method for DCC or RC control is to connect the Sierra right across the motor so that the Sierra doesn't know that it isn't hooked to the track. However, connected this way, the battery charging problems will still occur just as the same as a straight track powered connection. Further, the characteristics of various motor controllers can drive the Sierra nuts and it may not work very well.
To get around the battery charging issues, the Sierra can be powered from it's battery terminals if a constant source of power is available such as from a traction battery, DCC, or constant track power. In the case of DCC or constant track power the Sierra, in theory, doesn't need it's own battery. However, this really doesn't work out too well. Soundtraxx recommends using a 2000 µF capacitor to provide some stored charge, but unavoidable track power dropouts will always occur and the capacitor really isn't enough, the Sierra will reset too often. Short dropouts aren't a problem for most DCC decoders, but they drive the Sierra nuts and you can plainly hear the result. The battery assures that the Sierra will see a steady source of power all the time.
In the case of a battery/RC installation, the solution to the power problem is to run the Sierra via a 6 volt regulator and junk the Sierra's own battery. The onboard traction battery will provide a constant source of power and the Sierra will be happy.
In the case of a DCC or track power source a 9 to 12 volt regulator and a current limiting resistor is used to continually charge the Sierra battery at rate that is about the average current draw of the Sierra. The Sierra then runs from the regulator most of the time and the battery gets trickle charged. At times of high peak load, such as when blowing a whistle, the Sierra draws the excess from the battery which is then recharged over time from the regulator.
Once the Sierra power issues are solved, there is still the issue of how to get the Sierra to work with a variety of motor controllers.
Once the Sierra is connected to power itself from the loco's wiring via the battery terminals, then the Sierra's pins 7 and 8 can be directly connected to the motor but this is usually what causes it to freak out.
The problem with engine speed is that the diesel Sierra is picky about the signals applied to pins 7 or 8. These signals really need to be supplied from an opto-isolator to keep the Sierra from getting confused. However, optical isolators can only source a few mA so that the input voltage to pins 7 or 8 must be held below 8 volts or the Sierra will try to draw some serious current and saturate the opto-isolators and the Sierra will not notch up any higher than part way. With this restriction it is really difficult to get the diesel sound to notch properly from a standing start. Steam systems that use a chuff trigger aren't so picky, they only need to know that a voltage is present and which polarity it is so that running optical isolators directly from the motor works fine. Steam systems that use the Auto Chuff feature will have exactly the same problem as the diesel systems. These have to know the actual value of the input voltage to set the chuff rate properly.
At one time, Soundtraxx provided two technical notes for connecting the Sierra to DCC decoders or the Aristo 5490 mini-receivers. They were called Technical Note #6, Using Sierra with Radio Control and Technical Note #7, Using Sierra with DCC. Neither proved to be completely adequate. There are peculiarities with both the Sierra and various other equipment that may or may not be handled properly by the circuits provided in those notes.
 The diesel Sierra has a sensitivity
adjustment (programming step #2) to set how fast the system ramps
up in speed with increasing track voltage. On the SD40 system, I
found 7 discrete throttle notches above idle. The Sierra doesn't
even come off notch 0 until there is more than 2.5 volts applied.
To get to the highest notch and still be below 8 volts, the Sierra
has to be set to the highest sensitivity (25%) setting. If you
compare this curve with the one above, it is clear that the Sierra
will draw a lot of input current on the 50 and 100% setting at the
higher notches. Since optoisolators can't source much current, the
25% setting is the only setting that will work over the whole notch
range when the inputs of the Sierra are optically isolated.
The diesel Sierra has a sensitivity
adjustment (programming step #2) to set how fast the system ramps
up in speed with increasing track voltage. On the SD40 system, I
found 7 discrete throttle notches above idle. The Sierra doesn't
even come off notch 0 until there is more than 2.5 volts applied.
To get to the highest notch and still be below 8 volts, the Sierra
has to be set to the highest sensitivity (25%) setting. If you
compare this curve with the one above, it is clear that the Sierra
will draw a lot of input current on the 50 and 100% setting at the
higher notches. Since optoisolators can't source much current, the
25% setting is the only setting that will work over the whole notch
range when the inputs of the Sierra are optically isolated.
With the Sierra driven by optical isolators, the Sierra doesn't use the differential voltage between pins 7 and 8. Instead it looks for a voltage on ONE of those pins with respect to pin 2. If there is a voltage on both pins, the Sierra will become confused.
The key to making a diesel or voltage controlled chuff steam Sierra work correctly with a DCC decoder or R/C RX involves understanding of exactly how the Sierra responds to the voltages applied to pins 7 and 8 (the input pins) with respect to pin 2 (the Sierra internal and battery ground). Pins 7 and 8 drive a bridge rectifier within the Sierra. It takes a couple of volts of input to get the bridge rectifier to conduct at all so that the track voltage must rise at least that high before the voltage controlled effects can even start. Further, the voltages at BOTH pins 7 and 8 must drop to very nearly zero (less than 50 mV) before the Sierra will detect a stop. If the voltages at pin 7 and 8 start to rise together, the Sierra will get confused and usually blow a forward start signal. The voltage between either pin 7 or 8 and pin 2 will determine the magnitude of the sound effect. More voltage makes a faster sound. However, the response is highly non linear. It takes about 2.5 volts to make something happen at all, and then the system will max out at something like 5 volts if the RPM sensitivity (diesel systems) is set to maximum (25% at programming step 2). The start voltage adjustment (programming step 1) has some effect on this, but not enough. You can increase the start voltage, but you can't decrease it. When running from optically isolated inputs, this minimum input voltage gets to be a real problem. The engine will get to significant speed before the sound system will budge off idle.
While the Sierra might sort of work with some DCC decoders or R/C receivers with some combinations of programming, problems may still occur. These are listed in decreasing degree of importance, but if any of these things happen, the "universal" interface circuit shown below should fix it permanently.
The directional problems occur because the internal ground voltages in the Sierra and the motor controller will usually not match well enough to allow the Sierra to detect when zero speed is reached. The motor speed problems usually occur due to the differences in the way the various manufacturers operate the output switches of their PWM motor controller circuits. In any event, ALL of these problems can be solved with the interface circuit.
If the Sierra battery power input is connected provide power, it is not reasonable or safe to expect it to be able to sense motor speed by a direct connection to the motor circuit at pins 7 and 8 too. The solution is to connect the Sierra directly to other circuits ONLY at the battery power input. All of the other signal connections between the Sierra should be through optical isolators or reed switches. The schematic below shows the connections between a generic DCC decoder and the Sierra. The circuit shown will also work with the Aristo 5490 as well as any other RC receiver that I know of. Bell and whistle isolators are not required however for the 5490. The ART-5495 accessory controller has isolated reed switch outputs that can be wired directly to the Sierra effects triggers. This circuit doesn't care what kind of motor driver circuit is used, it'll work with them all.
Note that Sierra's DCC notes indicate that if a decoder has a ground connection (not all of them do) then it should be connected to the Sierra's black battery wire. This will force the loco and sound system's ground to be the same. Doing this still doesn't solve the basic problems although the stop indication may work better.
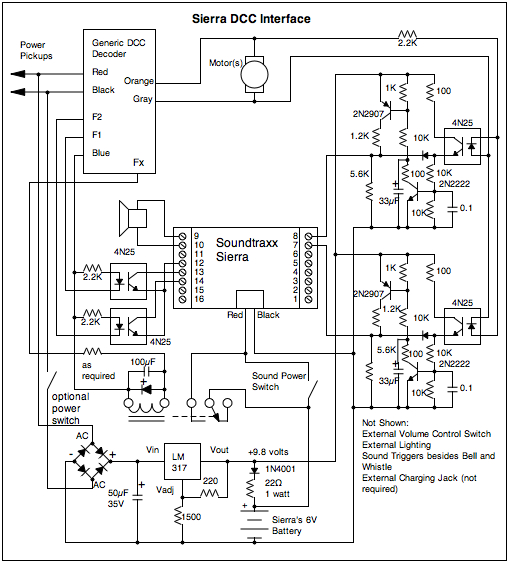 My
version of an interface circuit for the Sierra is powered from a
9.8 volt regulator that runs from track voltage. This regulator
powers the Sierra and charges the Sierra battery. It also powers
the interface circuit. With constant track power, the battery
should really not be necessary, but short power dropouts that may
not impact the DCC decoder or RX much will cause the Sierra to
reset and pop which is annoying. The battery provides an
uninterruptable power source for the Sierra. The 1N4001 diode and
22 ohm resistor make a trickle charger for the battery and provide
voltage dropping to keep the thermal stress off the Sierra. As long
as the loco is sitting on powered track, moving or not, the battery
will receive charge. The power switch disconnects the Sierra from
the battery to prevent the battery from being discharged during
storage. Another switch may be needed to disconnect the battery
charger so that the DCC decoder can be programmed on the
programming track. It is best to find some existing switched
circuit to derive track power from but if one can't be found, then
a SPST switch can be added somewhere. Then the loco can sit on
powered track and charge the battery without the sound system
running.
My
version of an interface circuit for the Sierra is powered from a
9.8 volt regulator that runs from track voltage. This regulator
powers the Sierra and charges the Sierra battery. It also powers
the interface circuit. With constant track power, the battery
should really not be necessary, but short power dropouts that may
not impact the DCC decoder or RX much will cause the Sierra to
reset and pop which is annoying. The battery provides an
uninterruptable power source for the Sierra. The 1N4001 diode and
22 ohm resistor make a trickle charger for the battery and provide
voltage dropping to keep the thermal stress off the Sierra. As long
as the loco is sitting on powered track, moving or not, the battery
will receive charge. The power switch disconnects the Sierra from
the battery to prevent the battery from being discharged during
storage. Another switch may be needed to disconnect the battery
charger so that the DCC decoder can be programmed on the
programming track. It is best to find some existing switched
circuit to derive track power from but if one can't be found, then
a SPST switch can be added somewhere. Then the loco can sit on
powered track and charge the battery without the sound system
running.
The optional relay allows the DCC decoder to enable and disable the Sierra automatically so that as soon as track power is lost, the Sierra will disconnect from the battery and go silent. This prevents the Sierra from being left on accidentally and flattening the battery.
Sierra recommends that the regulator drive the Sierra directly. This will work too and avoid the need for the battery and relay but then the sound won't work when the loco is analog converted. Also Sierra recommends a much larger filter capacitor. Large capacitors can drive some DCC boosters nuts so if you elect to go that route, put a 10 or 20 ohm resistor between the bridge rectifier and the filter capacitor to prevent the booster from seeing a very low impedance on the fast edges of the DCC signal.
The optional optoisolators connected to pins 12, 13 and 14 are for the bell and whistle sound triggers. Others can be added in the same fashion for coupler clank or other triggerable effects. Many decoders will trigger the Sierra fine without them. If your decoder gives you triggering difficulties, then the optoisolators will fix that problem.
However, the key to this arrangement is the circuit to the right. There are two identical interface circuits, one for forward and one for reverse. The pulse voltage across the motors is applied to two 4N25 optical isolators. The LEDs in the isolators are wired back to back so that only one is on at a time. This provides the polarity sensing. When the first motor pulse is received, one opto isolator will start to conduct and turn on the 2N2222 (or any other general purpose NPN) transistor. Its collector voltage will go from 9.8 volts to nearly zero, turning on the 2N2907 (or any other general purpose PNP) transistor. The 0.1 uF capacitor retains some charge and keeps the 2N2222 turned on between motor pulses. Note that for a low switching speed decoder, this time constant isn't long enough so I added another time delay capacitor, 33µF to the collector of the 2N2222. When the 2N2222 turns on, it discharges the capacitor quickly and turns on the 2N2907. The capacitor recharges slowly through the 10K resistor and provides additional delay. When the 2N2907 turns on, it pulls up either pin 7 or 8 from zero to about 3 volts (as determined by the 1.2K and 5.6K resistors and the impedance of the Sierra input pin). This pre biases the input pin just above the point where the sound effect will start to ramp up. A diesel engine needs to spool up from idle before the engine can start to move. As the motor speeds up, the increasing width pulses from the 4N25 will start then dragging the input voltage to the Sierra higher with increasing motor speed. At something less than 100% PWM duty factor, the voltage at pin 7 or 8 will increase to about 5.5 volts, enough to reach run 8 or maximum chuff rate but not enough to cause the Sierra to start to draw significant input current at pin 7 or 8. While all this is happening at one Sierra pin, the voltage on the other pin will do nothing, it'll stay at zero with respect the Sierra's internal ground (pin 2 or the battery black wire). The diode in the interface circuit (any kind of silicon diode such as a 1N4000) prevents the 2.5 volt output bias from latching the 2N2222 on forever. When PWM pulses stop, the 4N25 will stop conducting, the 0.1 uF capacitor will discharge, the 2N2222 will turn off and the 33µF capacitor will recharge and 2N2907 will turn off. Then the output voltage to pin 7 or 8 will drop to zero allowing the Sierra to detect it and blow the stop signal.
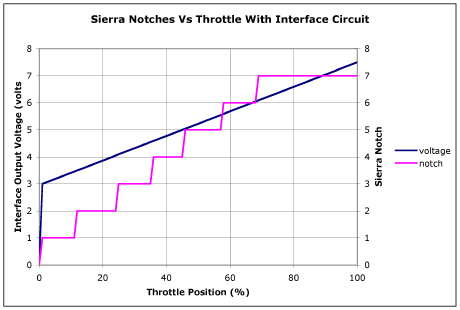 This graph shows the results
of the interface circuit. Since the Sierra isn't doing anything
interesting until the input voltage reaches about 3 volts, the
interface detects the first hint of a throttle moving off zero and
immediately pre-biases the input to about 3 volts. Therefore, at
the next throttle step, the Sierra can see an increase. It then
ramps up evenly until the engine speed has reached the highest
notch.
This graph shows the results
of the interface circuit. Since the Sierra isn't doing anything
interesting until the input voltage reaches about 3 volts, the
interface detects the first hint of a throttle moving off zero and
immediately pre-biases the input to about 3 volts. Therefore, at
the next throttle step, the Sierra can see an increase. It then
ramps up evenly until the engine speed has reached the highest
notch.
The circuit does take some set up depending on the motors in your loco and the setting of the start voltage of the Sierra. The start voltage should be set as low as it can be set, at the first click of your throttle. You want it as low as you can get it to go, but no matter how you set it, it won't be any lower than 2.5 volts or so. This sets the level at which the whistle signal triggers and also sets the start point of the RPM ramp. Then, the 1.2K resistor may need to be changed, probably to a lower value, so that the Sierra moves off idle at about the same throttle setting as the loco starts to move. You can fiddle with this so that the engine sound ramps up BEFORE the loco starts to move as this is usually what is expected to happen. Then set the bell start and stop voltages at the speeds that you want the bell to operate. Notch 8 will be achieved at maybe 60 to 80% of full throttle and stay there through the higher speed ranges. If you don't want the engine to reach run 8 until full throttle, increase the value of the 100 ohm resistors connected to the optoisolators.
All this may seem a little complicated, but it works every time.
[ Top ]
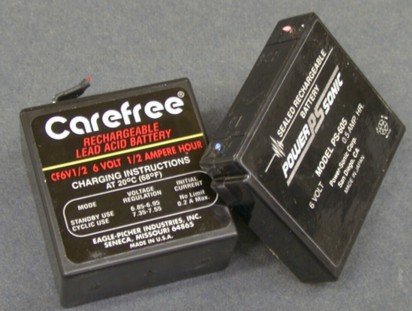 The Sierra
comes with a 6 volt gel cell lead-acid battery to allow the unit to
operate when the track voltage is too low to power the unit. There
are two kinds of batteries, the standard one (left) and a thinner
"slimline" version (right). The slimline version has the same rated
capacity of 0.5 Ah but it doesn't seem to do as well. These
particular two batteries have the wires clipped because they are
absolutely dead, which is the reason for this section of this
page.
The Sierra
comes with a 6 volt gel cell lead-acid battery to allow the unit to
operate when the track voltage is too low to power the unit. There
are two kinds of batteries, the standard one (left) and a thinner
"slimline" version (right). The slimline version has the same rated
capacity of 0.5 Ah but it doesn't seem to do as well. These
particular two batteries have the wires clipped because they are
absolutely dead, which is the reason for this section of this
page.
Lead-acid batteries are inexpensive and rugged when treated properly, but are probably not the best choice for a battery in sound system service. If the loco that the Sierra is installed in is run at low speed for extended periods, the battery will discharge and go flat. A typical Sierra will run between a half hour and an hour without any battery charging at all. At that point, the Sierra will make all manner of ugly popping sounds and, depending on how it is programmed, may blow the whistle madly. When it starts doing this, it's time to run it MUCH faster for a few hours to get some charge back into the battery to protect it. It is better to set the engine out with the motor turned off but with full track voltage to let the Sierra's battery recharge fully. This may take 12 hours or more.
Lead-acid batteries ABHOR being left in a discharged state. Leaving a lead-acid battery flat will allow it to sulfate and permanently fail. If you accidently leave the Sierra on while the train is idle, it'll shut down after a minute or so, but it will continue to discharge the battery at a low rate. Even then, depending the the state of charge of the battery, it will go flat in less than 30 hours and sit that way. The battery may never wake up again.
This has happened to me twice. One system was left on for a month. In a second, the battery was never in really good shape even when it was new. Both batteries eventually failed and wouldn't accept even a little bit of charge. A battery changeout was in order, but not with another lead-acid battery. This system needs a battery that can go flat and pick itself up again without damage.
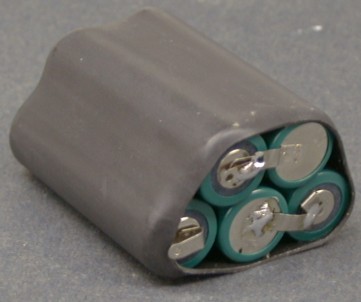 I selected the NiMH
battery technology to make two replacement battery packs. The NiMH
(Nickel Metal Hydride) technology is the most resistant of any of
the available technologies to being left flat, partially charged or
partially discharged or recharged from a partially discharged
state. These NiMH cells are rated at 1650 mAh, have solder tabs and
were relatively inexpensive (~$3 each at Hosfelt). I have been told that a
Sierra will run fine on 4.8 volts (4 cells worth), but I already
had 10 cells handy so I made two 6 volt packs to replace the two
dead Sierra batteries. Even though this kind of pack has about the
same volume and weight as the stock battery, it'll run the system
up to 3 times as long between charges. It'll also take 3 times
longer to fully recharge.
I selected the NiMH
battery technology to make two replacement battery packs. The NiMH
(Nickel Metal Hydride) technology is the most resistant of any of
the available technologies to being left flat, partially charged or
partially discharged or recharged from a partially discharged
state. These NiMH cells are rated at 1650 mAh, have solder tabs and
were relatively inexpensive (~$3 each at Hosfelt). I have been told that a
Sierra will run fine on 4.8 volts (4 cells worth), but I already
had 10 cells handy so I made two 6 volt packs to replace the two
dead Sierra batteries. Even though this kind of pack has about the
same volume and weight as the stock battery, it'll run the system
up to 3 times as long between charges. It'll also take 3 times
longer to fully recharge.
The heat shrink tubing used to make this pack is 1.5" in diameter before being shrunk.
 This 5 cell pack
is almost a direct physical fit for the standard Sierra battery. 4
cells laid in a row would be a good physical fit for a slimline
battery.
This 5 cell pack
is almost a direct physical fit for the standard Sierra battery. 4
cells laid in a row would be a good physical fit for a slimline
battery.
The system worked fine right off and shows on sign of unusual troubles. NiMH cells can sit in storage in any state of charge or be recharged from any state of charge without damage. NiMH cells do have a higher self discharge rate than lead-acid batteries, so they may go flat by themselves if not run for several months, but they will recharge readily. In any event, if you run the system flat, let it self discharge, or leave it on until it goes flat, you won't be damaging these batteries.
Its been a year after the install of two of these packs and both are doing fine. I run these systems maybe once a month or even less often because I don't get up to my cabin as often I'd like. Every time I've turned them on, they've worked and showed no signs of trouble. Since the initial full charge, I've not had to recharge them. They seem to do fine just during their run time while charging from PWC on the track.
When the battery, stock or replacement, does need to be charged from a flat state, the most effective way to do it is overnight. Just running a train fast won't do it completely unless you run 24 hours a day for several days. I set the train on the track at full voltage with the motor off and the volume turned down for a full day if possible. If the loco doesn't have a motor switch and the system is in the tender, I remove the loco from the track and let the tender charge by itself. The Aristo Railbus doesn't have a motor switch, but the motor block can be easily unplugged without taking the unit apart. For the NiMH packs described above, and the Sierra's limited charging rate, it may take 2 full days to fully charge the battery.
 After 5 years of virtual
non-operation, the gelcell battery in the Climax predictably died.
These things need to be charged once in a while or they'll fail
completely. I removed the old slimline battery and replaced it with
a 4 cell NiMH battery. At 4.8 volts, the pack still works fine and
fits where the slimline battery did. I didn't have the proper size
of shrink tube for this set so I just wrapped it in standard
package sealing tape. I made a black construction paper cap to fit
over the battery to hide it.
After 5 years of virtual
non-operation, the gelcell battery in the Climax predictably died.
These things need to be charged once in a while or they'll fail
completely. I removed the old slimline battery and replaced it with
a 4 cell NiMH battery. At 4.8 volts, the pack still works fine and
fits where the slimline battery did. I didn't have the proper size
of shrink tube for this set so I just wrapped it in standard
package sealing tape. I made a black construction paper cap to fit
over the battery to hide it.
In this Climax installation, the battery charges through a 10 ohm resistor from the internal 9 volt bus in the Climax, see my Climax Tips page for the details of this installation. With the dead battery, the sound system just issued a series of pops at about 20 pops/second. With the series resistor and without a functional battery, the voltage to the sound system would rise until the Sierra started, then the current draw of the Sierra working against the 10 ohm resistor would drop the voltage and cause the Sierra to shut down and issue a pop sound. The voltage would then rise again until the Sierra woke up. This circuit is called a "relaxation oscillator" and it will continue like that forever. In this case, the solution would be to replace the battery or remove the 10 ohm resistor and let the Sierra run from 9 volts. It would then be at the mercy of power dropouts so I chose to replace the battery.
I fired up the Warbonnet FA set today after 5 years with nary a wheel turn and, as expected, the Sierra didn't work. I got the same series of pops telling me that the stock Sierra gelcell battery had died. I cracked open the loco and the battery was indeed dead. It had 4 volts across it open circuit, but would not accept a charge. It got replaced with a 5 cell pack like the one shown above and all was good again.
After changing out a bunch dead Sierra batteries I wondered how many I had left to go. I have 9 Soundtraxx Sierra installations, 6 batteries have died. I expect the one that remains in service to die at any time.
The LGB Powered Tender and the C-16 were the first to go, they lasted less than 2 years. The replacement packs have now been in those two locos for 5 years and they still work fine.
[ Top ]
You can find a list of various sound system installations, including the Sierra, at other pages on this web site or other web sites. A list of links is available on my Sound Tips pages.
This page has been accessed times since Mar 28, 1999.
© 1999-2009 George Schreyer
Created Mar 28, 1999
Last Updated September 17, 2009