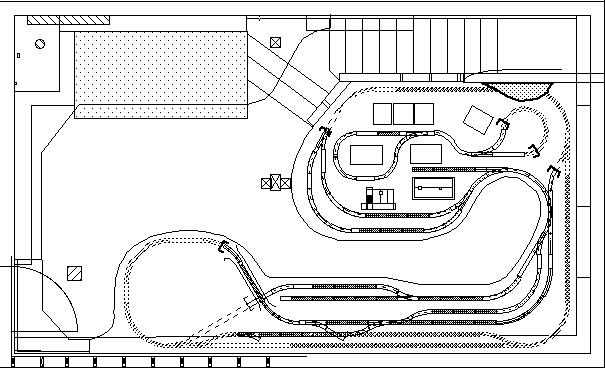
 This is a diagram of the inner line of the
GIRR Mountain Division. Track in dotted lines is hidden. The elevation
of the inner line ranges between 50" and 59" from the floor.
This is a diagram of the inner line of the
GIRR Mountain Division. Track in dotted lines is hidden. The elevation
of the inner line ranges between 50" and 59" from the floor.The GIRR Mtn. Div. consists of three major loops that can run either independently or interconnected at a rather complicated interchange. The inner loop is a folded dogbone that run partially underneath scenery. The outer loop runs around the outside walls of the basement elevated generally 12" above the inner loop. The upper loop is a loop-to-loop arrangement on a high (77") shelf more or less above the inner loop. Trains access the upper loop from the interchange via a 1.75 turn spiral built inside Geologically Improbable Mountain. There is a special loop-to-loop trolly line inside the inner loop.
This is a diagram of the inner line of the
GIRR Mountain Division. Track in dotted lines is hidden. The elevation
of the inner line ranges between 50" and 59" from the floor.
The trolley line is flex track bent to a 1' radius. The Bachmann trolley can deal with this radius, barely anyway. Trolley control can be either fully automatic or manual. The trolley makes two timed stops in town with controlled deceleration and acceleration and then makes a much longer (up to 5 minute) stop in the hidden section. The reversing loops are one way with spring switches.
Access to the track at the back of the town is provided by a hollow block of buildings that can also be entirely lifted out.
The maximum grade on the inner line is 4.2% which restricts train length to an average of 4 or 5 cars. Curves are almost all 2' radius with one section at 2.5'.
The track is a combination of LGB sectional and flex track and Aristo sectional track. As far as I can tell, the two types are functionally interchangeable. Being indoors, track cleaning is required maybe once a year since all the wheels are metal. Turnouts are all 1200 type with all of the left turnouts being LGB and most of the right turnouts being Aristo. This is just an artifact of what was available at San-Val the day that I bought much of the track.
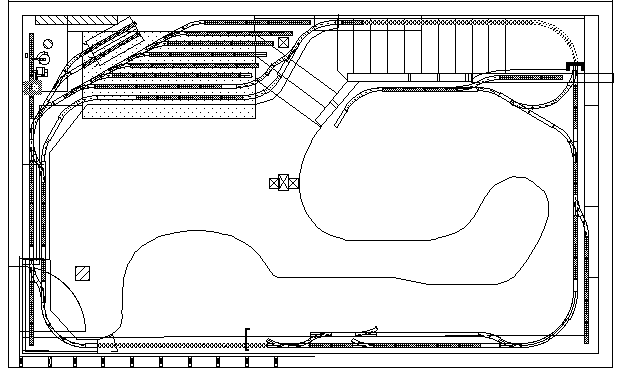 This is the outer or main line which is wrapped
around the room. Most of this line is about 9" to 12" above the inner
line (59" to 62" from the floor) except at the interchange where the
inner line rises to meet the outer line. The interchange track is split
between the inner and outer line drawings at the lower center of the
drawings.
This is the outer or main line which is wrapped
around the room. Most of this line is about 9" to 12" above the inner
line (59" to 62" from the floor) except at the interchange where the
inner line rises to meet the outer line. The interchange track is split
between the inner and outer line drawings at the lower center of the
drawings.
Grades on the outer line are 1.5% maximum with most curves being 2' radius. Train lengths can exceed 20 cars with the limiting factor being train straightening in the curves.
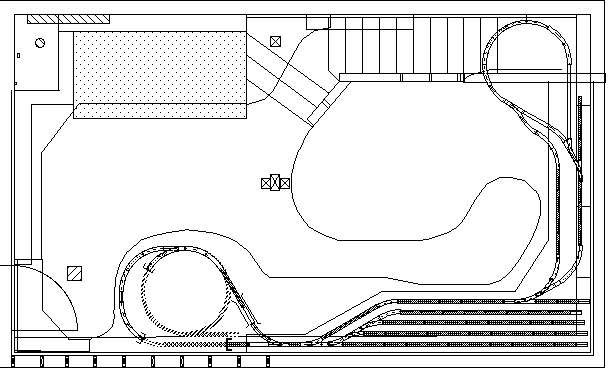 This is the upper line. It connects to the
other two lines at the interchange and then climbs a 1 3/4 turn spiral
inside the mountain. This puts it 77" from the floor so that a
stepladder is required to view this level. The mountain is hollow with
clear access inside to all the hidden track. The loop at the other end
also has access from inside the loop.
This is the upper line. It connects to the
other two lines at the interchange and then climbs a 1 3/4 turn spiral
inside the mountain. This puts it 77" from the floor so that a
stepladder is required to view this level. The mountain is hollow with
clear access inside to all the hidden track. The loop at the other end
also has access from inside the loop.
The reversing loops are conventional one way loops with spring switches. Reversing control on the loops is handled by a home-brew intelligent auto reversing controller which senses train presence at the exit of the loops and determines if the main line should be reversed or not.
The grade in the spiral is 5.2% on a 4' diameter curve. This restricts train length on this grade. A Bachmann 2-4-2 will barely handle one car, a weighted Big Hauler will handle 3, an LGB 0-4-0 with a powered tender will handle 5, and the Shay will handle 8.
Clearances to walls and other obstructions are tight. I designed it to clear a Big Hauler, the largest engine that I envisioned using. This vision turned out to be myopic as I've had to make adjustments over the years for larger equipment. However, with the exception of vertical clearance, the Shay did fit with only very minor adjustments. The Bachmann Heisler required some more minor tweaks. My hard vertical clearance limit is 7 1/4" from the rail head and the Shays weren't close to that. I replaced the stacks (with ones ripped off old RC Big Haulers) and cut 1/4" sections out of the middle of the steam domes to make them fit. If your layout will clear a Big Hauler, it can probably clear a Shay.
Turnouts in both yards and the interchange are each controlled by interlocking route control systems such that only one control panel switch is thrown to align all the turnouts to set up a complete route through that particular trackwork. In the interchange, up to ten turnouts are thrown with one command. This system has practically eliminated derailments due to misaligned turnouts and I rarely find a need to check the aspect of any turnouts.
In the yards, power is also automatically routed to the selected track. In the interchange, power control is automatically transferred between power packs so that control is continuous throughout the trackwork. When the lines are not interconnected, each line has its own power pack. When lines are interconnected, there is a hierarchy which defines which pack takes over control of which line. The outer power pack (or TE, switch selectable) is the master pack. The inner pack (or its associated TE RX) is the 2nd in the pecking order. The upper loop runs from either the outer or inner pack depending on the state of the interchange. When the upper loop is not connected to either other loop, it runs from an MRC power pack.
The main yard normally runs from the outer loop power. However, there is a yard power switch that can run the yard from an LGB starter set power pack. There is also a "yardmaster" switch that allows the main line within the yard limits to be hijacked by the yard power pack.
This arrangement sets up a conventional cab control system with 4 cabs, all of them capable of running a portion of the layout independently.
Even thought this layout is small, I use an Aristo Train Engineer on the main (outer) and inner power packs. I find that the freedom to walk around with a train really enhances operational enjoyment. I haven't yet connected the Train Engineer to the interlocking control system (as I have done in my outdoor layout) but I might later.
About 1998 I converted the GIRR outdoor layout to DCC. Based on the performance of DCC outdoors, in late 2008 I also converted the GIRR Mountain Division to DCC. The conversion had been completely successful once I settled on the right decoders. I was pleased enough with the long term results at the GIRR that I elected to spend about $1100 on the DCC equipment and the decoders to convert the Mountain Division too. About half of that was for the fixed equipment and half for the DCC decoders I needed for my existing locomotives. I could have saved $200 by not getting the walkaround radio control option, but this feature is important to me. Locomotive DCC costs were about $50 per locomotive or $150 if the decoder included sound.
In the period of a year since I did the conversion, I am still completely satisfied with the results. The layout is easier to use, the locos tend to run better and I have some control over the sound systems and accessories. I don't have to hand off control to the various power packs or TE's when I reconfigure the loops. The reversing functions are still automatic on the upper loop and I can now reverse trains in the loops as long as I watch out for the spring switches. The reversing on the wye is still automatic and the reversing on the two reverse cutoffs on the inner loop only require me to flip a turnout when the loco is in the loop, I don't have stop and reverse a train's direction in the loop as DCC doesn't care about track polarity.
I've also added complete control of my routes from the throttles but that hasn't been as useful as I thought it would be. It's easy to do, but since I'm usually standing near a control panel anyway, it's even easier to reach over and throw a panel switch to set a route.
I purchased the same Digitrax equipment (radio equipped Super Chief) to install on the indoor layout primarily because:
The locomotives are also interchangeable as I have generally elected not to overlap addresses. The one exception is for the Shay's which are both at address 5.
The addition of DCC presented only a little additional wiring complexity. Since I retained the complete functionality of the cab control system, I had to add some switches on the control panel to include DCC. These switches select between the DCC source or the existing power source for each of the three loops. The main yard automatically accepts the DCC track signal from the outer loop and the yardmaster function still works as before.
A piece of track should be designated as a "programming" track for initial DCC decoder programming. On the GIRR, I use a separate 3' section of track that I pull out of the control cabinet and set on the ground when I need it. On the Mtn Div, I use the track that runs right in front of the control panels. It is already double gapped at both ends. A 4PDT switch is used to connect it either to it's normal source of power or the programming track terminals of the DCC booster. It only takes two poles to make that connection, but the recommended practice for a programming track that is also a running track is to create a dead section on either side of the programming track to prevent a loco from accidentally being driven from DCC powered track onto the programming track and shorting them together. This can put undesirable stresses on the programming circuitry and possible damage it.
The inner loop has two reversing loops that are now wired as X-sections. A portion of each loop has it's track polarity reversed by a turnout at one end of the section when it is being used for reversing. With cab controls, a train is driven onto the those sections from one end or the other and stopped. If the turnout that was thrown to get onto that track section is the turnout that controls the polarity, it is switched back. If the train was driven on at the other end, the polarity control turnout is then switched to allow the train to exit. Then the power pack polarity is reversed and the train is driven off the other end. This operation requires manual intervention but it is cheap and easy so it was retained for the DCC conversion. The only operational difference is that with DCC, the train doesn't have to stop, the polarity controlling turnout can be thrown on the fly. These reversing sections are not used all that often so that manual intervention is acceptable here.
The upper loop is another story. The automatic reversing system in use there assumes DC or PWC on the track. DCC on the the track totally confuses it. Therefore I switch the existing reversing controller off with an existing switch and switch in (with the same 3 pole switch) a DCC autoreversing module to power the two loops. The two loops would normally run from a bridge rectifier to make the polarity in the loops constant. This cannot work with DCC, hence the need to switch in the autoreversing module. Doing it this way, I can have a DCC converted loco running continuously loop to loop, or an regular track powered loco running loop to loop.
On the GIRR outdoor DCC layout, I run a fairly high track voltage of 22 volts to provide the speed and power that the larger heavier locos need. The Mtn Div is a slower, calmer, railroad that won't need to run as fast and the loco loads are not nearly so high. I therefore don't need the very high current booster that I use outdoors and I can run the track at lower voltage, about 18 volts. This limits the top speed of the locos and the stresses placed on the decoders and booster.
I have also added walkaround route control capability. Every turnout or remote uncoupler on the layout can be controlled via the throttle, either as part of a route or as a stand alone function where a route is not directly involved. The three panels were partially rewired to accommodate the expansion of the route control system to turnouts that were not previous in the routing system.
The layout and all of the locos have been converted and are running with excellent results. Where they exist, sound systems were retained. In two cases, a combo motor/sound decoder was being installed where the sound was non-existent or of marginal quality as these combo decoders are usually less expensive that a good digital stand alone sound system. The following table lists the equipment converted and what went into it. It is primarily for my reference in the future, I find that these web pages are a good a place as any to record what I did.
| Locomotive | Loco Number | DCC Address | Decoder Type | Sound System | Conversion Complete? | Notes |
|---|---|---|---|---|---|---|
| Bachmann Railtruck | 1 | 1 | LokSound V3.5 | LokSound V3.5 | Yes | LokSound V3.5 is an HO sized decoder but the railtruck was designed to accommodate DCC and it's power consumption is low enough for an HO decoder. |
| LGB 2017 and Powered Tender | 2 | 2 | Digitrax DG583S | Sierra | Yes | Was a difficult installation as the 2017 (Americanized version of the Stainz) has a vertically split motor block which requires total disassembly of the loco to isolate the motors. The tender is easy, the motor block is similar to the LGB 2060. The decoder is mounted in the tender similarly to the Aristo Rogers. |
| Lehmann Porter (Daisy) | 3 | 3 | NCE D408SR | Digitrax SFX064D | Yes | If Soundtraxx ever makes a large scale Tsunami that will fit, the D408SR and SFX064D will be removed and returned to stock. |
| Lionel James | 4 | 4 | DG583S | Bachmann with modifications | Yes | The loco was renumbered to not be in conflict with the Shay. An HO decoder blew up in this loco, then an AD320 burned up. The DG583S seems to be doing just fine. |
| Bachmann Shay | 5 | 5 | QSI Quantum Magnum | QSI Quantum Magnum | Yes | The existing Bachmann analog sound board was reused in a Thomas the Tank Engine on the outdoor GIRR. Considerable modifications were required to isolate the motors. Large volume of the QSI decoder made mechanical integration difficult but eventually, it fit. |
| Bachmann Heisler | 7 | 7 | Digitrax DG583S | Sierra | Yes | The locomotive was unlettered, but has been lettered as GIRR #7. Conversion was pretty easy because the Heisler had been designed to accept DCC |
| 5th generation Bachmann Big Hauler | 12 | 12 | Digitrax DG583S | Bachmann with modifications | Yes | Later Big Haulers use lower speed, higher current motors, an HO decoder will not handle them. |
| AristoCraft C-16 (early version) | 18 | 18 | Digitrax DG583S | Sierra | Yes | A DG580L was installed as an interim decoder until the backordered DG583S arrived. The DG580L actually failed before the replacement decoder was delivered so the C-16 was out of service for awhile. |
| Bachmann 2-4-2 Columbia | 19 | 19 | Digitrax DG583S | Bachmann with modifications | Yes | Even though this is a small and weak loco, the motor current is too high for an HO decoder. The decoder is installed in the tender. |
| AristoCraft Classic Railbus | 2808 | 2808 | Digitrax DG583S | Sierra | Yes | While waiting on delivery of the Digitrax decoder, I put in an old MRC AD320. Eventually, the AD320 went into James and died there. |
| 3rd generation Bachmann Big Hauler | 48 | 48 | Digitrax DG583S | Bachmann with modifications | Yes | Later Big Haulers use lower speed, higher current motors, an HO decoder will not handle them. |
| 2nd Generation Bachmann Big Hauler | 49 | 49 | Digitrax DH123D | Bachmann with modifications | Yes | 2nd generation Big Hauler has a high speed, low current motor. It easily runs from a larger HO sized decoder. Conversion was straightforward working from the bottom of the loco. |
| Lionel Handcar | 87200 | 87 | Digitrax DH123 | none | Yes | The handcar still has some troubles on dirty track but it runs pretty well. Decoder current was limited by resistance in series with the motor. |
| Aristo Rogers 2-4-2 | 90 | 90 | Digitrax DG583S | Sierra | Yes | Decoder installed in the tender. Some locomotive modifications were required to isolate the motors. |
| Bachmann Trolly | -- | -- | -- | none | No | The trolly is a special case, it runs on it's own dedicated track with custom built automatic controls. it does exactly what it is supposed to do now and does not need DCC. |
Since almost all the GIRR Mtn. Div. locos (except the handcar and the Railbus) already had two digit loco numbers on them, I use two digit addressing for DCC. The railbus has a four digit address. On the outdoor GIRR, I eventually reprogrammed most of the locos to four digit address to match the numbers painted on the sides.
During the months that I was waiting on back ordered decoders and the time it took to convert all the locos, the cab control system still got used. Since all of the locomotives have been converted to DCC, I don't even run the cab control system anymore. If you are contemplating a conversion to DCC, then you might consider just parking the unconverted locos and scrapping any previous control system that you had. Once the locos are converted, you probably won't use it again either. The only real need is to test run new locos that are added later. These can be still be run in the DCC system at the analog address 00.
I've received some questions about how I created these drawings. I used MacDraw Pro on a Macintosh (mostly done on PowerBook 100) to create these drawings. I drew custom track templates for sectional track and copied and moved them around as necessary. Track elements lock on a 0.5 cm grid (the drawings are metric) so lining up things is easy.
The rest of the drawings were done with the MacDraw Pro drawing elements on a 0.5 cm grid. All basement measurements were made very accurately and even some non-square corners are handled properly. The drawings include about 200 individual layers that can be stacked and shown in any order. These layers include the basement, plumbing, house framing where important, blocked or restricted access areas, layout framing, layout roadbed, track, equipment clearances, wiring, structures, significant scenic elements, wiring diagrams, operational notes, in short, everything significant
Doing the drawings with CAD was a real boost as they came out so accurately. I could cut wood and track by the numbers and fully expect them to fit.
I subsequently tried to use CadRail (my PowerMac does Windows too) to do my outdoor layout and had to give it up. The program was inflexible, frustrating and didn't allow me to add the other associated graphics as I wanted.
I did use Design Your Own Railroad to do operational tests. As a CAD tool DYOR is fully useless, but it does do a credible job in testing how a layout will work operationally and it helped me refine my plans while it was easy.
Eventually all good software dies from bit rot. It's not that the software actually changed, but it's environment does. MacDraw Pro ran on the "classic" version of the Macintosh OS (up through OS 9) and later in the classic mode in OS X (10.0 through 10.4). However, in Mac OS 10.5, support for the classic OS was dropped and MacDraw Pro would no longer run. I have converted to another program called EasyDraw. EasyDraw will read and convert most of a MacDraw Pro drawings however the conversion sometimes isn't perfect and some manual tweaking is required after the fact. Also, EasyDraw isn't as easy to use as MacDraw Pro. It seems to take more mouse clicks to get anything done. Sometimes it is hard to remember where the authors of the software stashed some needed command and it also has some "interesting" software quirks. It has much more capability than MacDraw Pro but this extra capability comes at the cost of extra complexity.